Loading...
Loading...
Loading...
Loading...
Loading...
Loading...
Loading...
Loading...
How to scan for sensitive data in Airtable
Airtable is a popular cloud collaboration tool that lands somewhere between a spreadsheet and a database. As such, it can house all sorts of sensitive data that you may not want to surface in a shared environment.
By utilizing Airtable's API in conjunction with Nightfall AI’s scan API, you can discover, classify, and remediate sensitive data within your Airtable bases.
You will need a few things to follow along with this tutorial:
An Airtable account and API key
A Nightfall API key
An existing Nightfall Detection Rule
A Python 3 environment (version 3.7 or later)
The most recent version of Python Nightfall SDK
Install the Nightfall SDK and the requests library using pip.
To start, import all the libraries we will be using.
The JSON, OS, and CSV libraries are part of Python so we don't need to install them.
We've configured the Airtable and Nightfall API keys as environment variables so they are not written directly into the code.
Next, we define the Detection Rule with which we wish to scan our data.
The Detection Rule can be pre-made in the Nightfall web app and referenced by UUID.
Also, we abstract a nightfall class from the SDK, for our API key.
The Airtable API doesn't list all bases in a workspace or all tables in a base; instead, you must specifically call each table to get its contents.
In this example, we have set up a config.json file to store that information for the Airtable My First Workspace bases. You may also wish to consider setting up a separate Base and Table that stores your schema and retrieves that information with a call to the Airtable API.
As an extension of this exercise, you could write Nightfall findings back to another table within that Base.
Now we set up the parameters we will need to call the Airtable API using the previously referenced API key and config file.
We will now call the Airtable API to retrieve the contents of our Airtable workspace. The data hierarchy in Airtable goes Workspace > Base > Table. We will need to perform a GET request on each table in turn.
As we go along, we will convert each data field into its string enriched with identifying metadata so that we can locate and remediate the data later should sensitive findings occur.
🚧WarningIf you are sending more than 50,000 items or more than 500KB, consider using the file API. You can learn more about how to use the file API in the Using the File Scanning Endpoint with Airtable section below.
Before moving on we will define a helper function to use later so that we can unpack the metadata from the strings we send to the Nightfall API.
We will begin constructing an all_findings object to collect our results. The first row of our all_findings object will constitute our headers since we will dump this object to a CSV file later.
This example will include the full finding below. As the finding might be a piece of sensitive data, we recommend using the Redaction feature of the Nightfall API to mask your data.
Now we call the Nightfall API on content retrieved from Airtable. For every sensitive data finding we receive, we strip out the identifying metadata from the sent string and store it with the finding in all_findings so we can analyze it later.
Finally, we export our results to a CSV so they can be easily reviewed.
That's it! You now have insight into all of the sensitive data stored within your Airtable workspace!
As a next step, you could write your findings to a separate 'Nightfall Findings' Airtable base for review, or you could update and redact confirmed findings in situ using the Airtable API.
The example above is specific to the Nightfall Text Scanning API. To scan files, we can use a similar process as we did the text scanning endpoint. The process is broken down into the sections below, as the file scanning process is more intensive.
To utilize the File Scanning API you need the following:
An active API Key authorized for file scanning passed via the header Authorization: Bearer — see Authentication and Security
A Nightfall Detection Policy associated with a webhook URL
A web server configured to listen for file scanning results (more information below)
Similar to the process in the beginning of this tutorial for the text scanning endpoint, we will now initialize and retrieve the data we want to retrieve from Airtable.
Now we go through writing the data to a .csv file.
Using the above .csv file, begin the Scan API file upload process.
Once the files have been uploaded, use the scan endpoint.
A webhook server is required for the scan endpoint to submit its results. See our example webhook server.
The scanning endpoint will work asynchronously for the files uploaded, so you can monitor the webhook server to see the API responses and file scan findings as they come in.
RDS is a service for managing relational databases and can contain databases from several different varieties. This tutorial demonstrates connectivity with a postgresSQL database but could be modified to support other database options.
This tutorial allows you to scan your RDS managed databases using the Nightfall API/SDK.
You will need a few things first to use this tutorial:
An AWS account with at least one RDS database (this example uses postgres but could be modified to support other varieties of SQL)
A Nightfall API key
An existing Nightfall Detection Rule
A Python 3 environment (version 3.6 or later)
Python Nightfall SDK
To accomplish this, we will install the version required of the Nightfall SDK:
We will be using Python and importing the following libraries:
We will set the size and length limits for data allowed by the Nightfall API per request. Also, we extract our API Key, and abstract a nightfall class from the SDK, for it.
Next we extract our API Key, and abstract a nightfall class from the SDK, for it.
Next we define the Detection Rule with which we wish to scan our data. The Detection Rule can be pre-made in the Nightfall web app and referenced by UUID.
First we will set up the connection with the Postgres table, in RDS, and get the data to be scanned from there.
Note, we are setting the RDS authentication information as the below environment variables, and referencing the values from there:
'RDS_ENDPOINT'
'RDS_USER'
'RDS_PASSWORD'
'RDS_DATABASE'
'RDS_TABLE'
'RDS_PRIMARYKEY'
We can then check the data size, and as long as it is below the aforementioned limits, can be ran through the API.
If the data payloads are larger than the size or length limits of the API, extra code will be required to further chunk the data into smaller bits that are processable by the Nightfall scan API.
This can be seen in the second and third code panes below:
To review the results, we will print the number of findings, and write the findings to an output file:
Please find the full script together below, broken into functions that can be ran in full:
The following are potential ways to continue building upon this service:
Writing Nightfall results to a database and reading that into a visualization tool
Adding to this script to support other varieties of SQL
Redacting sensitive findings in place once they are detected, either automatically or as a follow-up script once findings have been reviewed
With the Nightfall API, you are also able to redact and mask your RDS findings. You can add a Redaction Config, as part of your Detection Rule. For more information on how to use redaction, and its specific options, please refer to the guide here.
The example above is specific for the Nightfall Text Scanning API. To scan files, we can use a similar process as we did the text scanning endpoint. The process is broken down in the sections below, as the file scanning process is more intensive.
To utilize the File Scanning API you need the following:
An active API Key authorized for file scanning passed via the header Authorization: Bearer — see Authentication and Security
A Nightfall Detection Policy associated with a webhook URL
A web server configured to listen for file scanning results (more information below)
Retrieve data from RDS
Similar to the process in the beginning of this tutorial for the text scanning endpoint, we will now initialize our AWS RDS Connection. Once the session is established, we can query from RDS.
Now we go through the data and write to a .csv file.
Begin the file upload process to the Scan API, with the above written .csv file, as shown here.
Once the files have been uploaded, begin using the scan endpoint mentioned here. Note: As can be seen in the documentation, a webhook server is required for the scan endpoint, to which it will send the scanning results. An example webhook server setup can be seen here.
The scanning endpoint will work asynchronously for the files uploaded, so you can monitor the webhook server to see the API responses and file scan findings as they come in.
Snowflake is a data warehouse built on top of the Amazon Web Services or Microsoft Azure cloud infrastructure. This tutorial demonstrates how to use the Nightfall API for scanning a Snowflake database.
This tutorial allows you to scan your Snowflake databases using the Nightfall API/SDK.
You will need a few things first to use this tutorial:
A Snowflake account with at least one database
A Nightfall API key
An existing Nightfall Detection Rule
Most recent version of Python Nightfall SDK
We will first install the required Snowflake Python connector modules and the Nightfall SDK that we need to work with:
To accomplish this, we will be using Python and importing the following libraries:
We will set the size and length limits for data allowed by the Nightfall API per request. Also, we extract our API Key, and abstract a nightfall class from the SDK, for it.
Next we extract our API Key, and abstract a nightfall class from the SDK, for it.
First we will set up the connection with Snowflake, and get the data to be scanned from there.
Note, we are setting the Snowflake authentication information as the below environment variables, and referencing the values from there:
SNOWFLAKE_USER
SNOWFLAKE_PASSWORD
SNOWFLAKE_ACCOUNT
SNOWFLAKE_DATABASE
SNOWFLAKE_SCHEMA
SNOWFLAKE_TABLE
SNOWFLAKE_PRIMARY_KEY
We can then check the data size, and as long as it is below the aforementioned limits, can be ran through the API.
If the data payloads are larger than the size or length limits of the API, extra code will be required to further chunk the data into smaller bits that are processable by the Nightfall scan API.
This can be seen in the second and third code panes below:
To review the results, we will print the number of findings, and write the findings to an output file:
The following are potential ways to continue building upon this service:
Writing Nightfall results to a database and reading that into a visualization tool
Redacting sensitive findings in place once they are detected, either automatically or as a follow-up script once findings have been reviewed
With the Nightfall API, you are also able to redact and mask your Snowflake findings. You can add a Redaction Config, as part of your Detection Rule. For more information on how to use redaction, and its specific options, please refer to the guide here.
The example above is specific to the Nightfall Text Scanning API. To scan files, we can use a similar process as we did the text scanning endpoint. The process is broken down into the sections below, as the file scanning process is more intensive.
To utilize the File Scanning API you need the following:
An active API Key authorized for file scanning passed via the header Authorization: Bearer — see Authentication and Security
A Nightfall Detection Policy associated with a webhook URL
A web server configured to listen for file scanning results (more information below)
Retrieve data from Snowflake
Similar to the process in the beginning of this tutorial for the text scanning endpoint, we will now initialize our Snowflake Connection. Once the session is established, we can query from Snowflake.
Now we go through the data and write to a .csv file.
Begin the file upload process to the Scan API, with the above written .csv file, as shown here.
The scanning endpoint will work asynchronously for the files uploaded, so you can monitor the webhook server to see the API responses and file scan findings as they come in.
This section consists of various documents that assist you in scanning various popular data stores using Nightfall APIs.
AWS S3 is a popular tool for storing your data in the cloud, however, it also has huge potential for . By utilizing AWS SDKs in conjunction with Nightfall’s Scan API, you can discover, classify, and remediate sensitive data within your S3 buckets.
You will need the following for this tutorial:
A Nightfall API key
An existing Nightfall Detection Rule
A Python 3 environment
most recent version of the
We will use as our AWS client in this demo. If you are using another language, check for AWS's recommended SDKs.
To install boto3 and the Nightfall SDK, run the following command.
In addition to boto3, we will be utilizing the following Python libraries to interact with the Nightfall SDK and to process the data.
We've configured our AWS credentials, as well as our Nightfall API key, as environment variables so they don't need to be committed directly into our code.
Next we define the Detection Rule with which we wish to scan our data. The Detection Rule can be pre-made in the Nightfall web app and referenced by UUID. Also, we extract our API Key, and abstract a nightfall class from the SDK, for it.
Now we create an iterable of scannable objects in our target S3 buckets, and specify a maximum file size to pass to the Nightfall API (500 KB). In practice, you could add additional code to chunk larger files across multiple API requests.
We will also create an all_findings object to store Nightfall Scan results. The first row of our all_findings object will constitute our headers, since we will dump this object to a CSV file later.
This example will include the full finding below. As the finding might be a piece of sensitive data, we recommend using the Redaction feature of the Nightfall API to mask your data.
We will now initialize our AWS S3 Session. Once the session is established, we get a handle for the S3 resource.
Now we go through each bucket and retrieve the scannable objects, adding their text contents to objects_to_scan as we go.
In this tutorial, we assume that all files are text-readable. In practice, you may wish to filter out un-scannable file types such as images with the object.get()['ContentType'] property.
For each object content we find in our S3 buckets, we send it as a payload to the Nightfall Scan API with our previously configured detectors.
request-responseOn receiving the request-response, we break down each returned finding and assign it a new row in the CSV we are constructing.
In this tutorial, we scope each object to be scanned with its API request. At the cost of granularity, you may combine multiple smaller files into a single call to the Nightfall API.
Now that we have finished scanning our S3 buckets and collated the results, we are ready to export them to a CSV file for further review.
That's it! You now have insight into all of the sensitive data inside your data stored inside your organization's AWS S3 buckets.
As a next step, you could attempt to delete or redact your files in which sensitive data has been found by further utilizing boto3.
The example above is specific to the Nightfall Text Scanning API. To scan files, we can use a similar process as we did the text scanning endpoint. The process is broken down in the sections below, as the file scanning process is more intensive.
To utilize the File Scanning API you need the following:
An active API Key authorized for file scanning passed via the header Authorization: Bearer — see Authentication and Security
A Nightfall Detection Policy associated with a webhook URL
A web server configured to listen for file scanning results (more information below)
The first step is to get a list of files in your S3 buckets/objects
Similar to the process at the beginning of this tutorial for the text scanning endpoint, we will now initialize our AWS S3 Session. Once the session is established, we get a handle for the S3 resource.
Now we go through each bucket and retrieve the scannable objects.
For each object content we find in our S3 buckets, we send it as an argument to the Nightfall File Scan API with our previously configured detectors.
Iterate through a list of files and begin the file upload process.
A webhook server is required for the scan endpoint to submit its results. See our example webhook server.
The scanning endpoint will work asynchronously for the files uploaded, so you can monitor the webhook server to see the API responses and file scan findings as they come in.
Elasticsearch is a popular tool for storing, searching, and analyzing all kinds of structured and unstructured data, especially as a part of the larger ELK stack. However, along with all data storage tools, there is huge potential for unintentionally leaking sensitive data. By utilizing Elastic's own REST APIs in conjunction with Nightfall AI’s Scan API, you can discover, classify, and remediate sensitive data within your Elastic stack.
You can follow along with your own instance or spin up a sample instance with the commands listed below. By default, you will be able to download and interact with sample datasets from the elk instance at localhost:5601. Your data can be queried from localhost:9200. The "Add sample data" function can be found underneath the Observability section on the Home page; in this tutorial we reference the "Sample Web Logs" dataset..
You will need a few things to follow along with this tutorial:
An Elasticsearch instance with data to query
A Nightfall API key
An existing Nightfall Detection Rule
A Python 3 environment (version 3.7 or later)
Python Nightfall SDK
We will need to install the nightfall sdk library and the requests library using pip.
We will be using Python and importing the following libraries:
We first configure the URLs to communicate with. If you are following along with the Sample Web Logs dataset alluded to at the beginning of this article, you can copy this Elasticsearch URL. If not, your URL will probably take the format http://<hostname>/<index_name>/_search.
Also, we abstract a nightfall class from the SDK, from our API key.
We now construct the payload and headers for our call to Elasticsearch. The payload represents whichever subset of data you wish to query. In this example, we are querying all results from the previous hour.
We then make our call to the Elasticsearch data store and save the resulting response.
Now we send our Elasticsearch query results to the Nightfall SDK for scanning.
We will create an all_findings object to store Nightfall Scan results. The first row of our all_findings object will constitute our headers, since we will dump this object to a CSV file later.
This example will include the full finding below. As the finding might be a piece of sensitive data, we would recommend using the Redaction feature of the Nightfall API to mask your data. More information can be seen in the 'Using Redaction to Mask Findings' section below.
Next we go through our findings from the Nightfall Scan API and match them to the identifying fields from the Elasticsearch index so we can find them and remediate them in situ.
Finding locations here represent the location within the log as a string. Finding locations can also be found in byteRange.
Finally, we export our results to a csv so they can be easily reviewed.
That's it! You now have insight into all sensitive data shared inside your Elasticsearch instance within the past hour.
However, in use-cases such as this where the data is well-structured, it can be more informative to call out which fiels are found to contain sensitive data, as opposed to the location of the data. While the above script is easy to implement without modifying the queried data, it does not provide insight into these fields.
the Nightfall API, you are also able to redact and mask your Elasticsearch findings. You can add a Redaction Config, as part of your Detection Rule. For more information on how to use redaction, and its specific options, please refer to the guide here.
The example above is specific to the Nightfall Text Scanning API. To scan files, we can use a similar process as we did the text scanning endpoint. The process is broken down in the sections below, as the file scanning process is more intensive.
To utilize the File Scanning API you need the following:
An active API Key authorized for file scanning passed via the header Authorization: Bearer — see Authentication and Security
A Nightfall Detection Policy associated with a webhook URL
A web server configured to listen for file scanning results (more information below)
Retrieve data from Elasticsearch
Similar to the process in the beginning of this tutorial for the text scanning endpoint, we will now initialize our and retrieve the data we like, from Elasticsearch:
Now we go through write the logs to a .csv file.
Begin the file upload process to the Scan API, with the above written .csv file, as shown here.
The scanning endpoint will work asynchronously for the files uploaded, so you can monitor the webhook server to see the API responses and file scan findings as they come in.
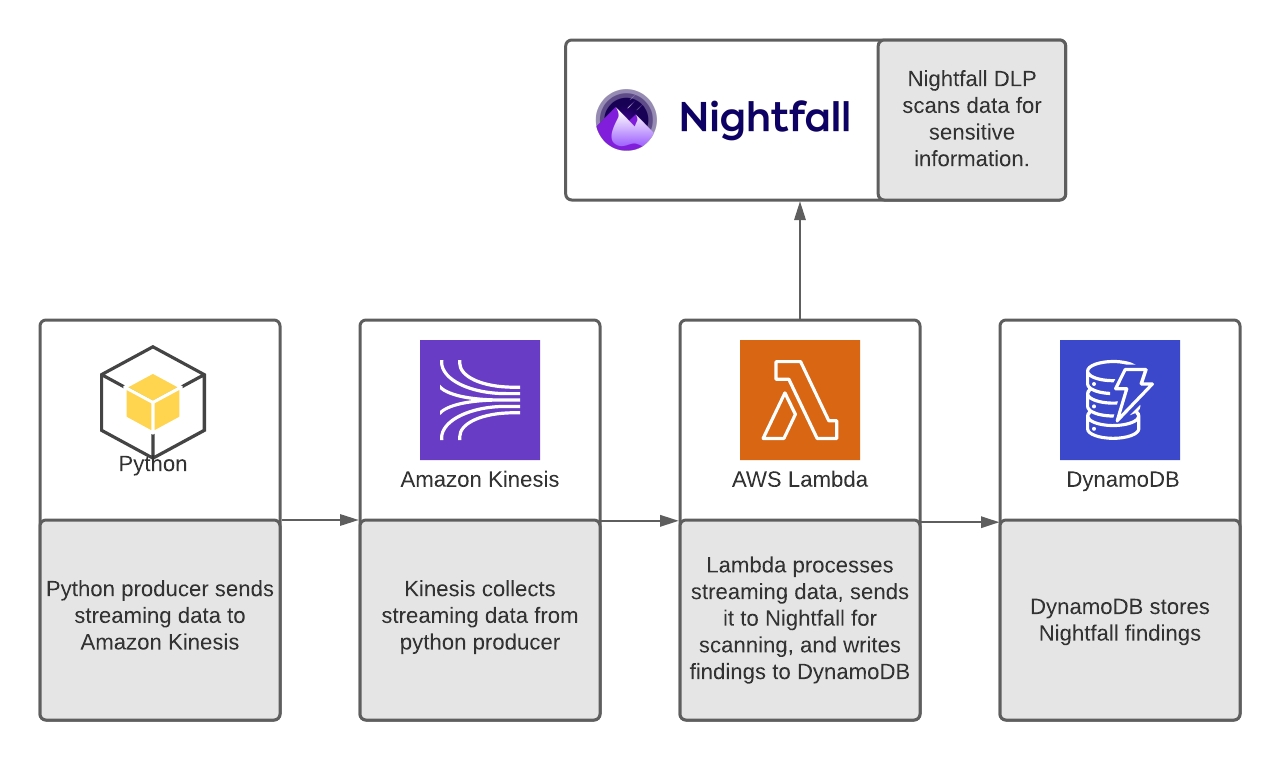
Amazon Kinesis allows you to collect, process, and analyze real-time streaming data. In this tutorial, we will set up Nightfall DLP to scan Kinesis streams for sensitive data. An overview of what we are going to build is shown in the diagram below.
We will send data to Kinesis using a simple producer written in Python. Next, we will use an AWS Lambda function to send data from Kinesis to Nightfall. Nightfall will scan the data for sensitive information. If there are any findings returned by Nightfall, the Lambda function will write the findings to a DynamoDB table.
To complete this tutorial you will need the following:
An AWS Account with access to Kinesis, Lambda, and DynamoDB
A Nightfall API Key
An existing Nightfall Detection Rule which contains at least one detector for email addresses.
Before continuing, you should clone the companion repository locally.
First, we will configure all of our required Services on AWS.
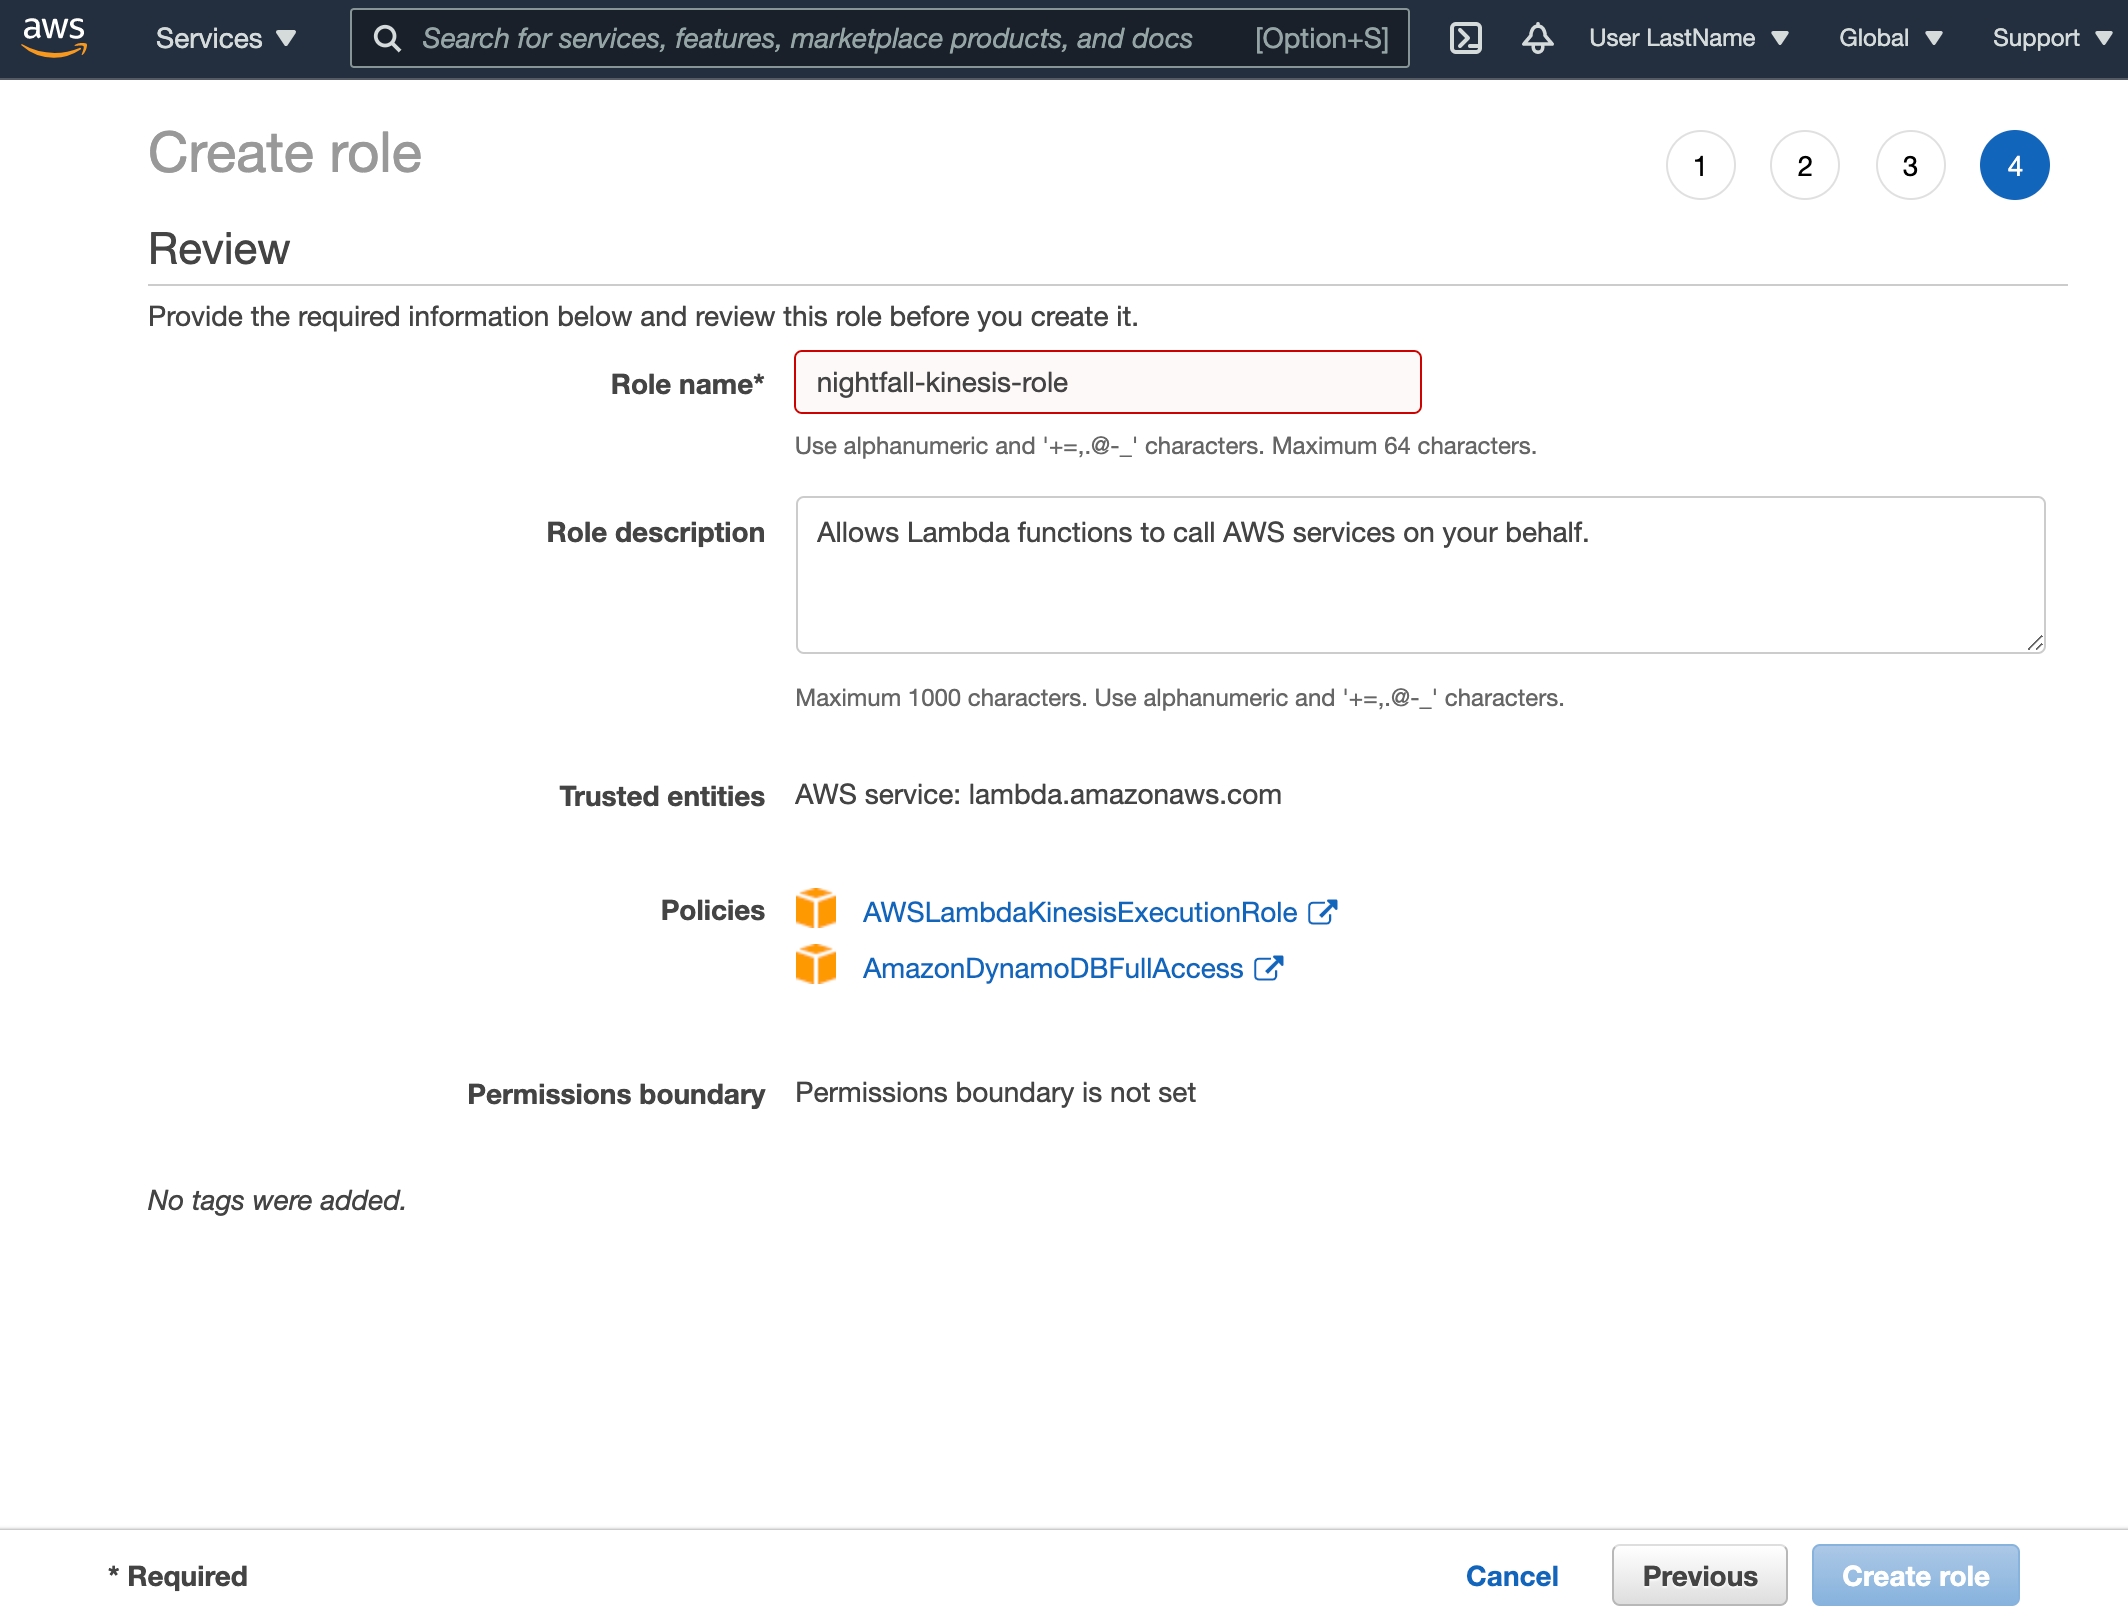
Choose Create role.
Create a role with the following properties:
Lambda as the trusted entity
Permissions
AWSLambdaKinesisExecutionRole
AmazonDynamoDBFullAccess
Role name: nightfall-kinesis-role
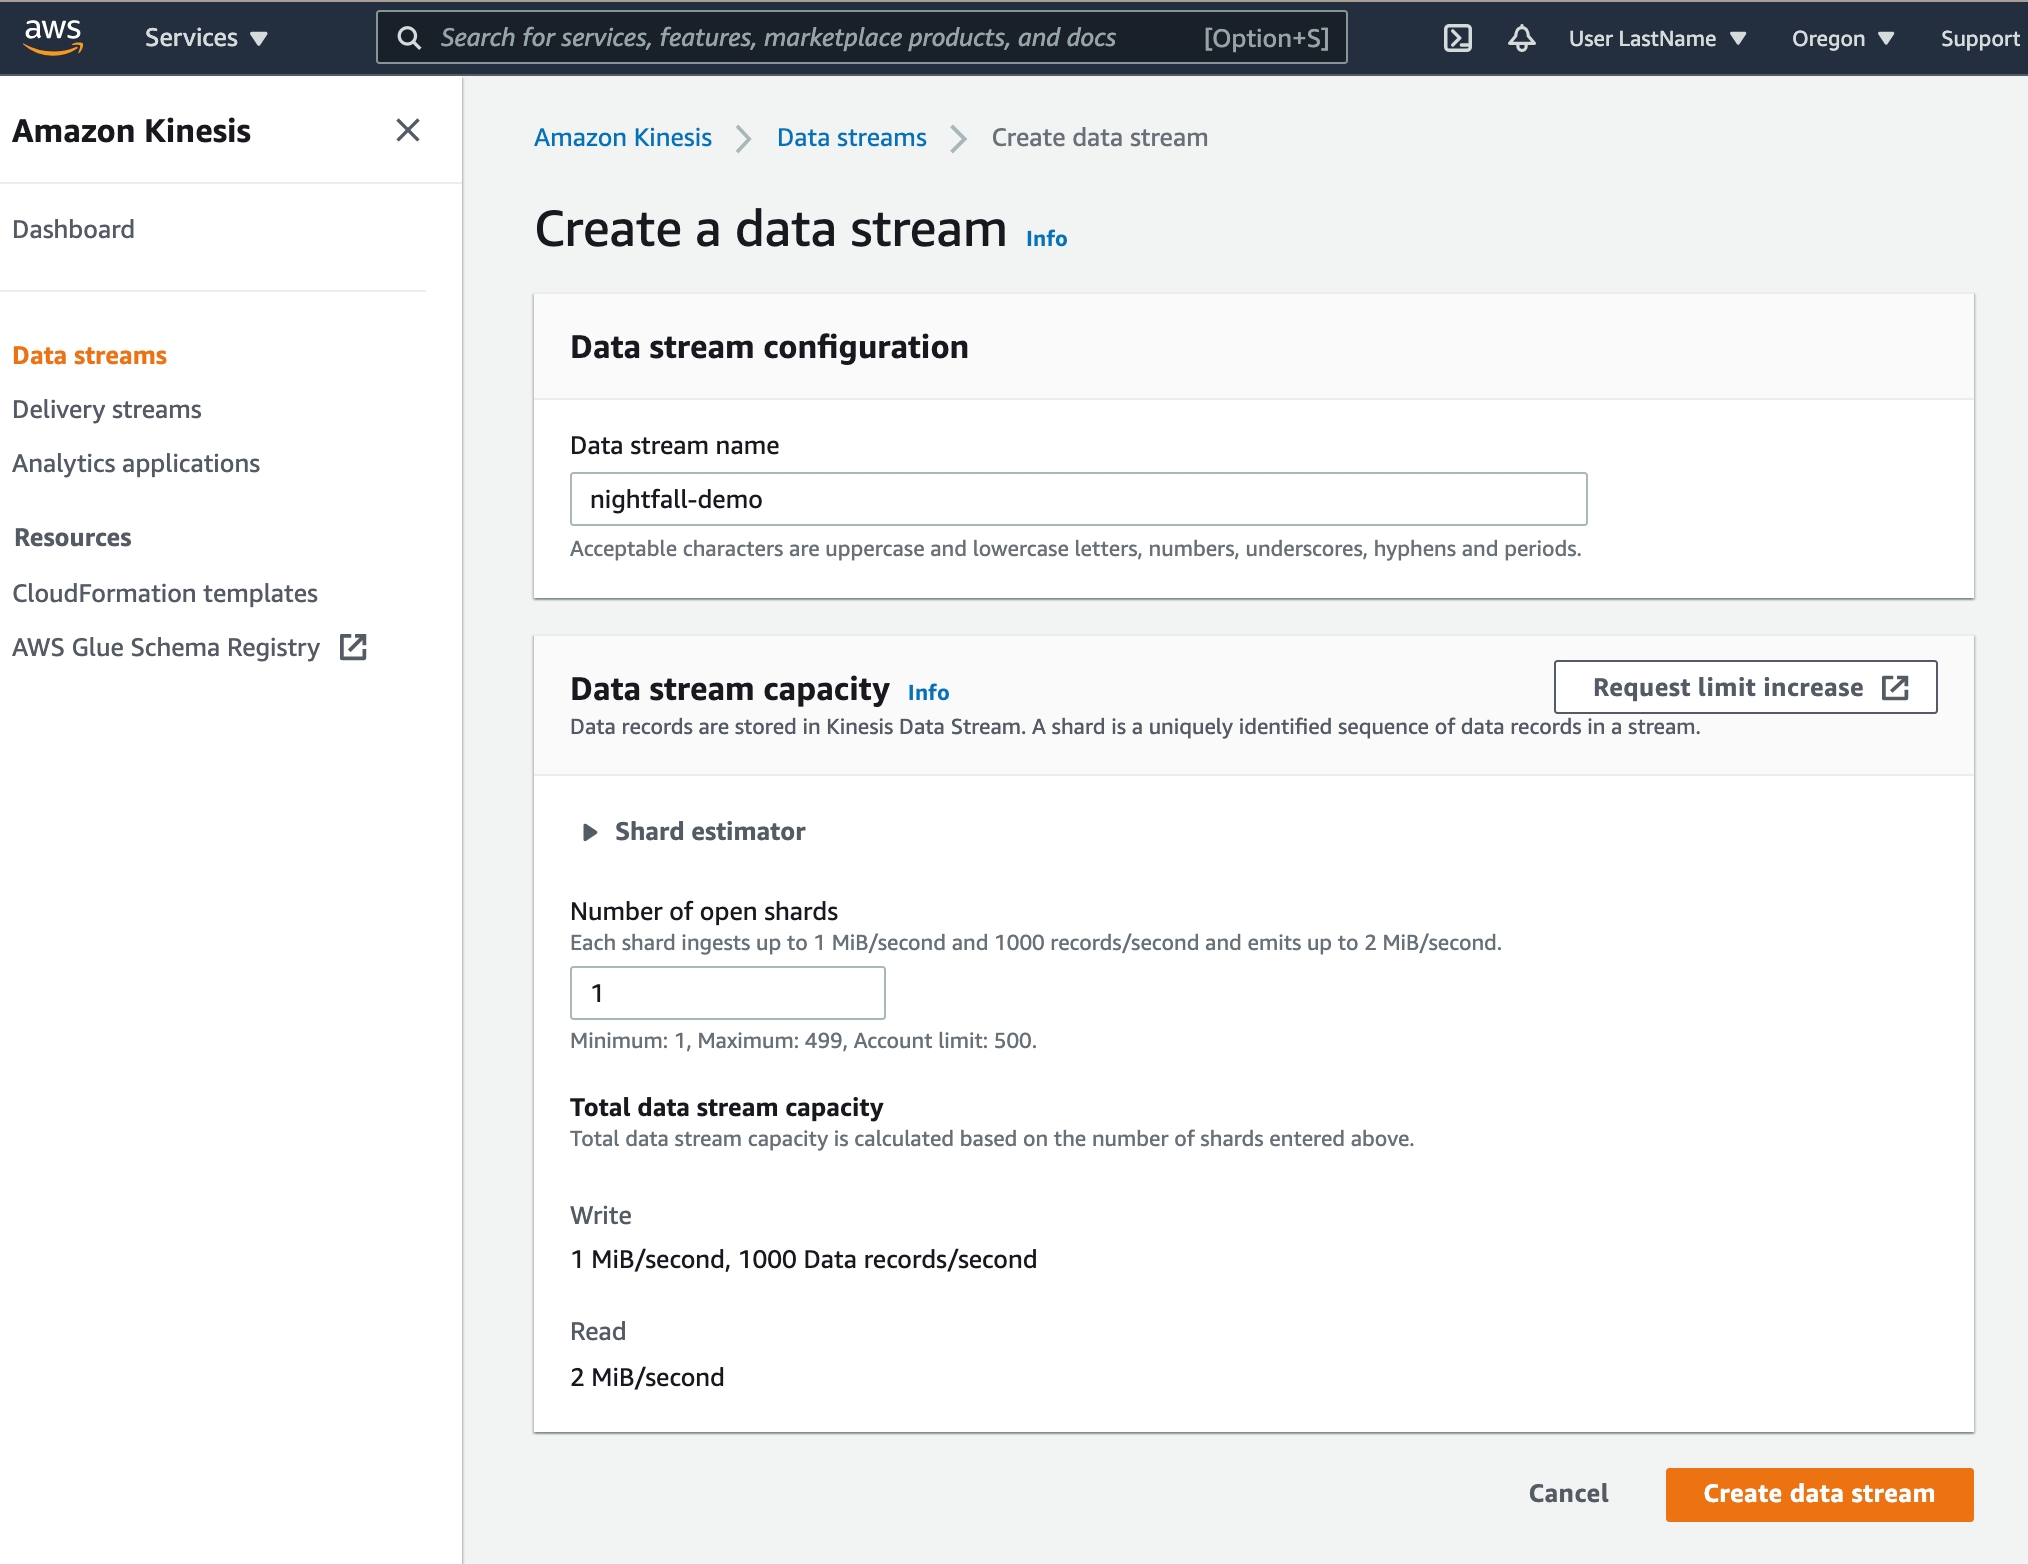
Enter nightfall-demo as the Data stream name
Enter 1 as the Number of open shards
Select Create data stream
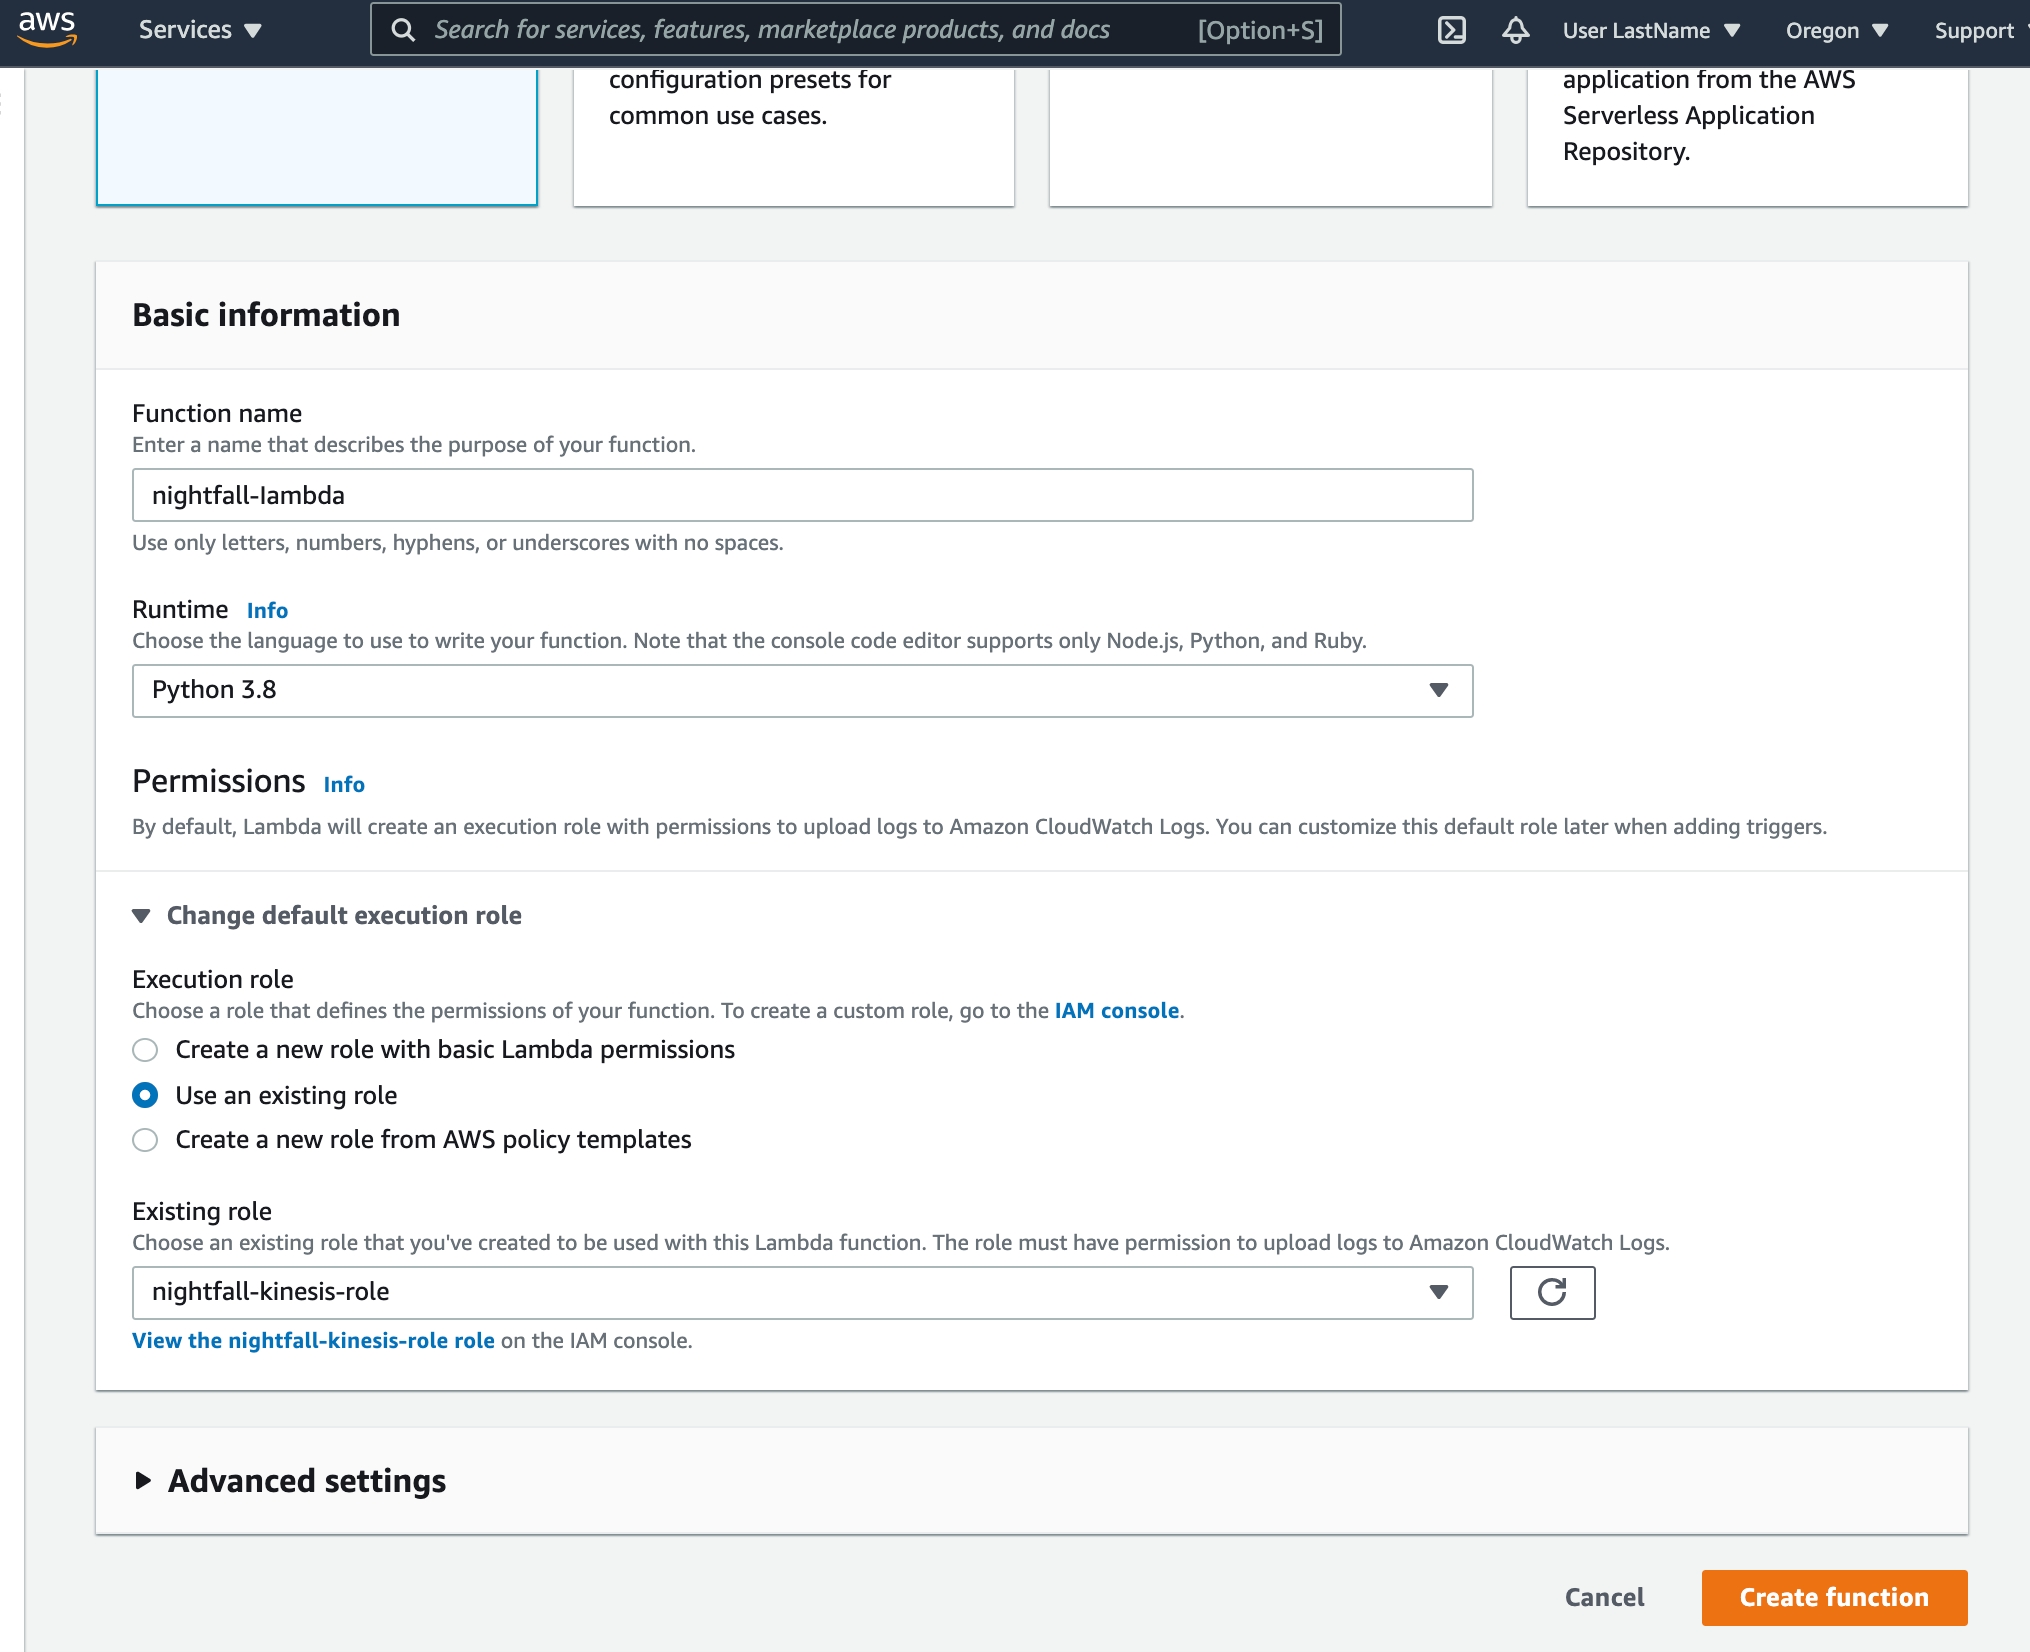
Choose Author from scratch and add the following Basic information:
nightfall-lambda as the Function name
Python 3.8 as the Runtime
Select Change default execution role, Use an existing role, and select the previously created nightfall-kinesis-role
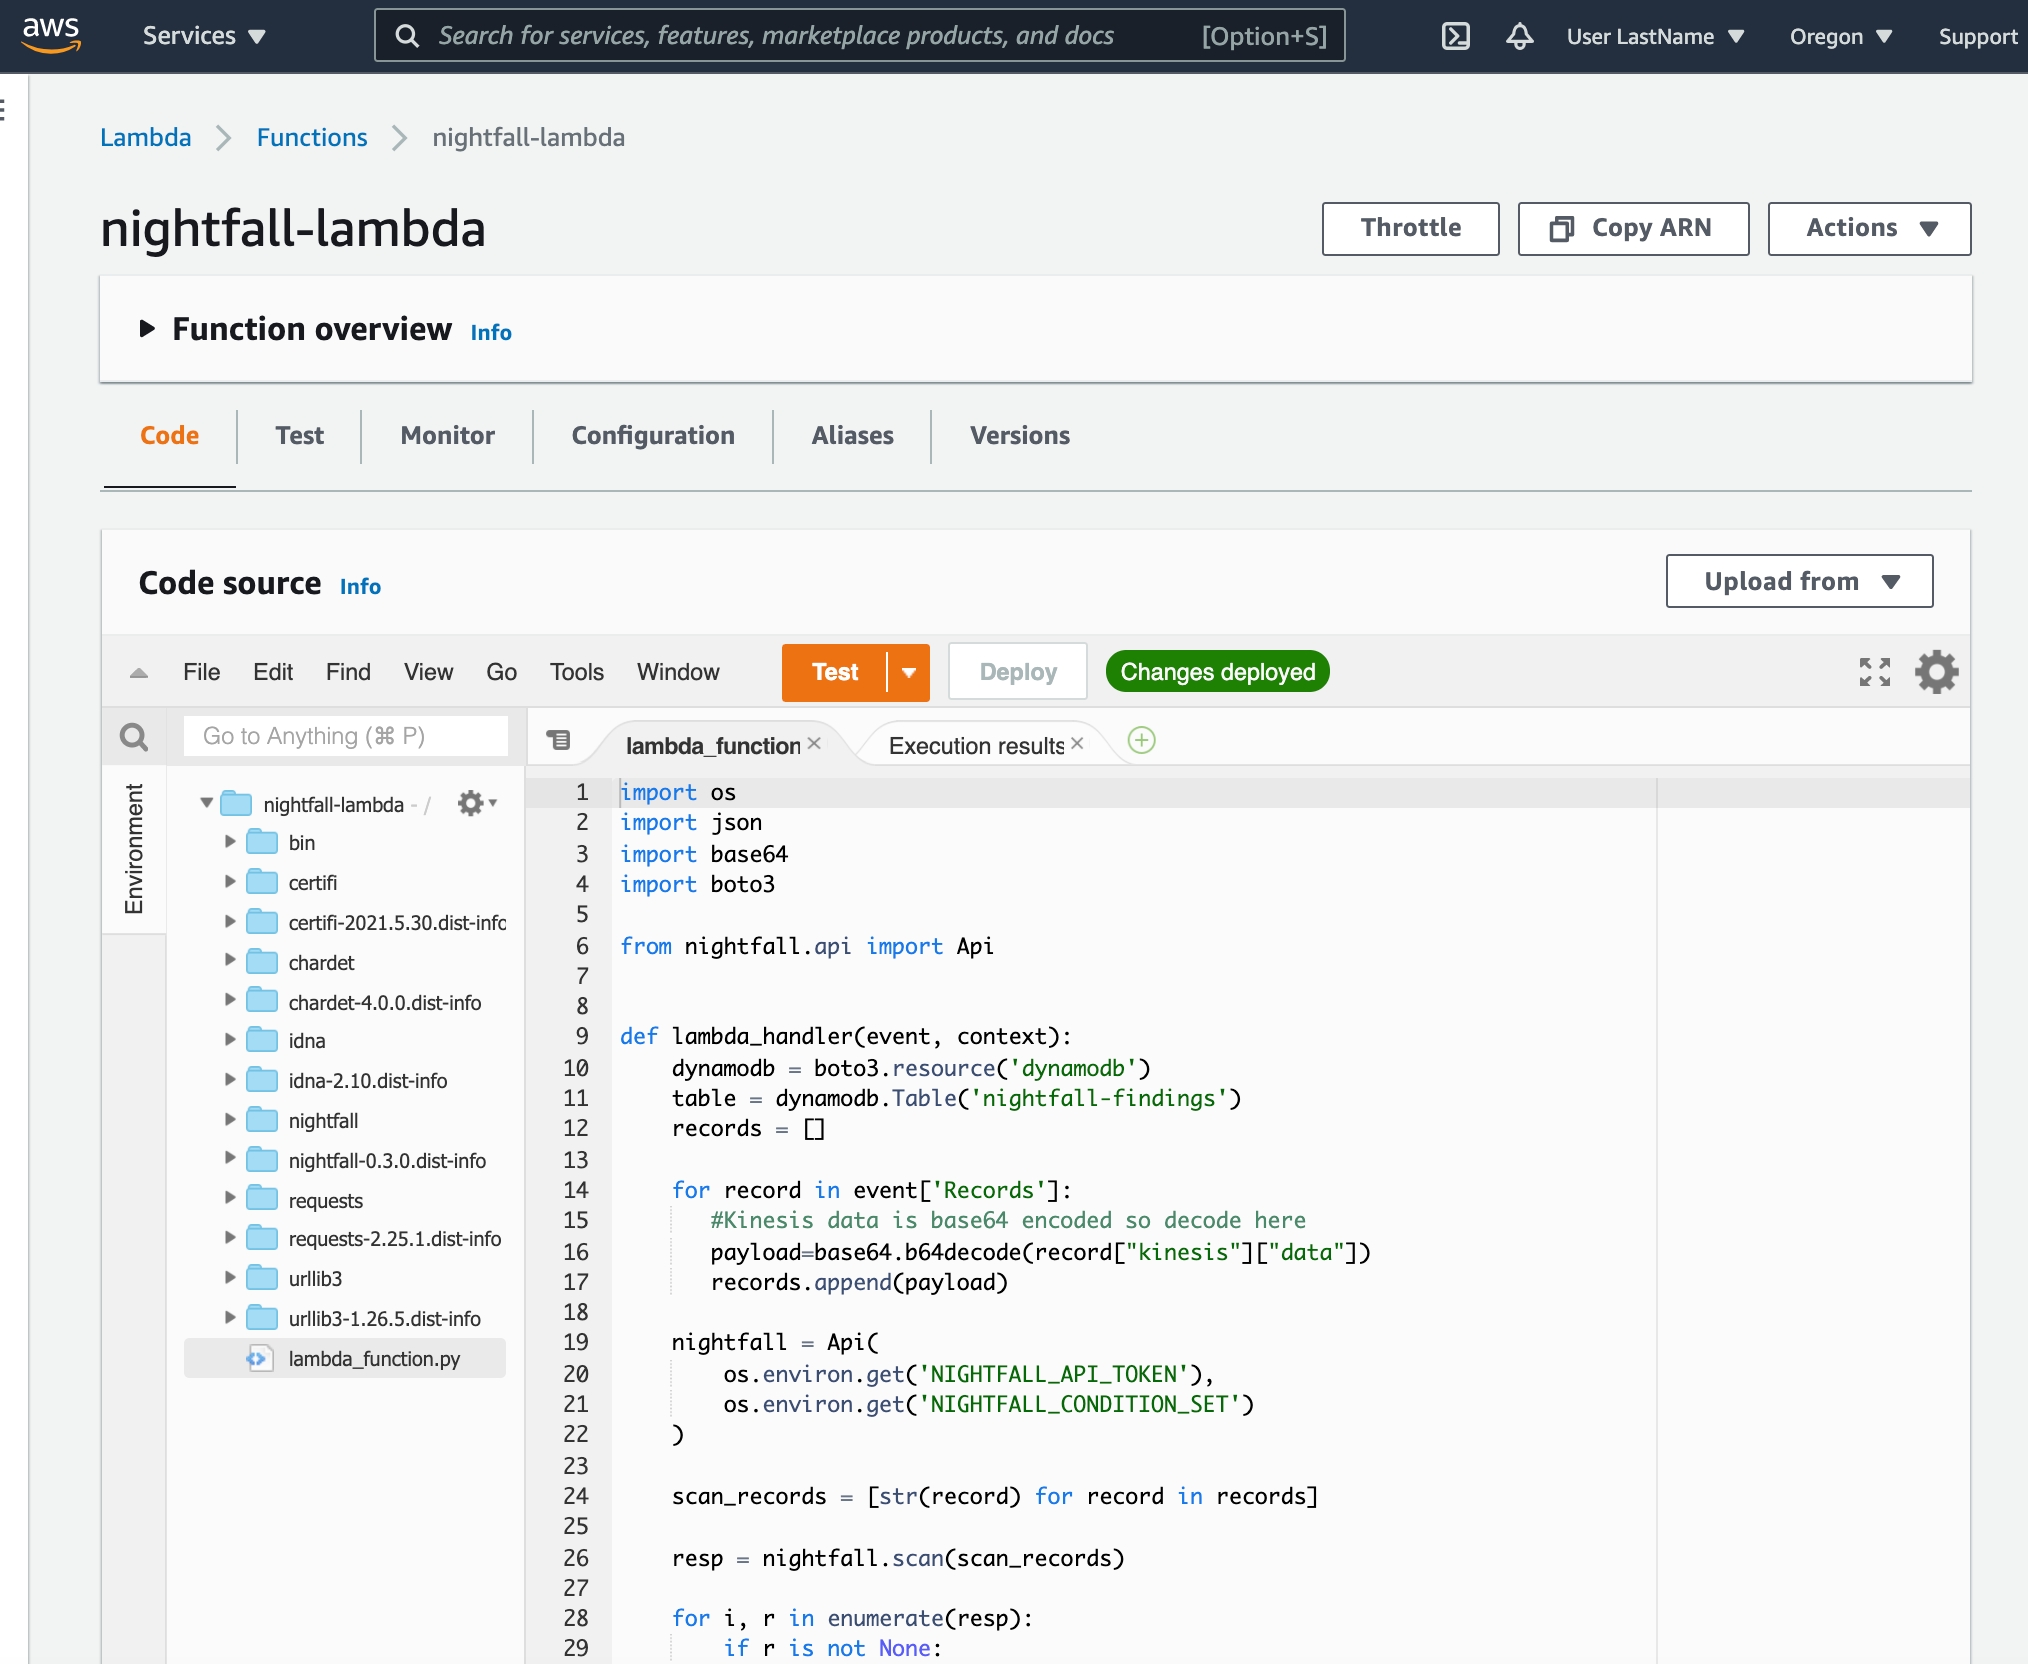
You should now see the previous sample code replaced with our Nightfall-specific Lambda function.
Next, we need to configure environment variables for the Lambda function.
Within the same Lambda view, select the Configuration tab and then select Environment variables.
Add the following environment variables that will be used during the Lambda function invocation.
NIGHTFALL_API_KEY : your Nightfall API Key
DETECTION_RULE_UUID : your Nightfall Detection Rule UUID.
🚧Detection Rule RequirementsThis tutorial uses a data set that contains a name, email, and random text. In order to see results, please make sure that the Nightfall Detection Rule you choose contains at least one detector for email addresses.
Lastly, we need to create a trigger that connects our Lambda function to our Kinesis stream.
In the function overview screen on the top of the page, select Add trigger.
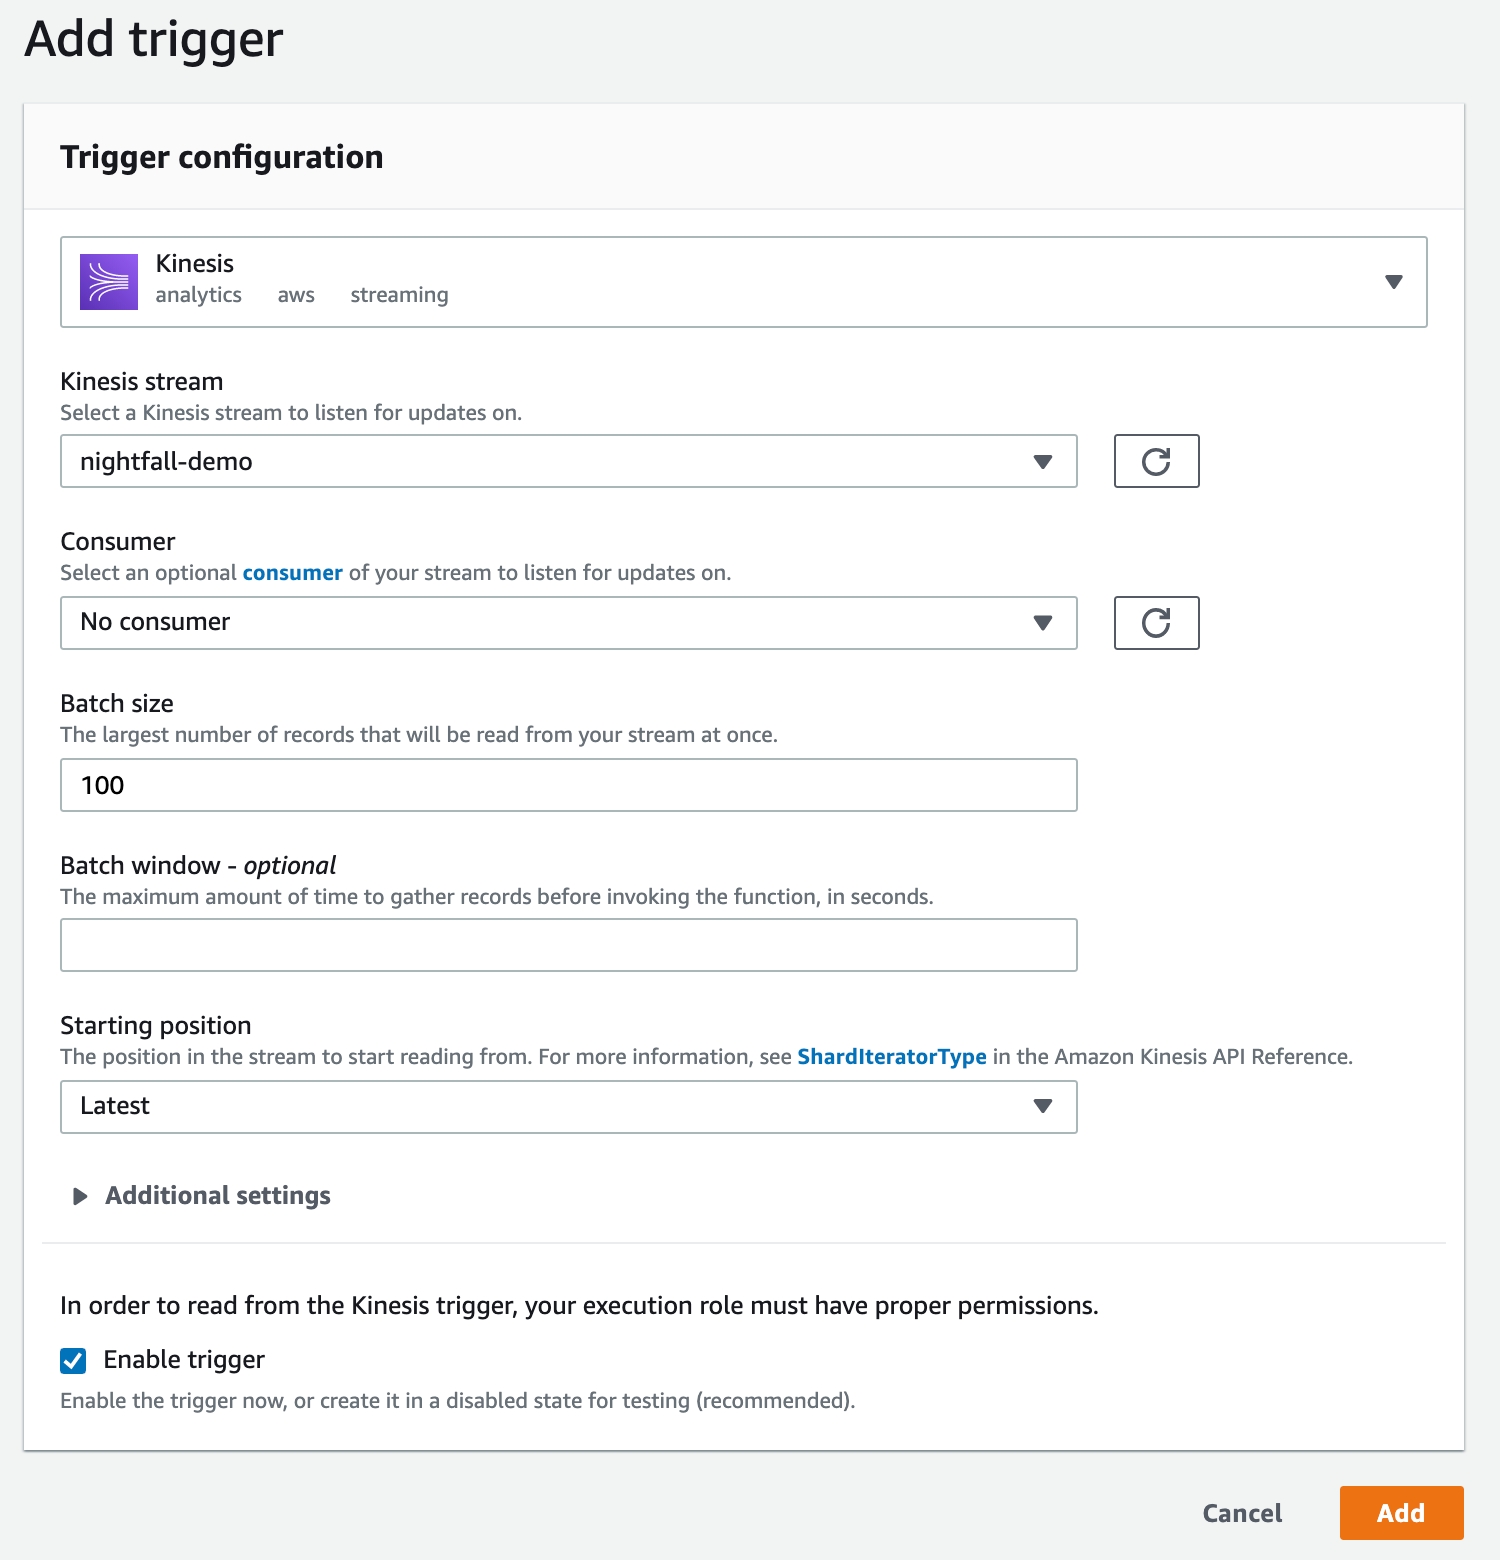
Choose Kinesis as the trigger.
Select the previously created nightfall-demo Kinesis stream.
Select Add
The last step in creating our demo environment is to create a DynamoDB table.
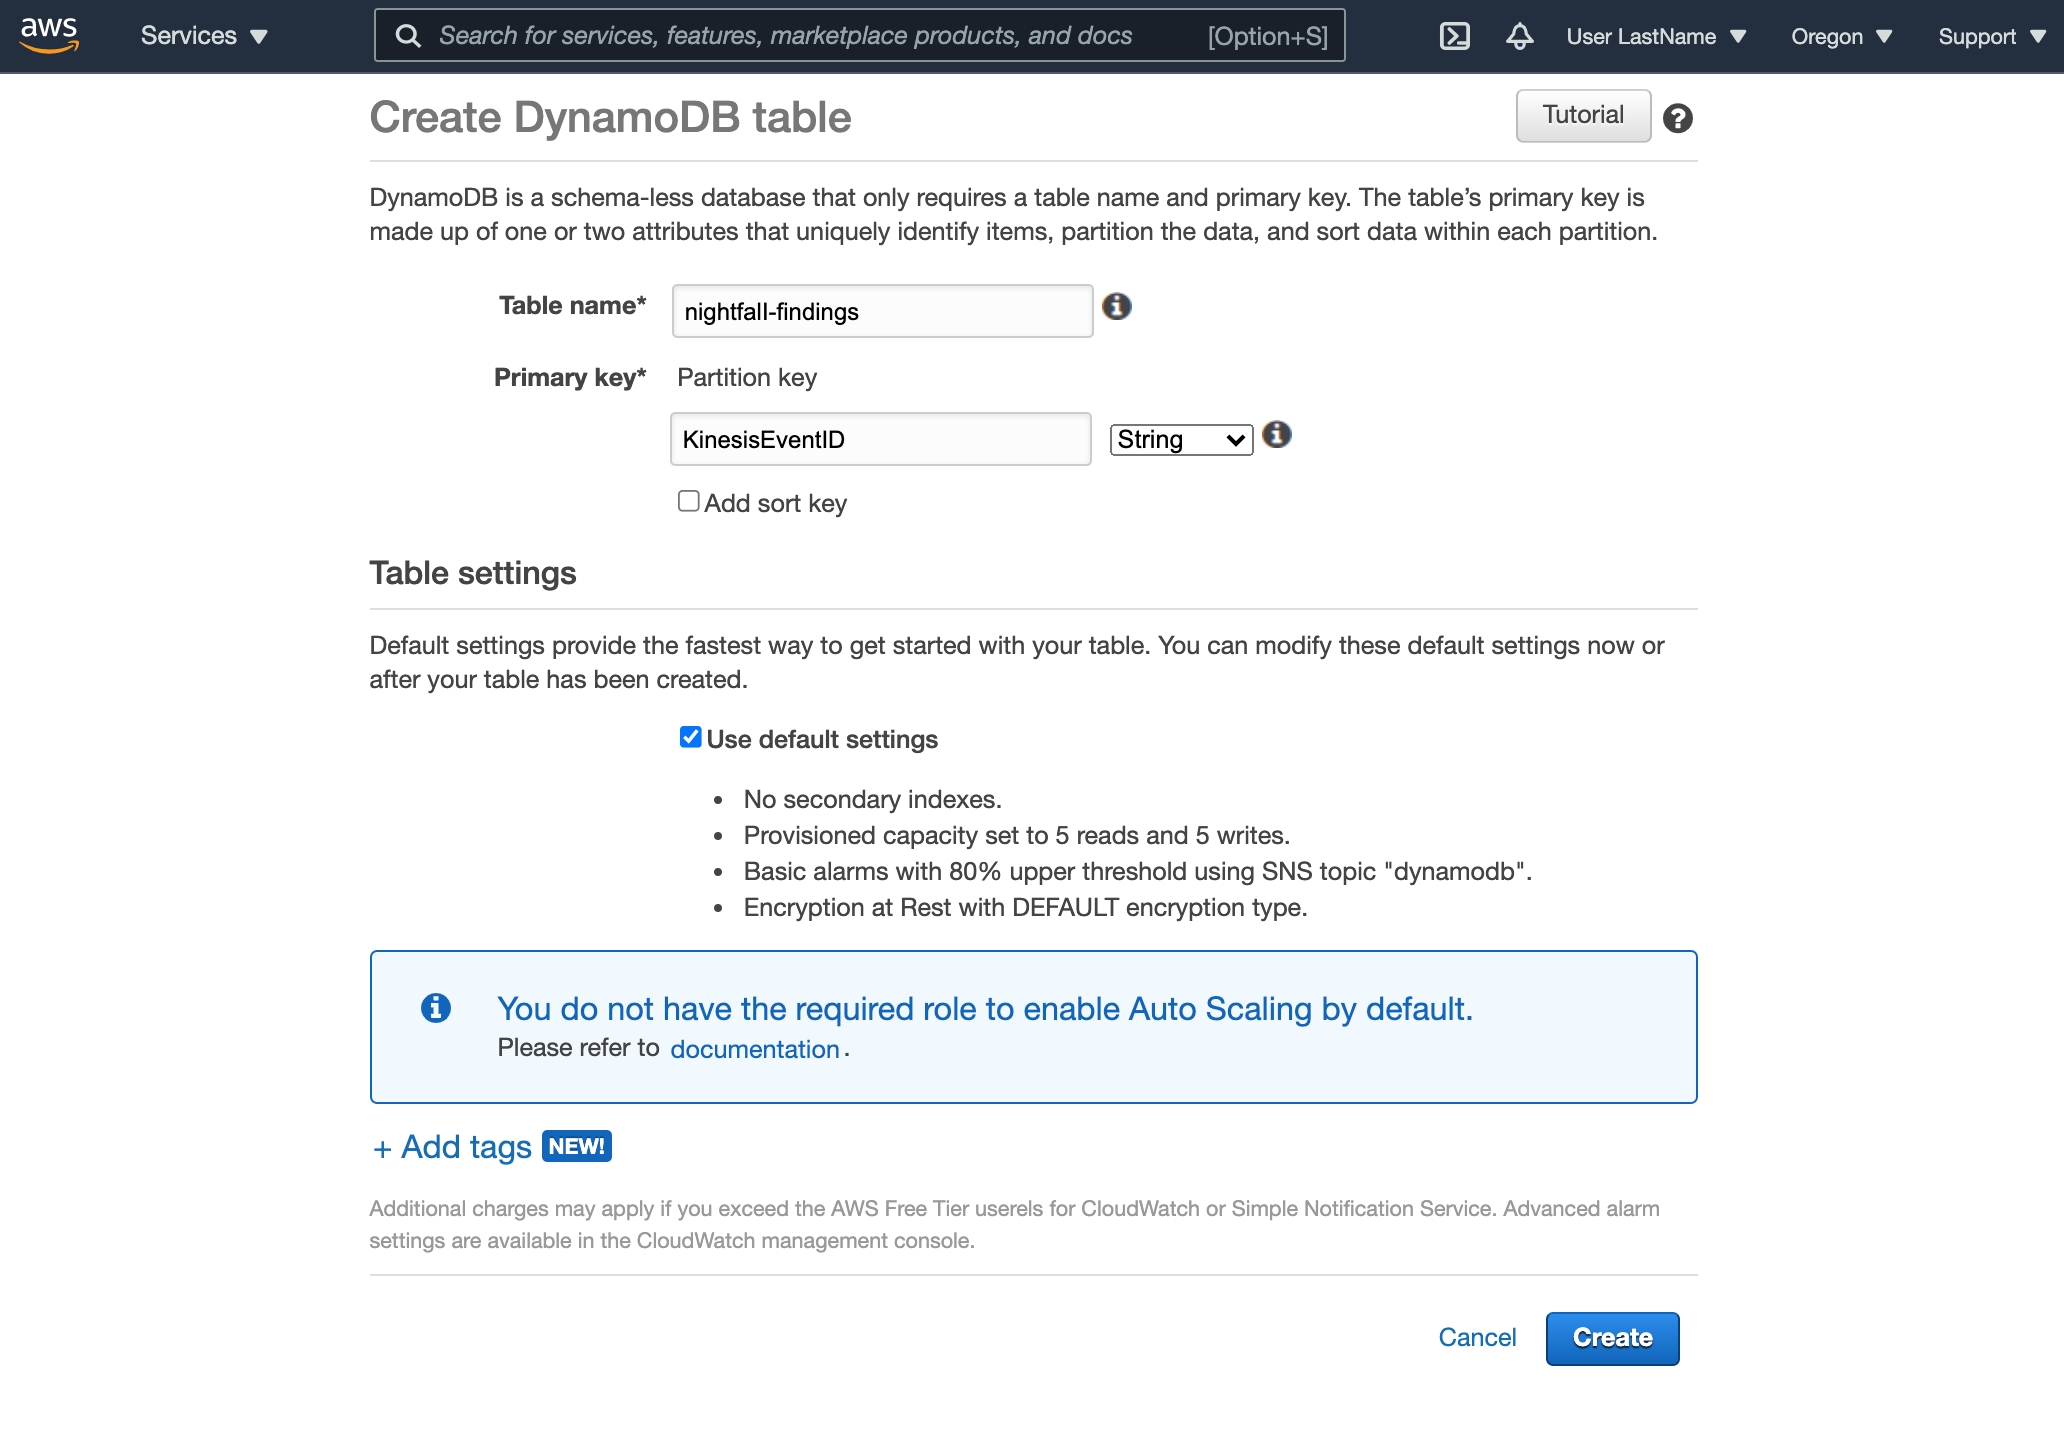
Enter nightfall-findings as the Table Name
Enter KinesisEventID as the Primary Key
Be sure to also run the following before the Lambda function is created:
This is to ensure that the required version of the Python SDK for Nightfall has been installed. We also need to install boto3.
Before we start processing the Kinesis stream data with Nightfall, we will provide a brief overview of how the Lambda function code works. The entire function is shown below:
This is a relatively simple function that does four things.
Create a DynamoDB client using the boto3 library.
Extract and decode data from the Kinesis stream and add it to a single list of strings.
Create a Nightfall client using the nightfall library and scan the records that were extracted in the previous step.
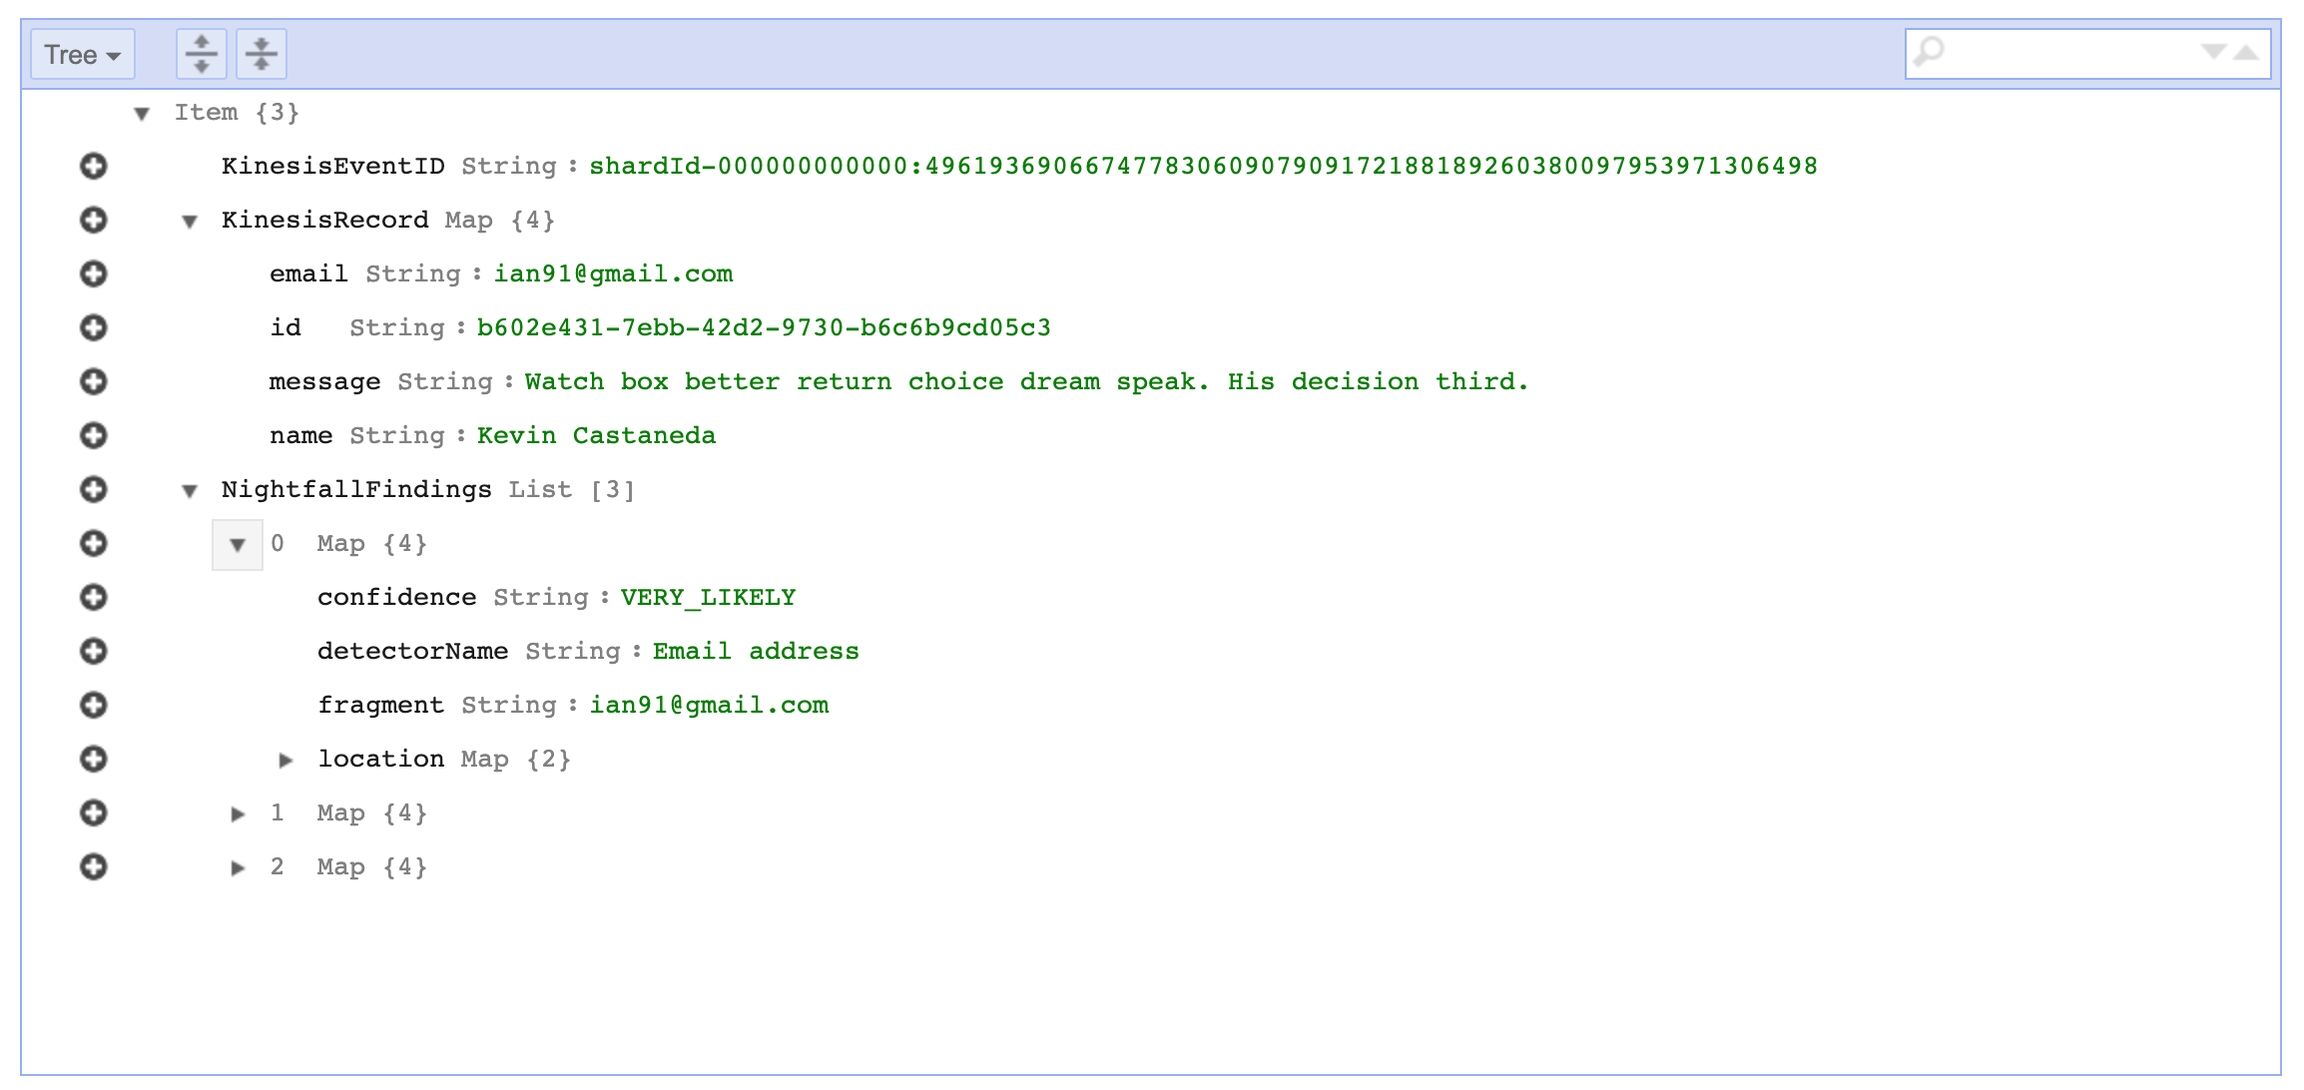
Iterate through the response from Nightfall, if there is are findings for a record we copy the record and findings metadata into a DynamoDB table. We need to process the list of Finding objects into a list of dicts before passing them to DynamoDB.
Now that you've configured all of the required AWS services, and understand how the Lambda function works, you're ready to start sending data to Kinesis and scanning it with Nightfall.
The script will send one record with the data shown above every 10 seconds.
You can start sending data with the following steps:
Open the companion repo that you cloned earlier in a terminal.
Create and Activate a new Python Virutalenv
Install Dependencies
Start sending data
If everything worked, you should see output similar to this in your terminal:
As the data starts to get sent to Kinesis, the Lambda function that we created earlier will begin to process each record and check for sensitive data using the Nightfall Detection Rule that we specified in the configuration.
If Nightfall detects a record with sensitive data, the Lambda function will copy that record and additional metadata from Nightfall to the DynamoDB table that we created previously.
If you'd like to clean up the created resources in AWS after completing this tutorial you should remove the following resources:
nightfall-kinesis-role IAM Role
nightfall-demo Kinesis data stream
nightfall-lambda Lambda Function
nightfall-findings DynamoDB Table
With the Nightfall API, you are also able to redact and mask your Kinesis findings. You can add a Redaction Config, as part of your Detection Rule, as a section within the lambda function. For more information on how to use redaction with the Nightfall API, and its specific options, please refer to the guide here.
How to run a full scan of an Amazon database
To scan an Amazon database instance (i.e. mySQL, Postgres) you must create a snapshot of that instance and .
The export process runs in the background and doesn't affect the performance of your active DB instance. Exporting RDS snapshots can take a while depending on your database type and size
Once the snapshot has been exported you will be able to scan the resulting parquet files with Nightfall like another file. You can do this using our endpoints for uploading files or using our Amazon S3 Python integration.
In addition to having created your RDS instance, you will need to define the following to export your snapshots so they can later be scanned by Nightfall:
To perform this scan, you will need to to which you will export a snapshot.
📘S3 Bucket RequirementsThis bucket must have snapshot permissions and the bucket to export must be in the same AWS Region as the the snapshot being exported.
If you have not already created a designated S3 bucket, in the AWS console select Services > Storage > S3
Click the "Create bucket" button and give your bucket a unique name as per the instructions.
For more information please see Amazon's documentation on identifying an .
You need an Identity and Access Management (IAM) Role to perform the transfer for a snapshot to your S3 bucket.
This role may be defined at the time of backup and it will be given the proper specific permissions.
You may also create the role under Services > Security, Identity, & Compliance > IAM and select “Roles” from under the “Access Management” section of the left-hand navigation.
From there you can click the “Create role” button and create a role where “AWS Service” is the trusted entity type.
You must create a symmetric encryption AWS Key using the Key Management Service (KMS).
From your AWS console, select the Services > Security, Identity, & Compliance > Key Management Service from the adjacent submenu.
From there you can click the “Create key” button and follow the instructions.
To do this task manually, go to Amazon RDS Service (Services > Database > RDS) and select the database to export from your list of databases.
Select the “Maintenance & backups” tab. Go to the “Snapshots” section.
You can select an existing automated snapshot or manually create a new snapshot with the “Take snapshot” button
Once the snapshot is complete, click the snapshot’s name.
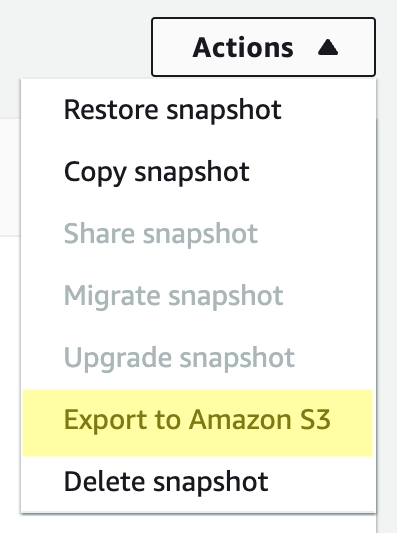
From the “Actions” menu in the upper right select “Export to Amazon S3"
Enter a unique export identifier
Choose whether you want to export all or part of your data (You will be exporting to Parquet)
Choose the S3 bucket
Choose or create your designated IAM role for backup
Choose your AWS KMS Key
Click the Export button
Once the Status column of export is "Complete", you can click the link to the export under the S3 bucket column.
Within the export in the S3 bucket, you will find a series of folders corresponding to the different database entities that were exported.
Exported data for specific tables is stored in the format base_prefix/files, where the base prefix is the following:
export_identifier/database_name/schema_name.table_name/
For example:
export-1234567890123-459/rdststdb/rdststdb.DataInsert_7ADB5D19965123A2/
The current convention for file naming is as follows:
partition_index/part-00000-random_uuid.format-based_extension
For example:
You may download these parquet files and upload them to Nightfall to scan as you would any other parquet file.
📘Obtaining file sizeYou can obtain the value for
fileSizeBytesyou can run the commandwc -c
In the above sequence of curl invocations, we upload the file and then initiate the file scan with a policy that uses pre-configured detection rule as well as an alertConfig that send the results to an email address.
Note that results you receive in this case will be an attachment with a JSON payload as follows:
The findings themselves will be available at the URL specified in findingsURL until the date-time stamp contained in the validUntil property.
Below is a SQL script small table of generated data containing example personal data, including phone numbers and email addresses.
Below is an example finding when a scan is done of the resulting parquet exported to S3 where the Detection Rule use Nightfall's built in Detectors for matching phone numbers and emails. In this example shows a match in the 1st row and and 4th column. This is what we would expect based on our table structure.
similarly, it also finds phone numbers in the 3rd column.
You may also use our tutorial for Integrating with Amazon S3 (Python) to scan through the S3 objects.
Next we define the Detection Rule with which we wish to scan our data. The Detection Rule can be and referenced by UUID.
Once the files have been uploaded, begin using the scan endpoint mentioned . Note: As can be seen in the documentation, a webhook server is required for the scan endpoint, to which it will send the scanning results. An example webhook server setup can be seen here.
Once the files have been uploaded, begin using the .
Next we define the Detection Rule with which we wish to scan our data. The Detection Rule can be and referenced by UUID.
Once the files have been uploaded, begin using the scan endpoint mentioned . Note: As can be seen in the documentation, a webhook server is required for the scan endpoint, to which it will send the scanning results. An example webhook server setup can be seen here.
The installed and configured on your local machine.
Local copy of the for this tutorial.
Open the in the AWS console.
Open the and select Create Data Stream
Open the and select Create function
Once the function has been created, in the Code tab of the Lambda function select Upload from and choose .zip file. Select the local nightfall-lambda-package.zip file that you cloned earlier from the and upload it to AWS Lambda.
Open the and select Create table
We've included a sample script in the that allows you to send fake data to Kinesis. The data that we are going to be sending looks like this:
Before running the script, make sure that you have the AWS CLI installed and configured locally. The user that you are logged in with should have the appropriate permissions to add records to the Kinesis stream. This script uses the library which handles authentication based on the credentials file that is created with the AWS CLI.
Congrats You've successfully integrated Nightfall with Amazon Kinesis, Lambda, and DynamoDB. If you have an existing Kinesis Stream, you should be able to take the same Lambda Function that we used in this tutorial and start scanning that data without any additional changes.
For more information see and
When parquet files are analyzed, as with other , not only will the the location of the finding be shown within a given byte range, but also column and row data as well.
For more information please see the Amazon documentation

