
Amazon Kinesis DLP Tutorial
Amazon Kinesis allows you to collect, process, and analyze real-time streaming data. In this tutorial, we will set up Nightfall DLP to scan Kinesis streams for sensitive data. An overview of what we are going to build is shown in the diagram below.
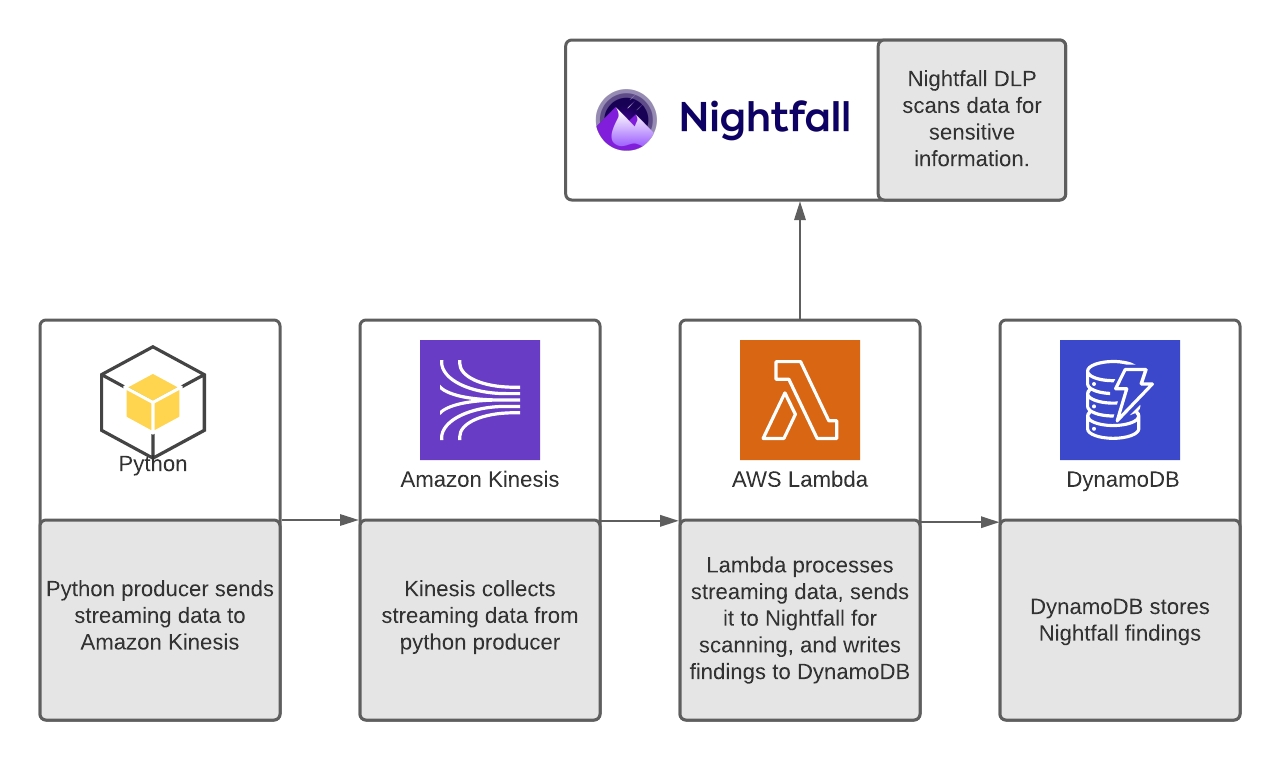
We will send data to Kinesis using a simple producer written in Python. Next, we will use an AWS Lambda function to send data from Kinesis to Nightfall. Nightfall will scan the data for sensitive information. If there are any findings returned by Nightfall, the Lambda function will write the findings to a DynamoDB table.
Prerequisites
To complete this tutorial you will need the following:
An AWS Account with access to Kinesis, Lambda, and DynamoDB
The AWS CLI installed and configured on your local machine.
A Nightfall API Key
An existing Nightfall Detection Rule which contains at least one detector for email addresses.
Local copy of the companion repository for this tutorial.
Before continuing, you should clone the companion repository locally.
git clone https://github.com/nightfallai/nightfall-kinesis-demoConfiguring AWS Services
First, we will configure all of our required Services on AWS.
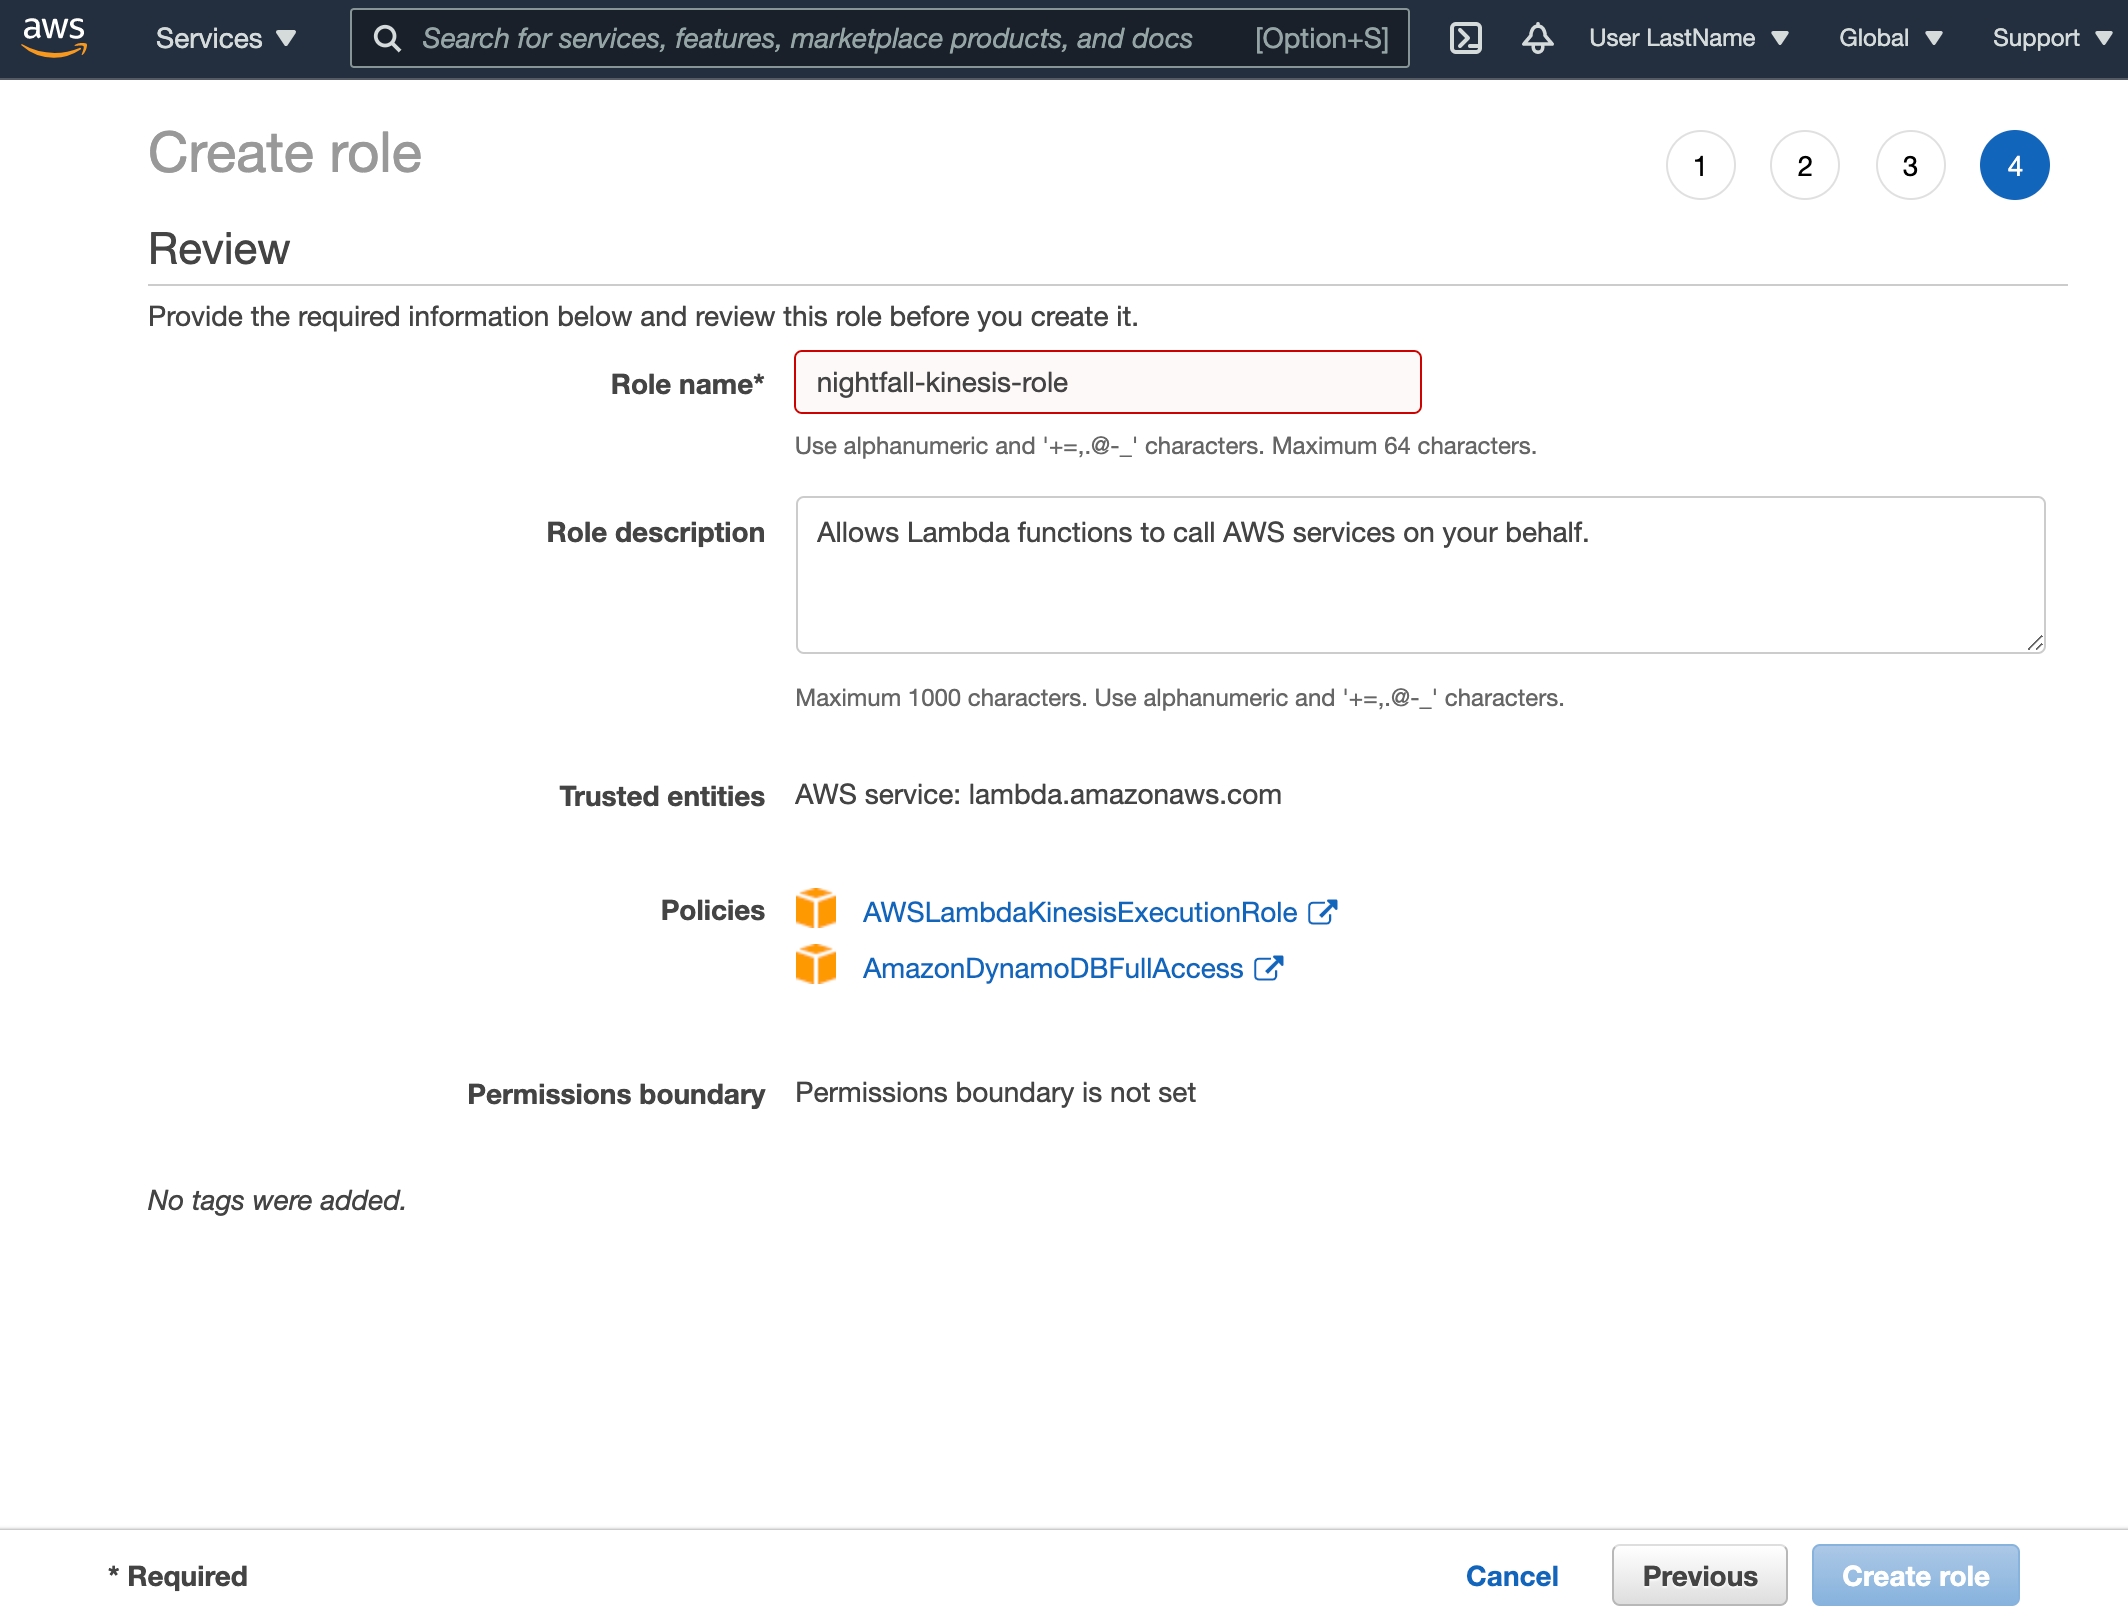
Create Execution Role
Open the IAM roles page in the AWS console.
Choose Create role.
Create a role with the following properties:
Lambda as the trusted entity
Permissions
AWSLambdaKinesisExecutionRole
AmazonDynamoDBFullAccess
Role name:
nightfall-kinesis-role
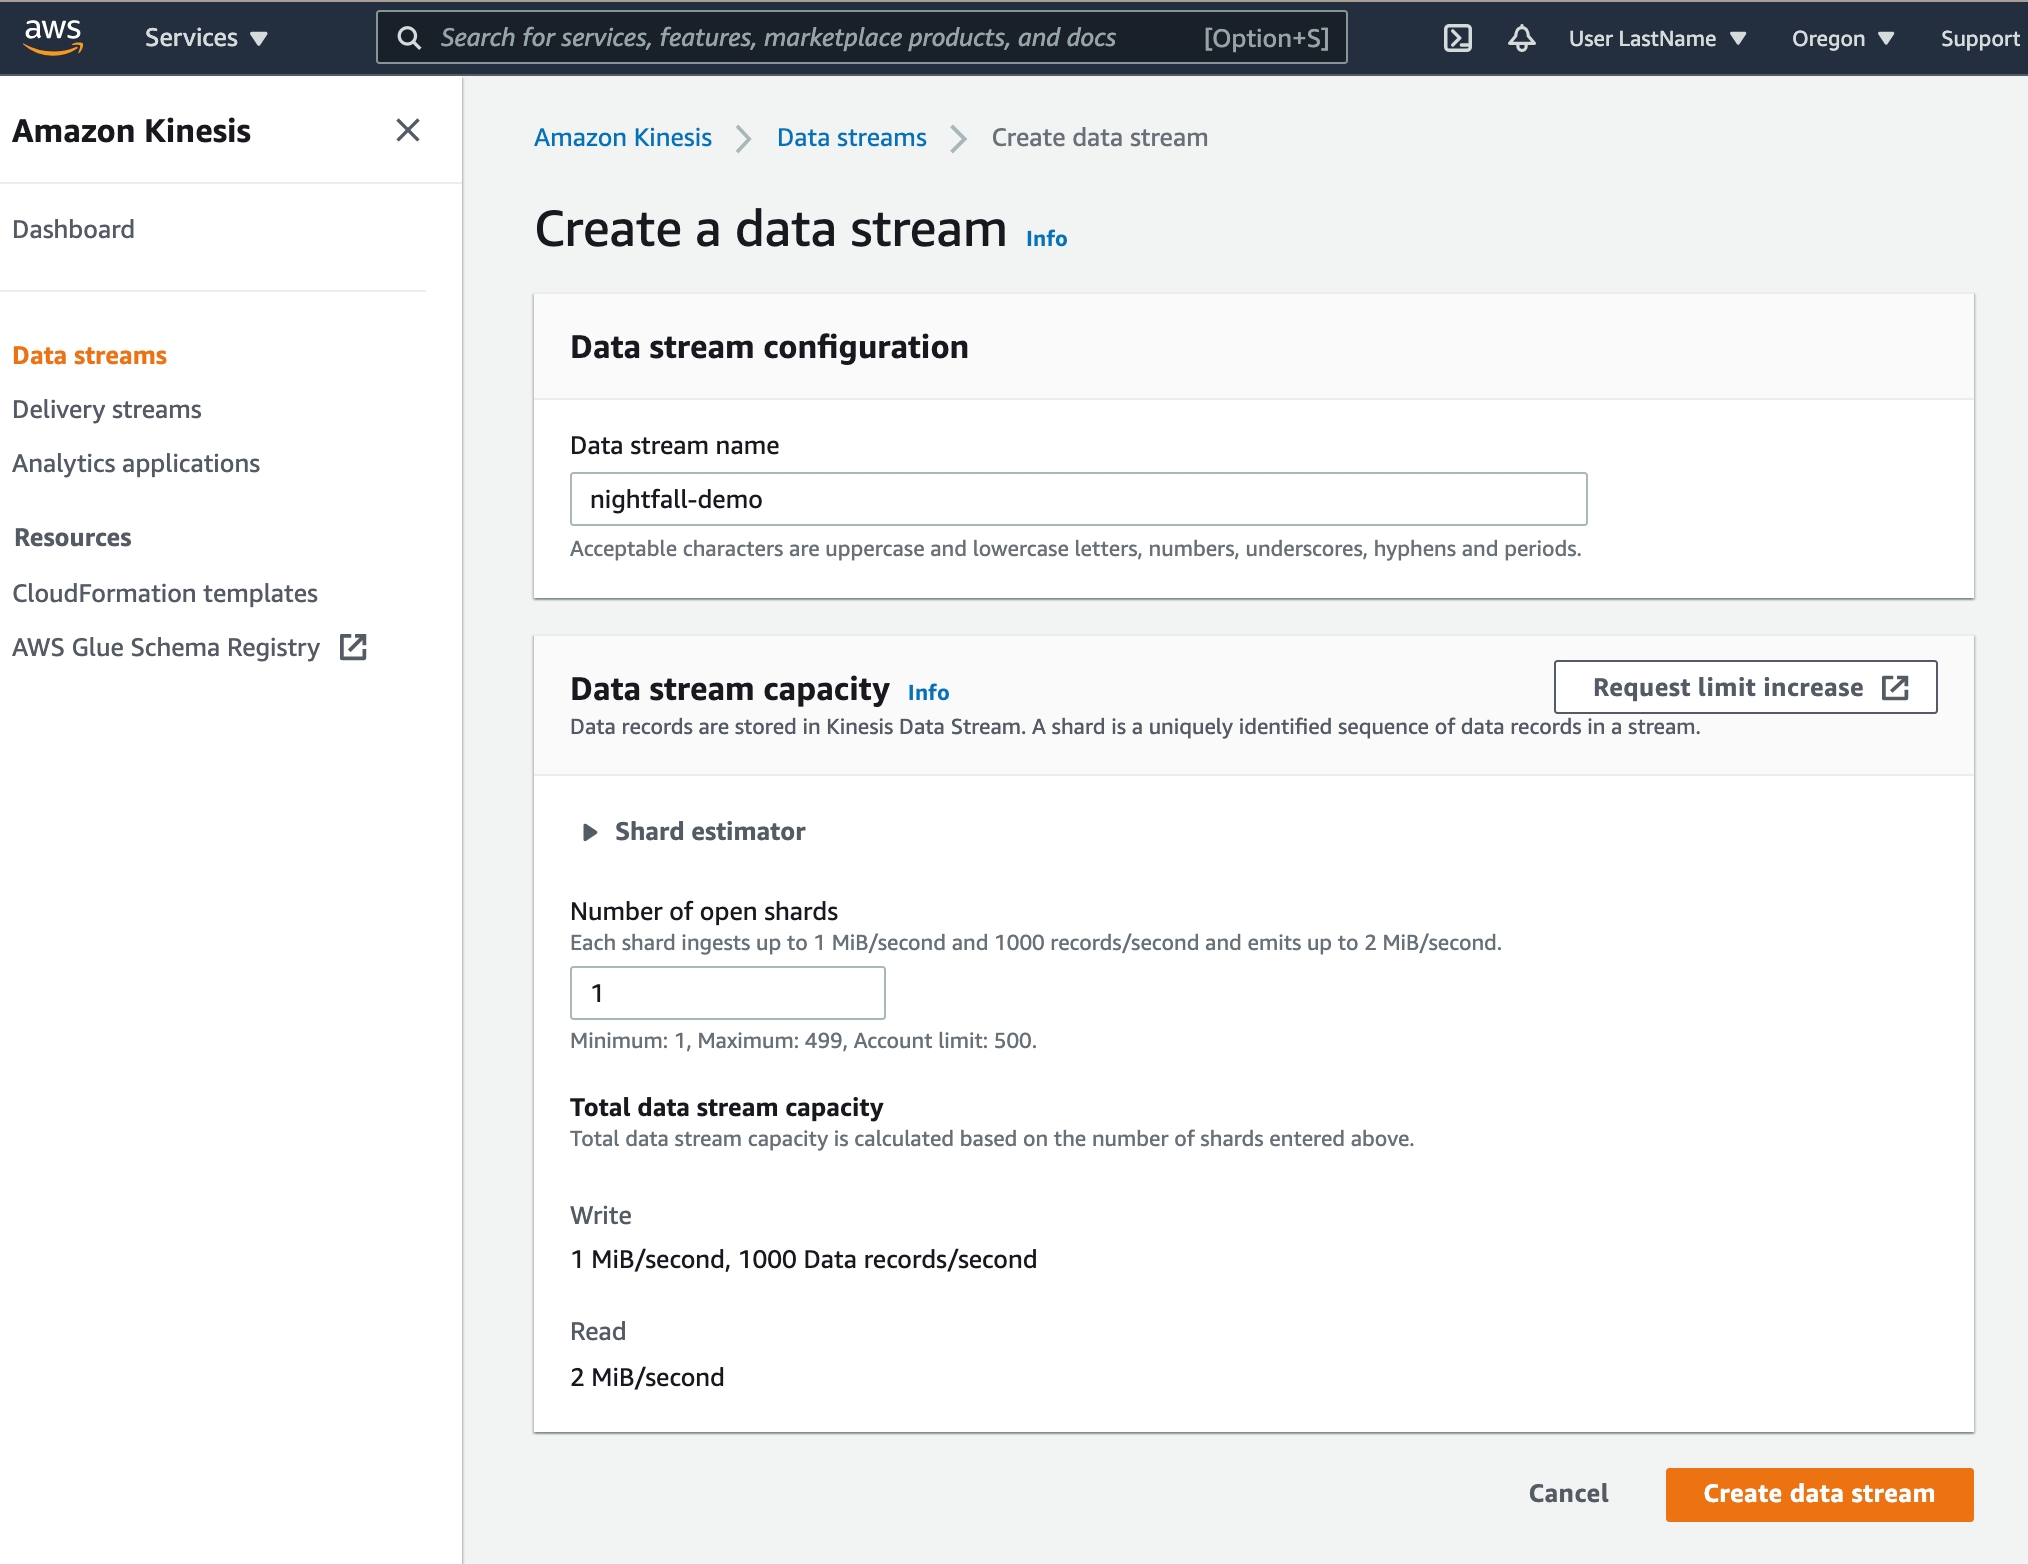
Create Kinesis Data Stream
Open the Kinesis page and select Create Data Stream
Enter
nightfall-demoas the Data stream nameEnter
1as the Number of open shardsSelect Create data stream
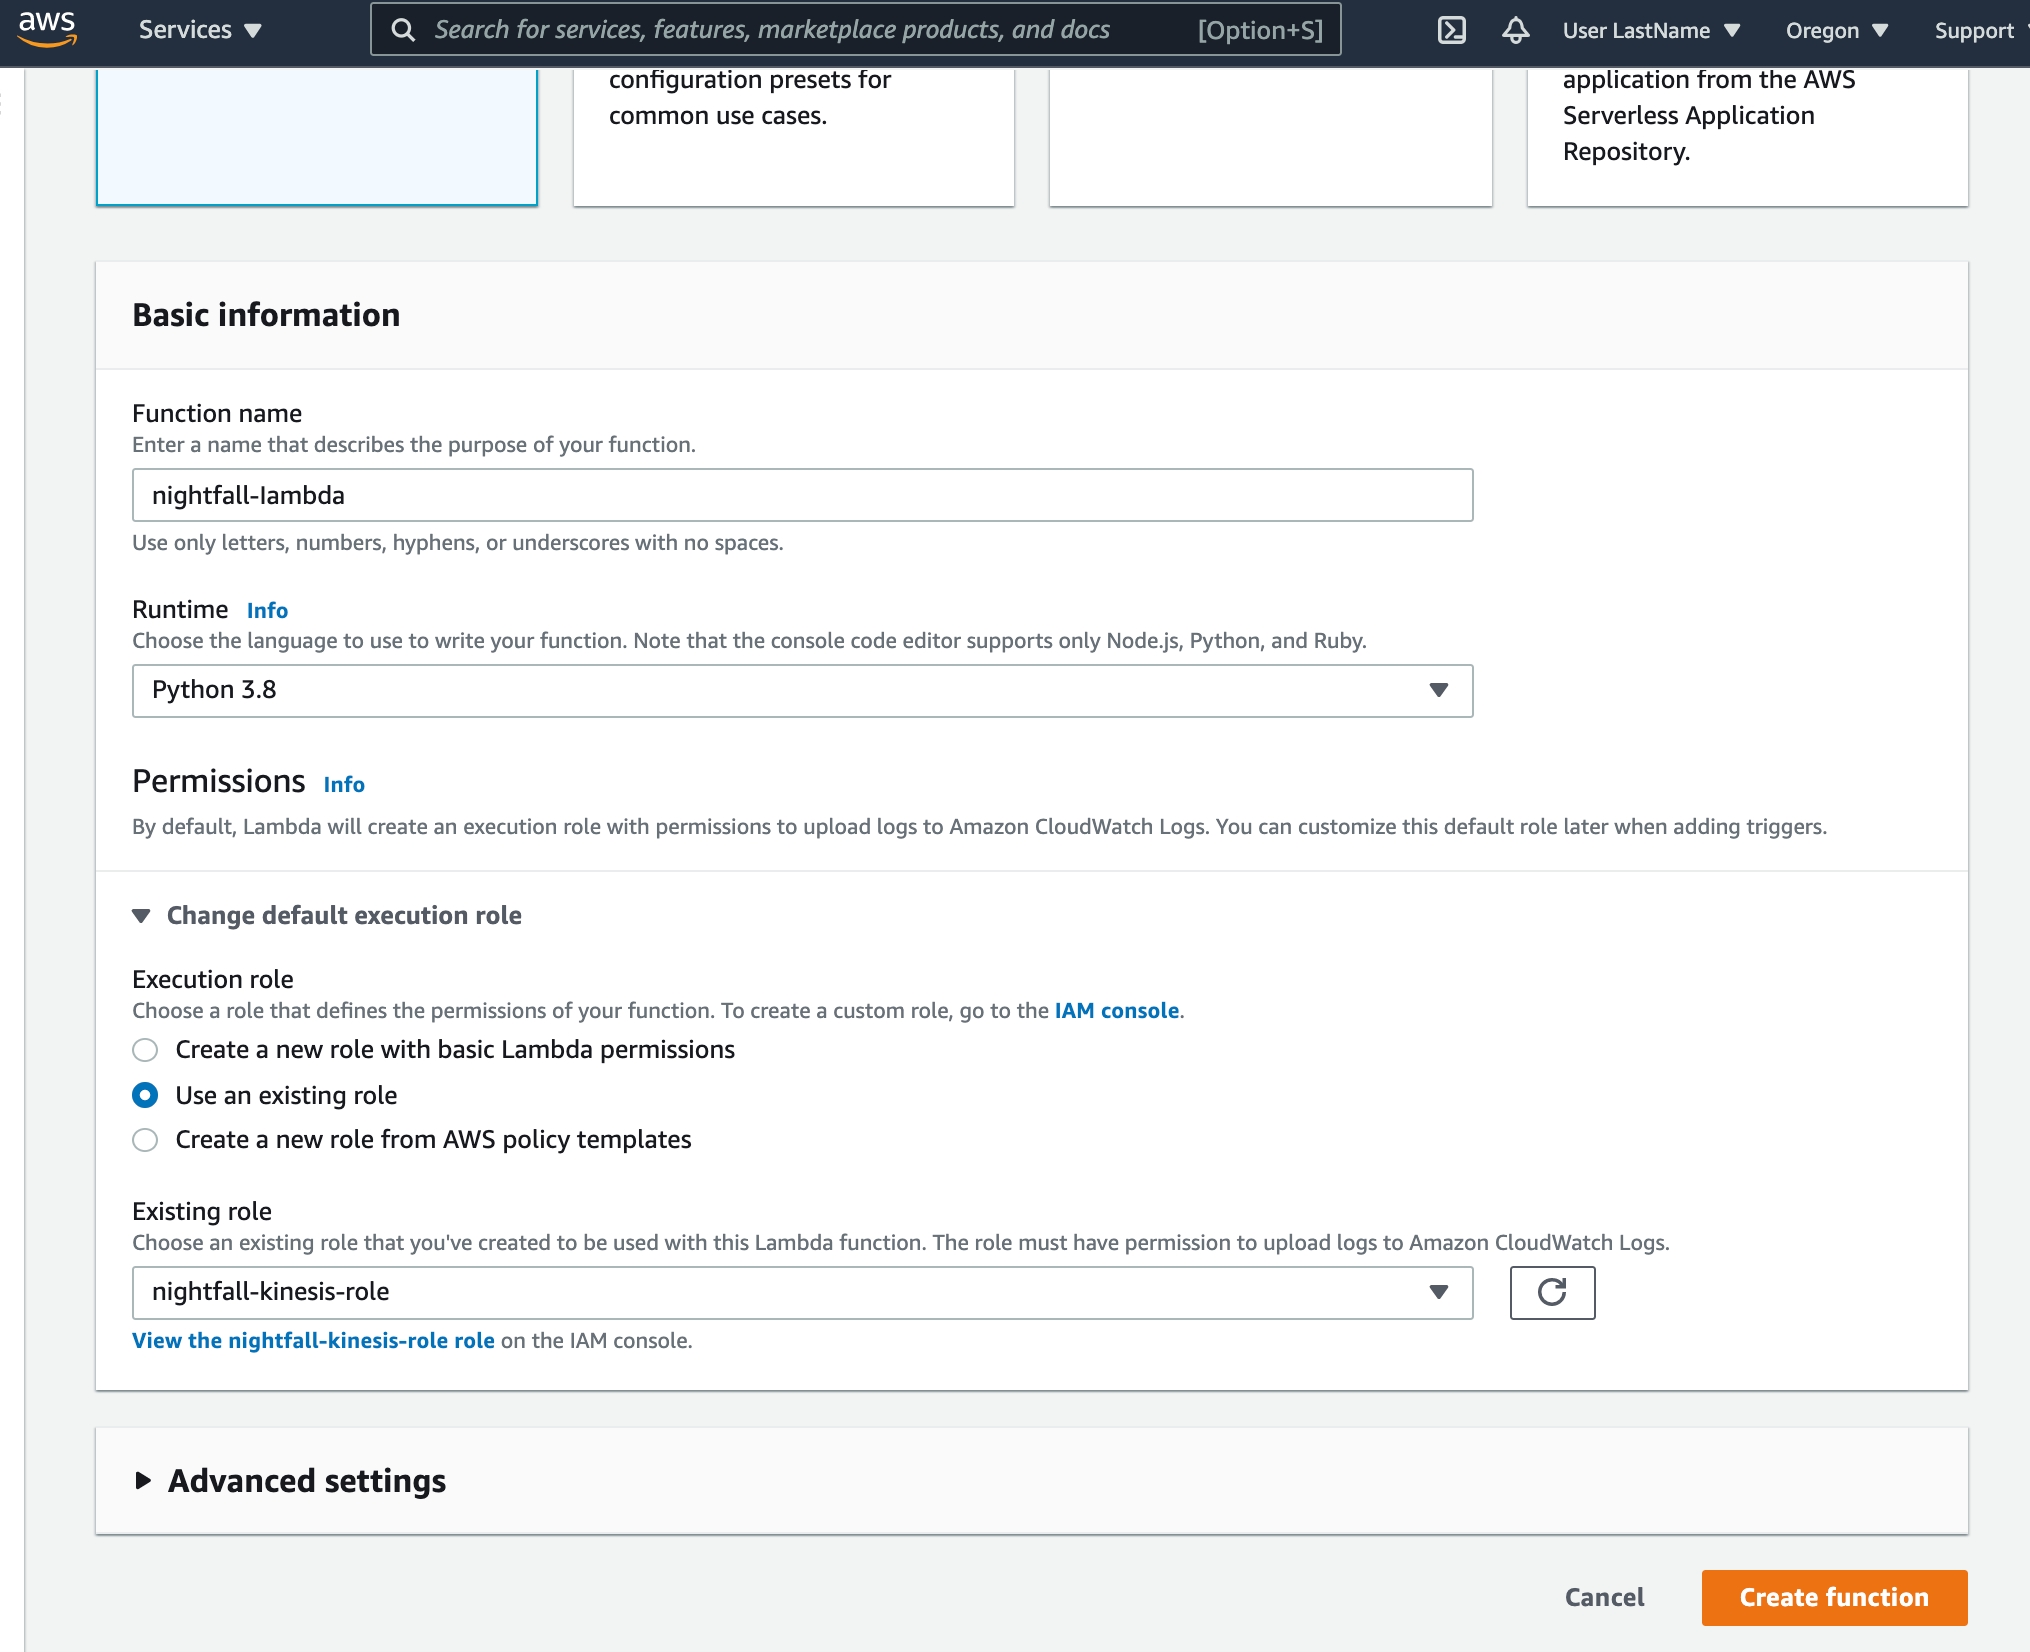
Create Lambda Function
Open the Lambda page and select Create function
Choose Author from scratch and add the following Basic information:
nightfall-lambdaas the Function namePython 3.8 as the Runtime
Select Change default execution role, Use an existing role, and select the previously created
nightfall-kinesis-role
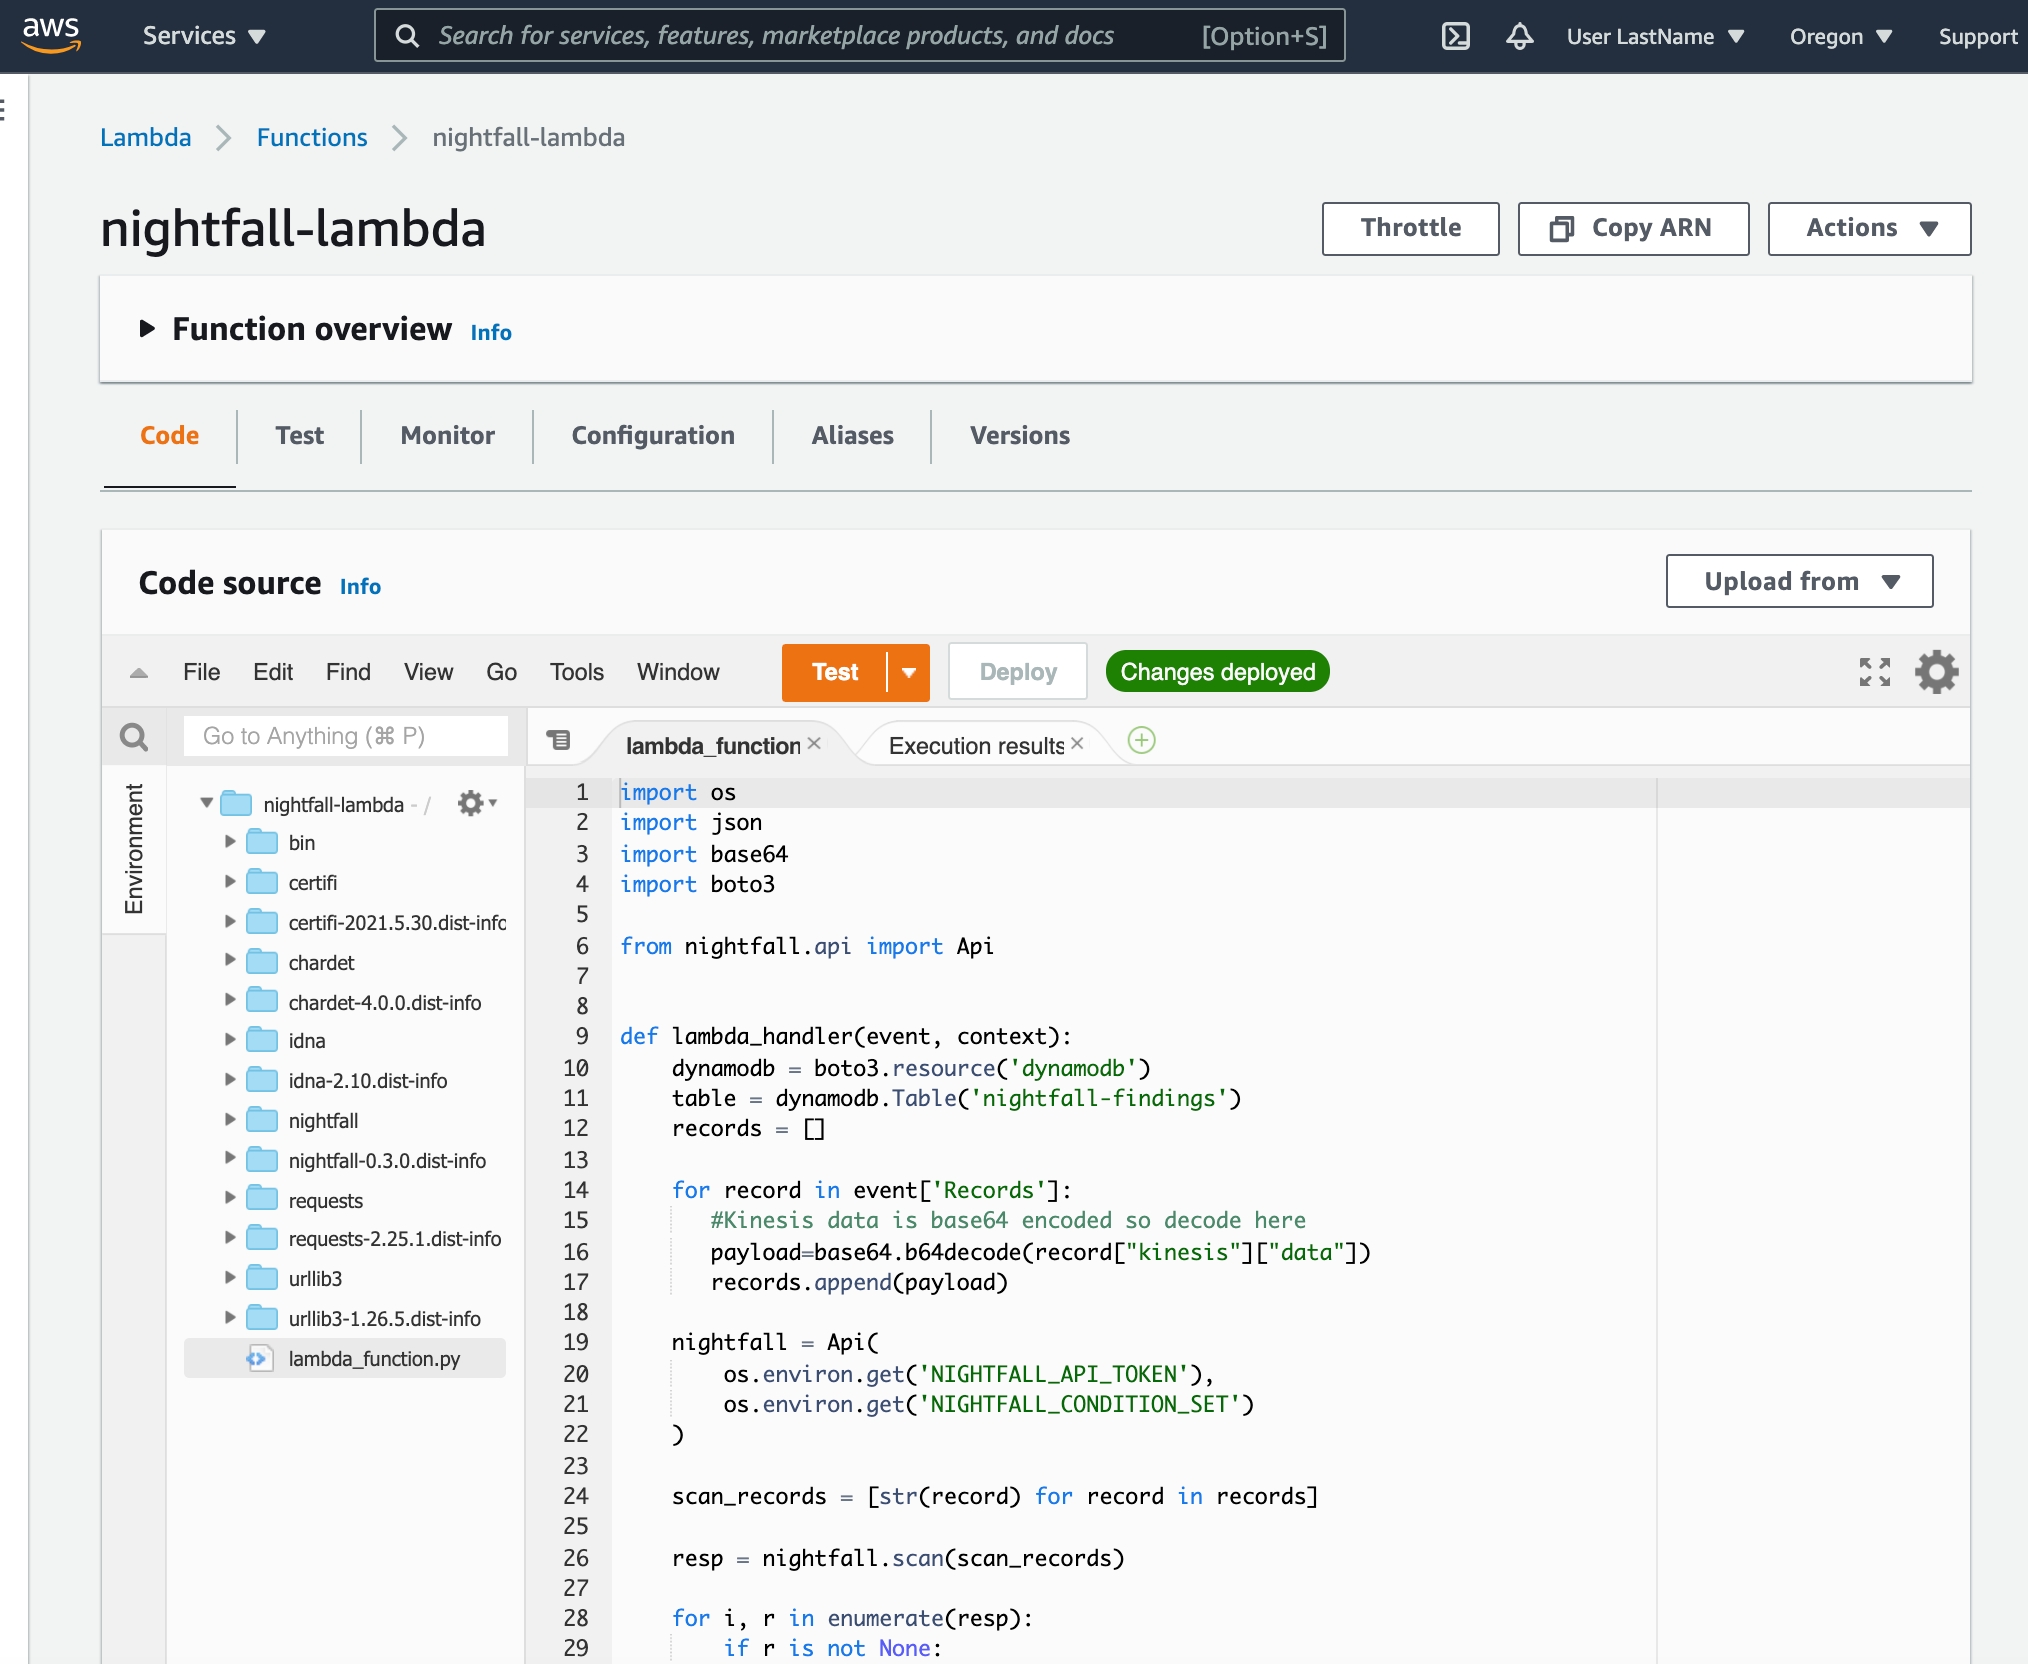
Once the function has been created, in the Code tab of the Lambda function select Upload from and choose .zip file. Select the local nightfall-lambda-package.zip file that you cloned earlier from the companion repository and upload it to AWS Lambda.
You should now see the previous sample code replaced with our Nightfall-specific Lambda function.
Next, we need to configure environment variables for the Lambda function.
Within the same Lambda view, select the Configuration tab and then select Environment variables.
Add the following environment variables that will be used during the Lambda function invocation.
NIGHTFALL_API_KEY: your Nightfall API KeyDETECTION_RULE_UUID: your Nightfall Detection Rule UUID.
🚧Detection Rule RequirementsThis tutorial uses a data set that contains a name, email, and random text. In order to see results, please make sure that the Nightfall Detection Rule you choose contains at least one detector for email addresses.
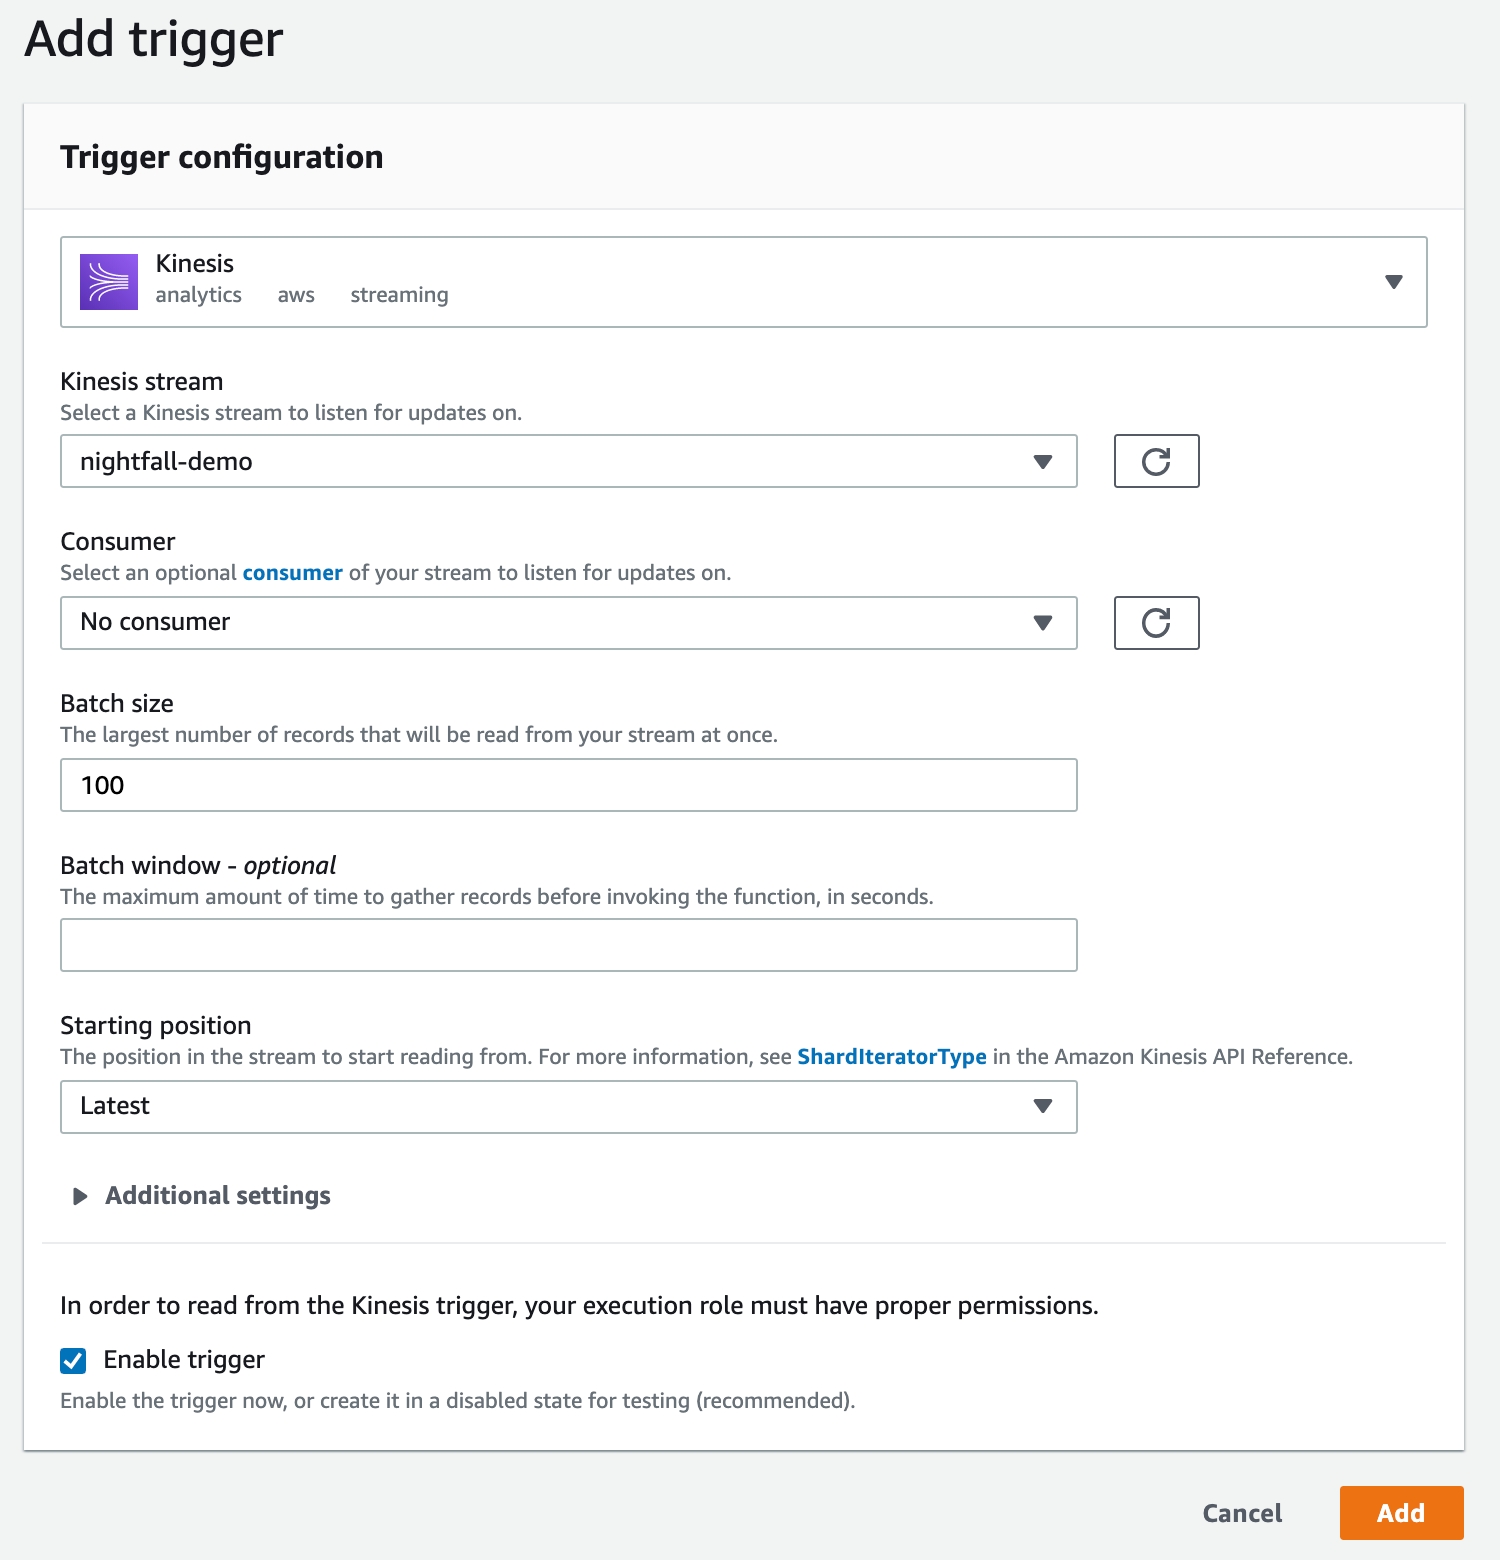
Lastly, we need to create a trigger that connects our Lambda function to our Kinesis stream.
In the function overview screen on the top of the page, select Add trigger.
Choose Kinesis as the trigger.
Select the previously created
nightfall-demoKinesis stream.Select Add
Create DynamoDB Table
The last step in creating our demo environment is to create a DynamoDB table.
Open the DynamoDB page and select Create table
Enter
nightfall-findingsas the Table NameEnter
KinesisEventIDas the Primary Key

Be sure to also run the following before the Lambda function is created:
This is to ensure that the required version of the Python SDK for Nightfall has been installed. We also need to install boto3.
pip install nightfall=1.2.0
pip install boto3
Lambda Function Overview
Before we start processing the Kinesis stream data with Nightfall, we will provide a brief overview of how the Lambda function code works. The entire function is shown below:
import os
import base64
import boto3
from nightfall import Nightfall


def lambda_handler(event, context):
    dynamodb = boto3.resource('dynamodb')
    table = dynamodb.Table('nightfall-findings')

    records = []
    for record in event['Records']:
        # Kinesis data is base64 encoded so decode here
        payload = base64.b64decode(record["kinesis"]["data"])
        records.append(payload.decode("utf-8"))

    nightfall = Nightfall(
        os.environ.get('NIGHTFALL_API_KEY')
    )

    findings, redactions = nightfall.scan_text(
        records,
        detection_rule_uuids=[os.environ.get('DETECTION_RULE_UUID')]
    )

    for record_i, record_findings in enumerate(findings):
        if record_findings:
            formatted_findings = []
            for finding in record_findings:
                formatted_findings.append({
                    'Finding': finding.finding,
                    'BeforeContext': finding.before_context,
                    'AfterContext': finding.after_context,
                    'DetectorName': finding.detector_name,
                    'DetectorUUID': finding.detector_uuid,
                    'ByteStart': finding.byte_range.start,
                    'ByteStop': finding.byte_range.stop,
                    'Confidence': finding.confidence.value,
                })

            table.put_item(
                Item={
                    'KinesisEventID': event['Records'][record_i]['eventID'],
                    'KinesisRecord': records[record_i],
                    'NightfallFindings': formatted_findings,
                }
            )
This is a relatively simple function that does four things.
Create a DynamoDB client using the
boto3library.
dynamodb = boto3.resource('dynamodb')
table = dynamodb.Table('nightfall-findings')
Extract and decode data from the Kinesis stream and add it to a single list of strings.
records = []
for record in event['Records']:
    # Kinesis data is base64 encoded so decode here
    payload = base64.b64decode(record["kinesis"]["data"])
    records.append(payload.decode("utf-8"))
Create a Nightfall client using the
nightfalllibrary and scan the records that were extracted in the previous step.
nightfall = Nightfall(
    os.environ.get('NIGHTFALL_API_KEY')
)

findings, redactions = nightfall.scan_text(
    records,
    detection_rule_uuids=[os.environ.get('DETECTION_RULE_UUID')]
)
Iterate through the response from Nightfall, if there is are findings for a record we copy the record and findings metadata into a DynamoDB table. We need to process the list of Finding objects into a list of dicts before passing them to DynamoDB.
for record_i, record_findings in enumerate(findings):
    if record_findings:
        formatted_findings = []
        for finding in record_findings:
            formatted_findings.append({
                'Finding': finding.finding,
                'BeforeContext': finding.before_context,
                'AfterContext': finding.after_context,
                'DetectorName': finding.detector_name,
                'DetectorUUID': finding.detector_uuid,
                'ByteStart': finding.byte_range.start,
                'ByteStop': finding.byte_range.stop,
                'Confidence': finding.confidence.value,
            })

        table.put_item(
            Item={
                'KinesisEventID': event['Records'][record_i]['eventID'],
                'KinesisRecord': records[record_i],
                'NightfallFindings': formatted_findings,
           }
        )
Sending Data to Kinesis
Now that you've configured all of the required AWS services, and understand how the Lambda function works, you're ready to start sending data to Kinesis and scanning it with Nightfall.
We've included a sample script in the companion repository that allows you to send fake data to Kinesis. The data that we are going to be sending looks like this:
'id': fake.uuid4(),
'name': fake.name(),
'email': fake.email(),
'message': fake.paragraph()
The script will send one record with the data shown above every 10 seconds.
Sample Data Script Usage Instructions
Before running the script, make sure that you have the AWS CLI installed and configured locally. The user that you are logged in with should have the appropriate permissions to add records to the Kinesis stream. This script uses the Boto3 library which handles authentication based on the credentials file that is created with the AWS CLI.
You can start sending data with the following steps:
Open the companion repo that you cloned earlier in a terminal.
Create and Activate a new Python Virutalenv
python3 -m venv venv
source venv/bin/activate
Install Dependencies
pip install -r requirements.txtStart sending data
If everything worked, you should see output similar to this in your terminal:
SENT TO KINESIS: {'id': '8a69f3f5-432e-4ec1-8295-e8b79236e36e', 'name': 'Jessica Henderson', 'email': '[email protected]', 'message': 'Eye evening ahead field. With energy all personal soon sense. Method decision TV that.'}
SENT TO KINESIS: {'id': 'd4a90b48-cbcd-45ca-a231-3edbbc0c4792', 'name': 'Thomas Cuevas', 'email': '[email protected]', 'message': 'People write from season. Upon drive before summer exactly tonight practice expert. Actually news reason particularly in should.'}
SENT TO KINESIS: {'id': '084083bc-114a-4cc5-8cd6-2e15fd26b6db', 'name': 'Nathan Ward', 'email': '[email protected]', 'message': 'Add school air visit physical range. Child that company late. Boy than remain. Early ability economy thought event option.'}
View Nightfall Findings in DynamoDB
As the data starts to get sent to Kinesis, the Lambda function that we created earlier will begin to process each record and check for sensitive data using the Nightfall Detection Rule that we specified in the configuration.
If Nightfall detects a record with sensitive data, the Lambda function will copy that record and additional metadata from Nightfall to the DynamoDB table that we created previously.

Conclusion
Congrats 🎉 You've successfully integrated Nightfall with Amazon Kinesis, Lambda, and DynamoDB. If you have an existing Kinesis Stream, you should be able to take the same Lambda Function that we used in this tutorial and start scanning that data without any additional changes.
Clean Up
If you'd like to clean up the created resources in AWS after completing this tutorial you should remove the following resources:
nightfall-kinesis-roleIAM Rolenightfall-demoKinesis data streamnightfall-lambdaLambda Functionnightfall-findingsDynamoDB Table
Using Redaction to Mask Findings
With the Nightfall API, you are also able to redact and mask your Kinesis findings. You can add a Redaction Config, as part of your Detection Rule, as a section within the lambda function. For more information on how to use redaction with the Nightfall API, and its specific options, please refer to the guide here.
Last updated
Was this helpful?