Posture Management for Google Drive
Loading...
Loading...
Loading...
Loading...
Loading...
Loading...
Loading...
Loading...
Loading...
Loading...
Loading...
Loading...
Posture Management security consists of protecting your sensitive data that is hosted in the cloud environment. An organization's security posture defines its readiness and ability to identify, respond, and recover from security threats and risks.
Nightfall's Application Posture Management solution is an innovative tool that transforms the landscape of SaaS application security, providing organizations with unparalleled visibility, control, and proactive defense against evolving cyber threats.
With Nightfall Security Posture management, security analysts can now proactively explore and review sharing and permissions settings across the SaaS environment. Nightfall's robust tools empower organizations to gain real-time insights, allowing for swift adjustments and automated prevention of security drift. Nightfall's posture management solution goes beyond monitoring, offering a dynamic and comprehensive approach to maintaining a secure SaaS app posture.
Some of the salient features of Nightfall Security Posture Management are as follows.
Real-Time Visibility: Nightfall provides immediate and continuous visibility into sharing and permissions settings, allowing organizations to stay ahead of potential security risks.
Automated Response: Swift and automated actions enable organizations to address security issues in real-time, preventing the drift and maintaining a secure SaaS environment.
Comprehensive Compliance: Nightfall's proactive approach ensures organizations meet and exceed compliance requirements, reducing the risk of fines, loss of business and reputational damage.
Dynamic Adjustment: Security teams can seamlessly adjust sharing settings, remove collaborators, or disable download/print permission, ensuring a flexible and responsive security posture.
Human Firewall Engagement: Nightfall facilitates communication with end-users, reducing the likelihood of human error and enhancing overall security awareness.
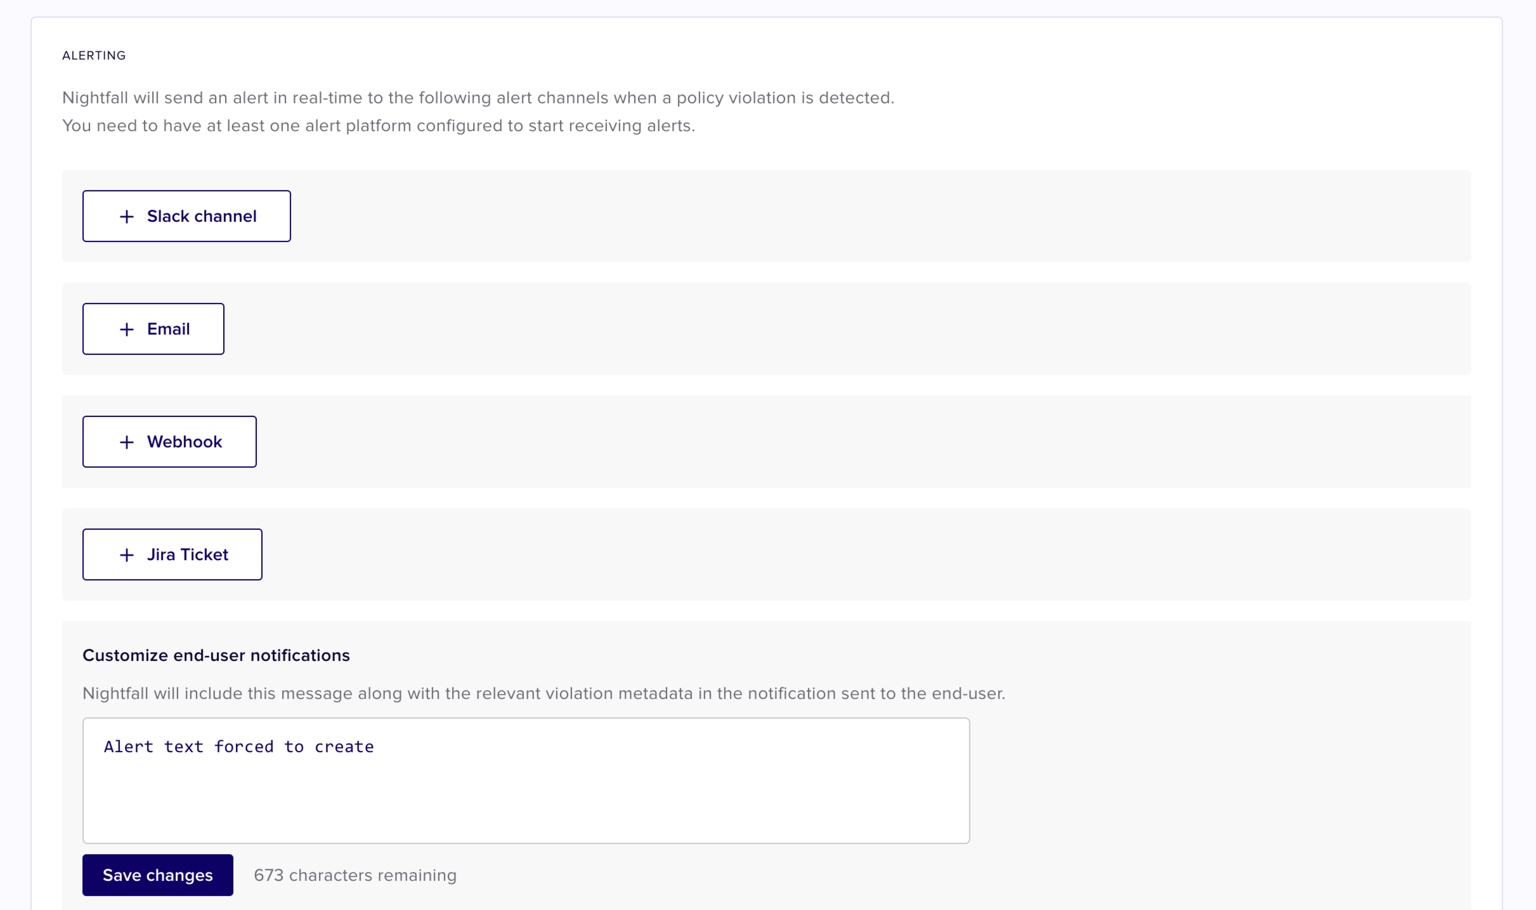
Nightfall for Google Drive allows you to configure alerts at the policy level and also at the integration level. Alerts can be sent in Google drive by using the following alert channels.
Slack
Webhook
Jira Tickets
When you configure alert settings at the integration level, the alert settings apply to all the policies, created for the Google Drive integration. However, when you configure alert settings specifically for a policy, which is created in the Google Drive integration, the alert settings are applicable only for that specific policy.
This document explains how to configure alerts at the integration level. To learn about how to configure alerts at the policy level, read this document.
To use Slack as an alert platform, you must first perform the required Slack configurations. You can refer to this document to learn more about how to configure Slack as an Alert platform.
To use Webhook as an alert platform, you must first perform the required Webhook configurations. You can refer to this document to learn more about how to configure Webhook as an Alert platform.
To use JIRA as an alert platform, you must have the DLP for the JIRA app installed from the Atlassian Marketplace. You can read more about the DLP for JIRA integration here.
You can configure alerts at the integration level once you have installed the Nightfall for Gmail DLP integration.
To configure alerts at the integration level:
Navigate to the Gmail DLP integration
Scroll down to the Alerting section.
You can configure one or multiple alert channels.
To configure Slack as an alert channel, click + Slack channel.
In the Slack alert channel field, enter the name of the Slack channel in which you wish to receive the alerts.
Click Save.
A confirmation pop-up box is displayed to confirm if the Slack channel (entered in the second step) must be used only for Gmail DLP integration or all the Nightfall integrations.
Select No, only integration level to use the Slack channel only for Gmail DLP, or select Yes, please to use the selected Slack channel for all the Nightfall integrations.
Click + Email.
Enter the Email ID of the recipient who should receive the notifications.
Click Save.
A confirmation pop-up box is displayed to confirm if the Email ID (entered in the second step) must be used only for Gmail DLP integration or all the Nightfall integrations.
Select No, only integration level to use the Slack channel only for Gmail DLP, or select Yes, please to use the selected Slack channel for all the Nightfall integrations.
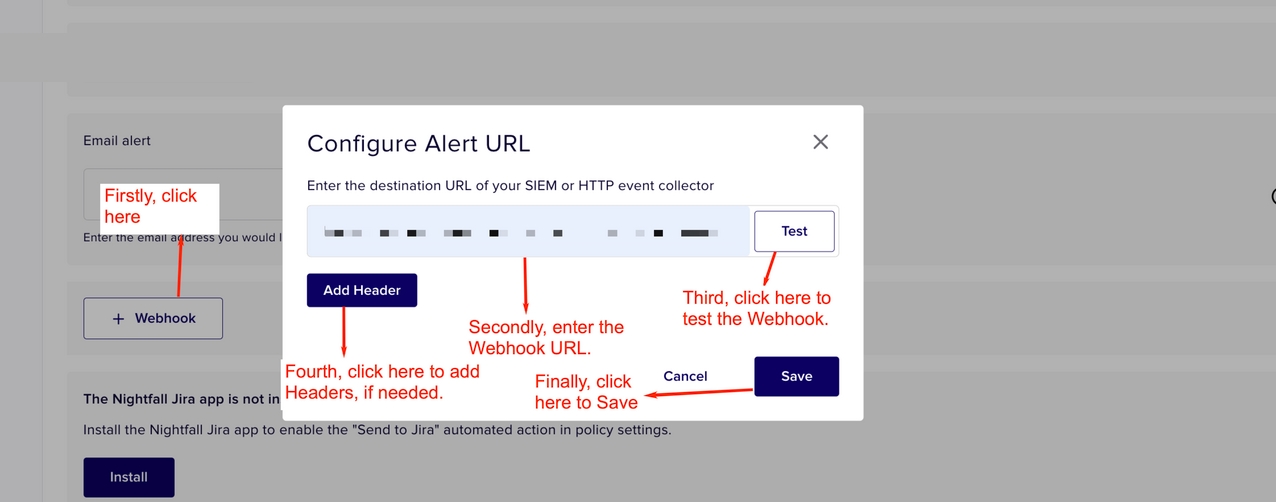
Click + Webhook.
Enter the Webhook URL.
Click Test. If the test result is not successful, check the Webhook URL.
(Optional) Click Add Header to add headers.
Click Save.
When you configure alerts to a Webhook, Nightfall AI sends occasional posts to:
To validate that the Webhook is properly configured before the policy is saved.
Periodically thereafter to ensure that the Webhook is still valid.
The response to the test Webhooks is 200 status code if successful.
An example of Webhook request is as follows.
This is part of alert event consumption and can be ignored.
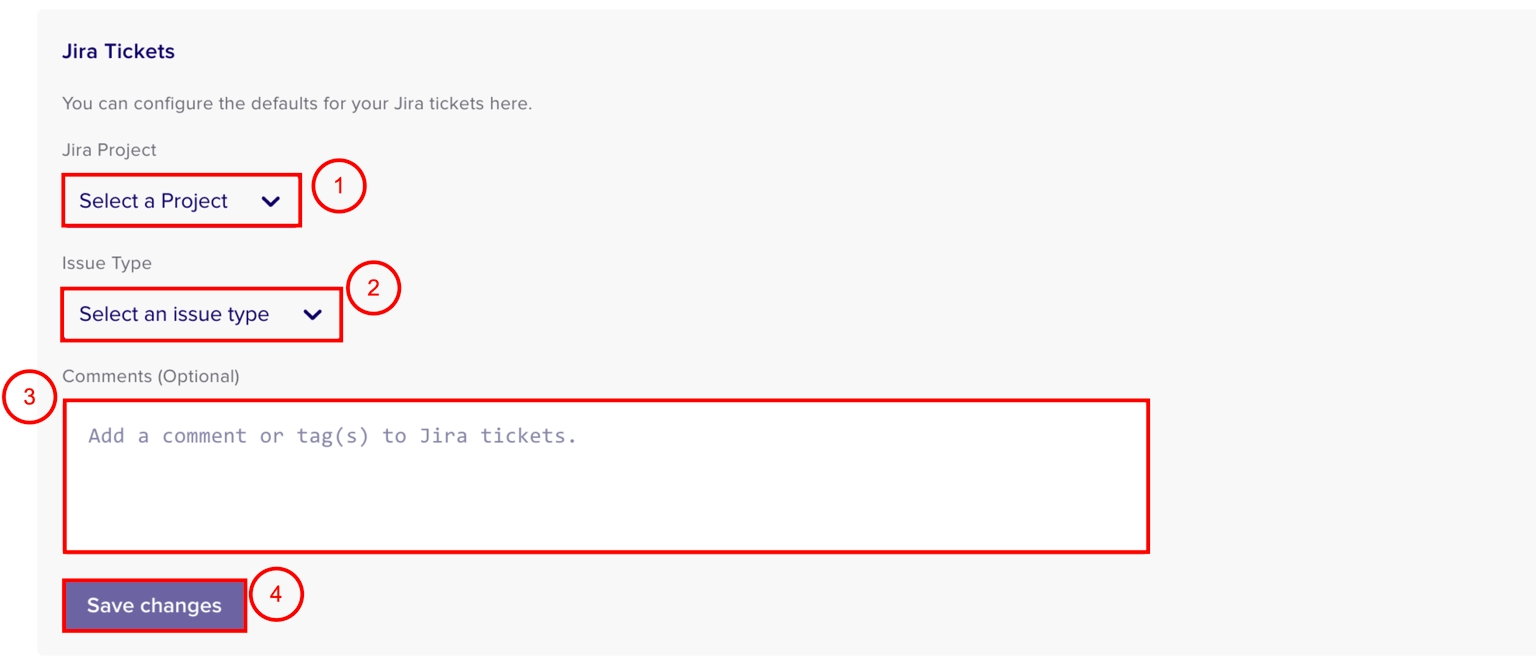
Click + Jira Ticket.
Select a JIRA project from the Jira Project drop-down menu.
Select an issue type from the Issue Type drop-down menu.
(Optional) Add comments to be added in the JIRA ticket.
Click Save changes.
A confirmation pop-up box is displayed to confirm if the JIRA settings configured for the Gmail DLP integration must be applied to all the other Nightfall integrations too.
Select No, only integration level to use the configurations only for Gmail DLP, or select Yes, please to use the selected JIRA configurations for all the Nightfall integrations.
When a Violation occurs, Nightfall sends a notification to the end-user whose actions triggered the violation. While notifying the end-user, Nightfall also sends a text message. You can draft the text message to be sent to the end-user. This message applies to all the policies. Click Save changes once done.
Posture management policies in Nightfall allow you to monitor sharing settings changes that alter the security posture of your SaaS environment. The trigger of a Posture violation event consists of two parts: scope and action. Scope refers to the location where the event occurred. Action refers to the suspicious event which could be a posture alteration attempt.
When a policy detects such a possible posture change attempt, you can configure appropriate steps to remediate the user action. Nightfall provides multiple automated remediation measures and notification channels when a policy detects a posture alteration attempt. The remediation actions help you revert the posture change attempt. The notification channels can be used to notify appropriate stakeholders about the posture change attempt detected by Nightfall.
The detailed steps to configure the Google Drive Posture management policy is explained in the following documents.
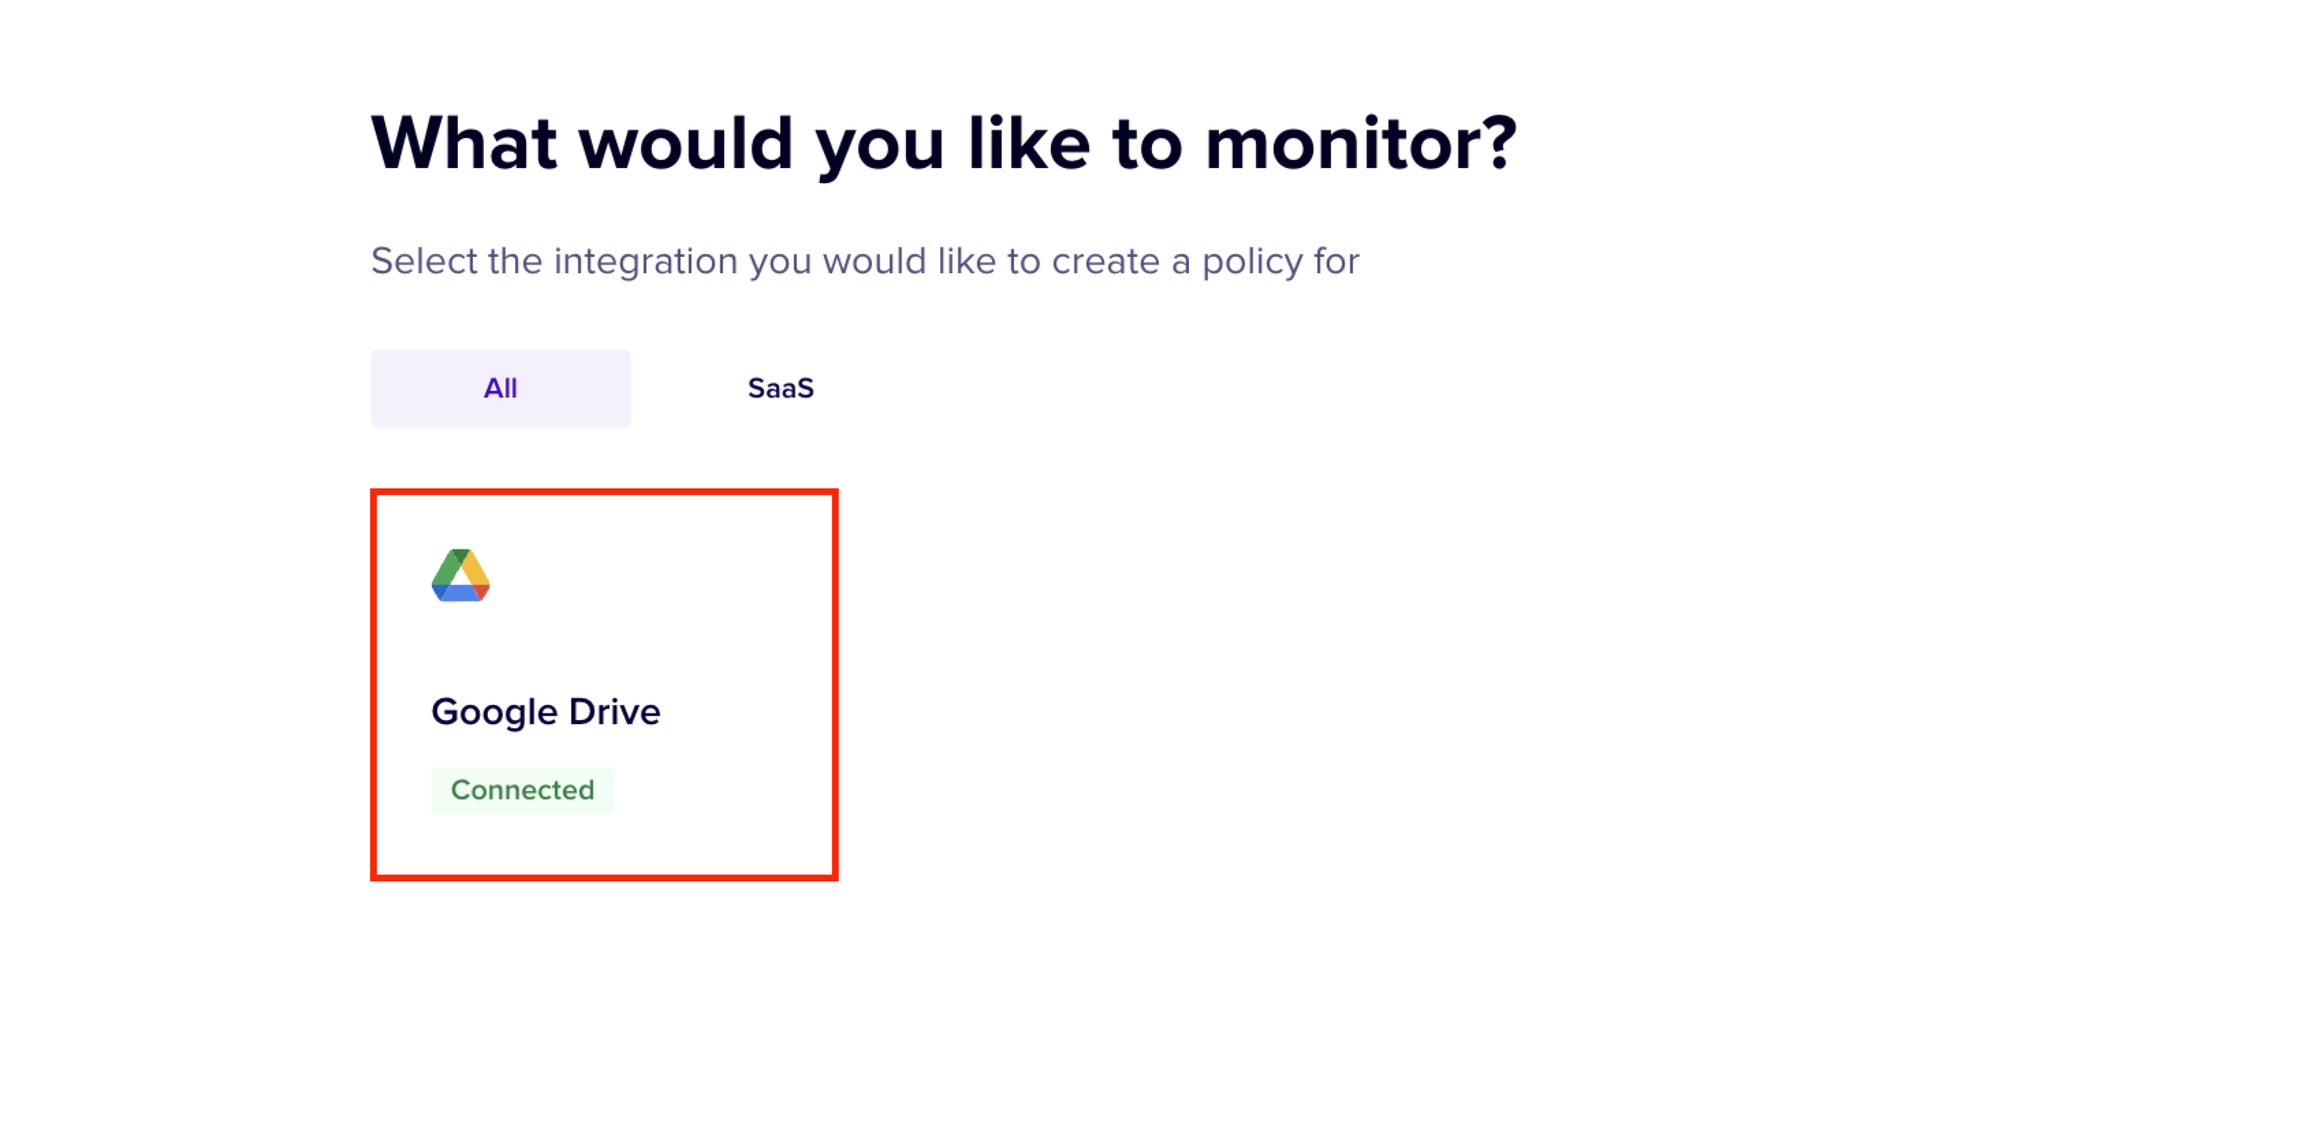
In this stage, you select the Integration for which the policy is created. In this case, Google Drive integration must be selected.
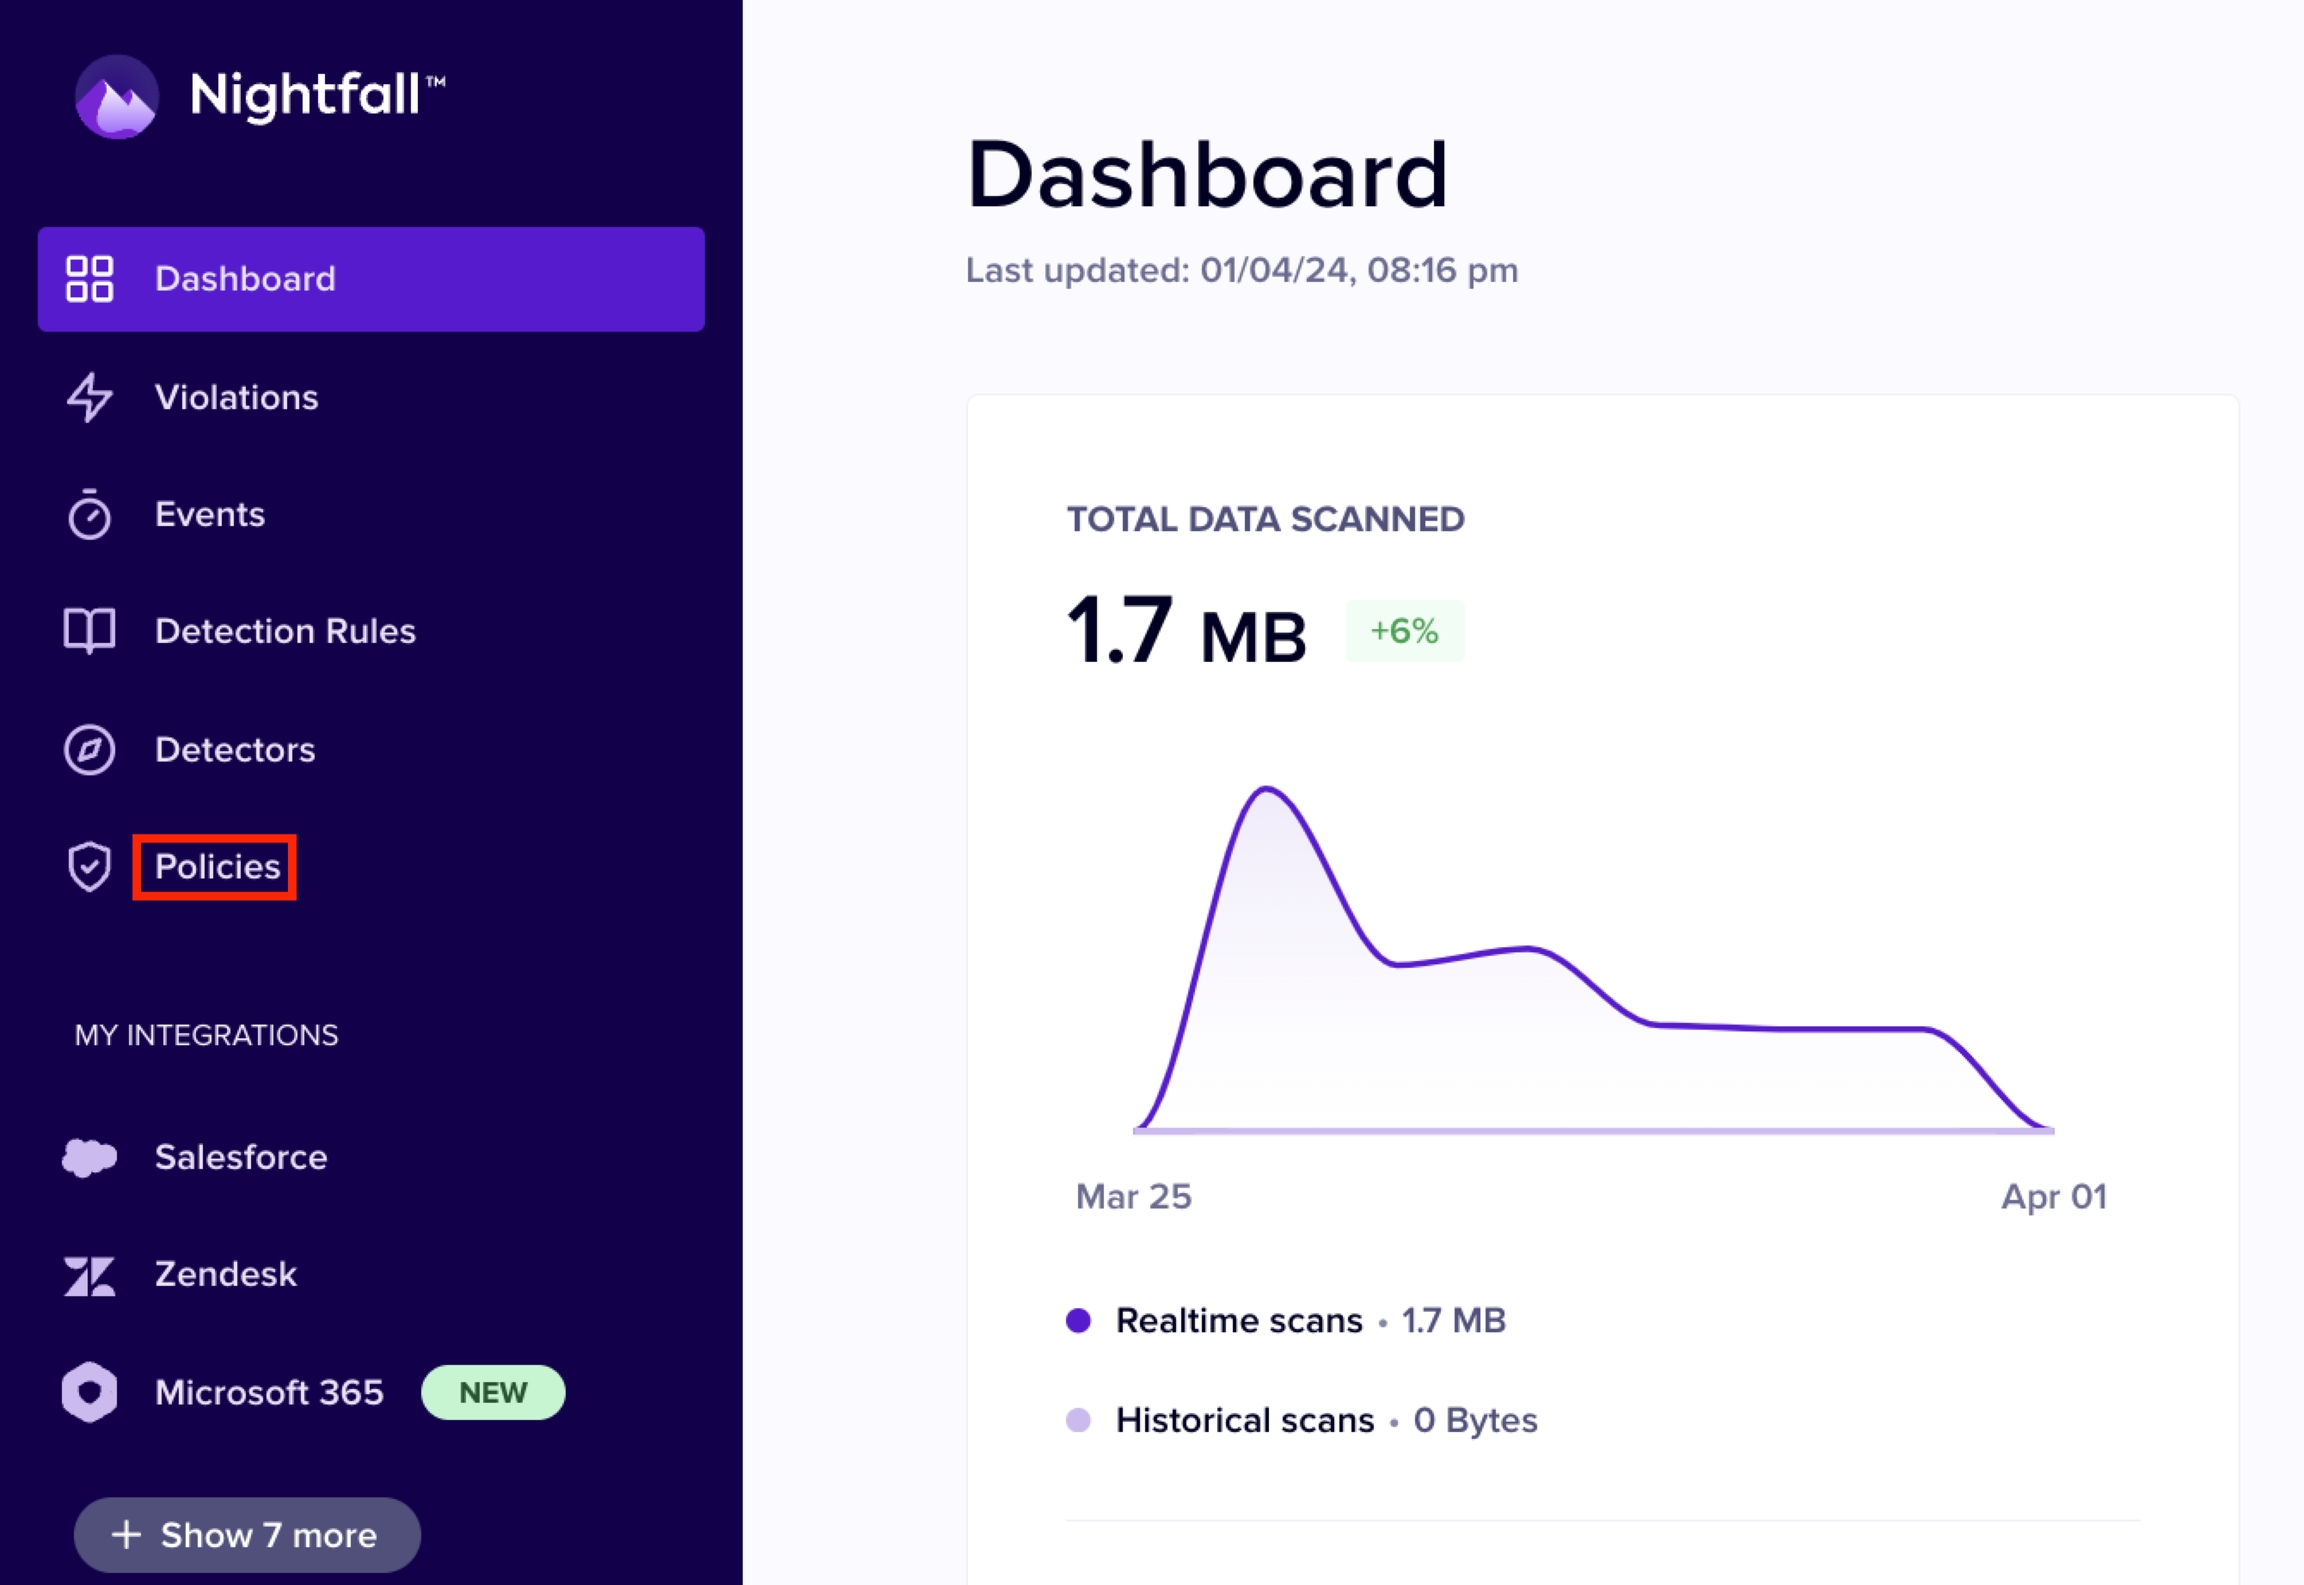
Click Policies from the left menu.
Click + New Policy.
Select Posture.
Select the Google Drive integration.
This document explains the steps to install the Nightfall for Google Drive.
To install the Nightfall DLP for Google Drive integration, you must have the following:
A Google Workspace account, preferably a service account.
An admin user account of your organization's Google Workspace account (or any other Google Workspace account) on which you wish to install the integration.
To install Nightfall for Google Drive:
Log in to Nightfall.
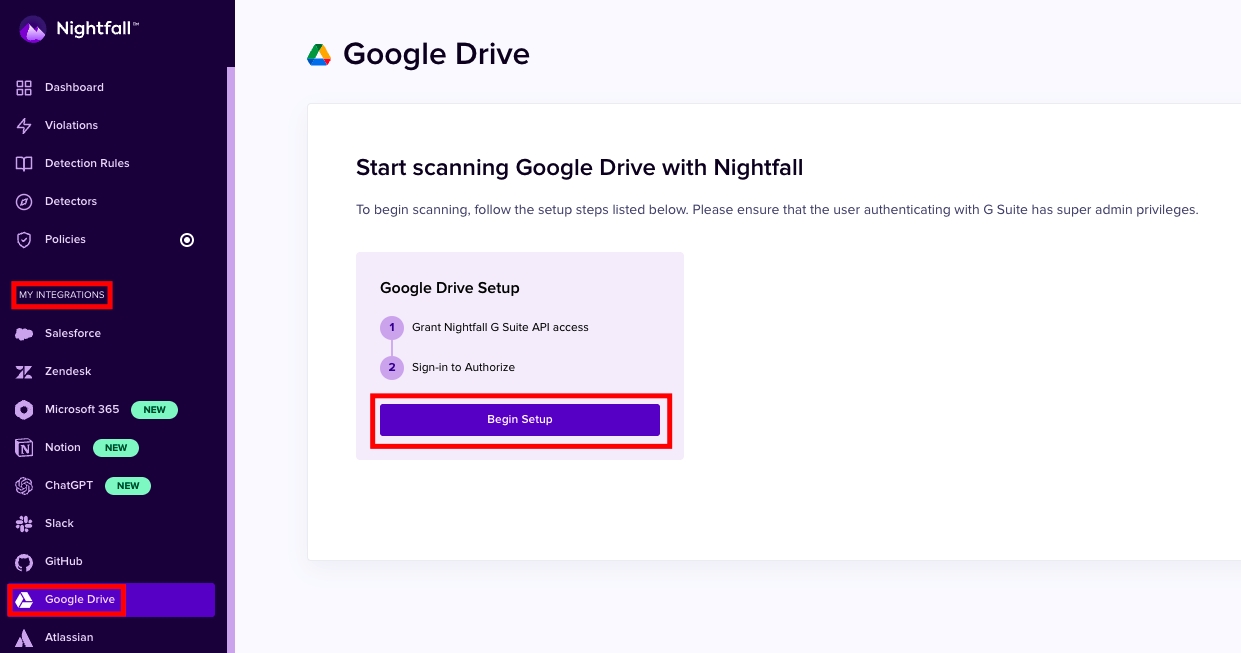
Click Google Drive under the MY INTEGRATIONS section (click Show more if you are unable to view Google Drive)
Click Begin Setup.
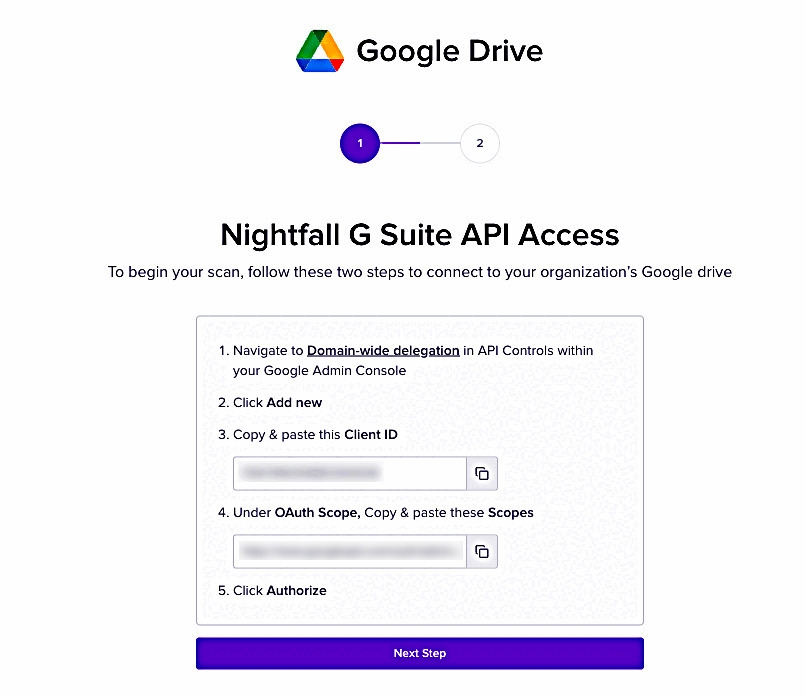
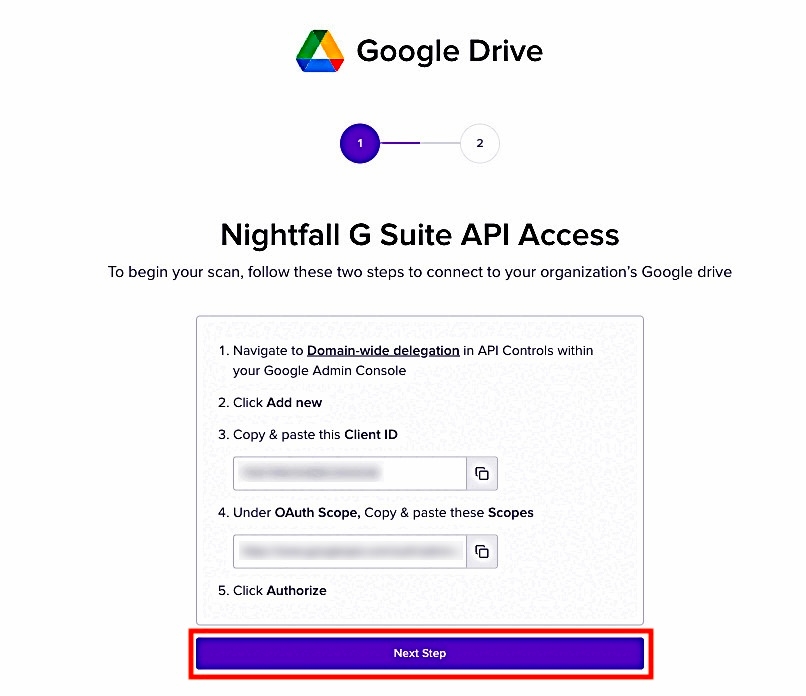
The access permission page is displayed as follows. Copy the client ID and Scopes ID generated.
Login to your Google Workspace with an admin account.
Click the menu icon.
Select Admin.
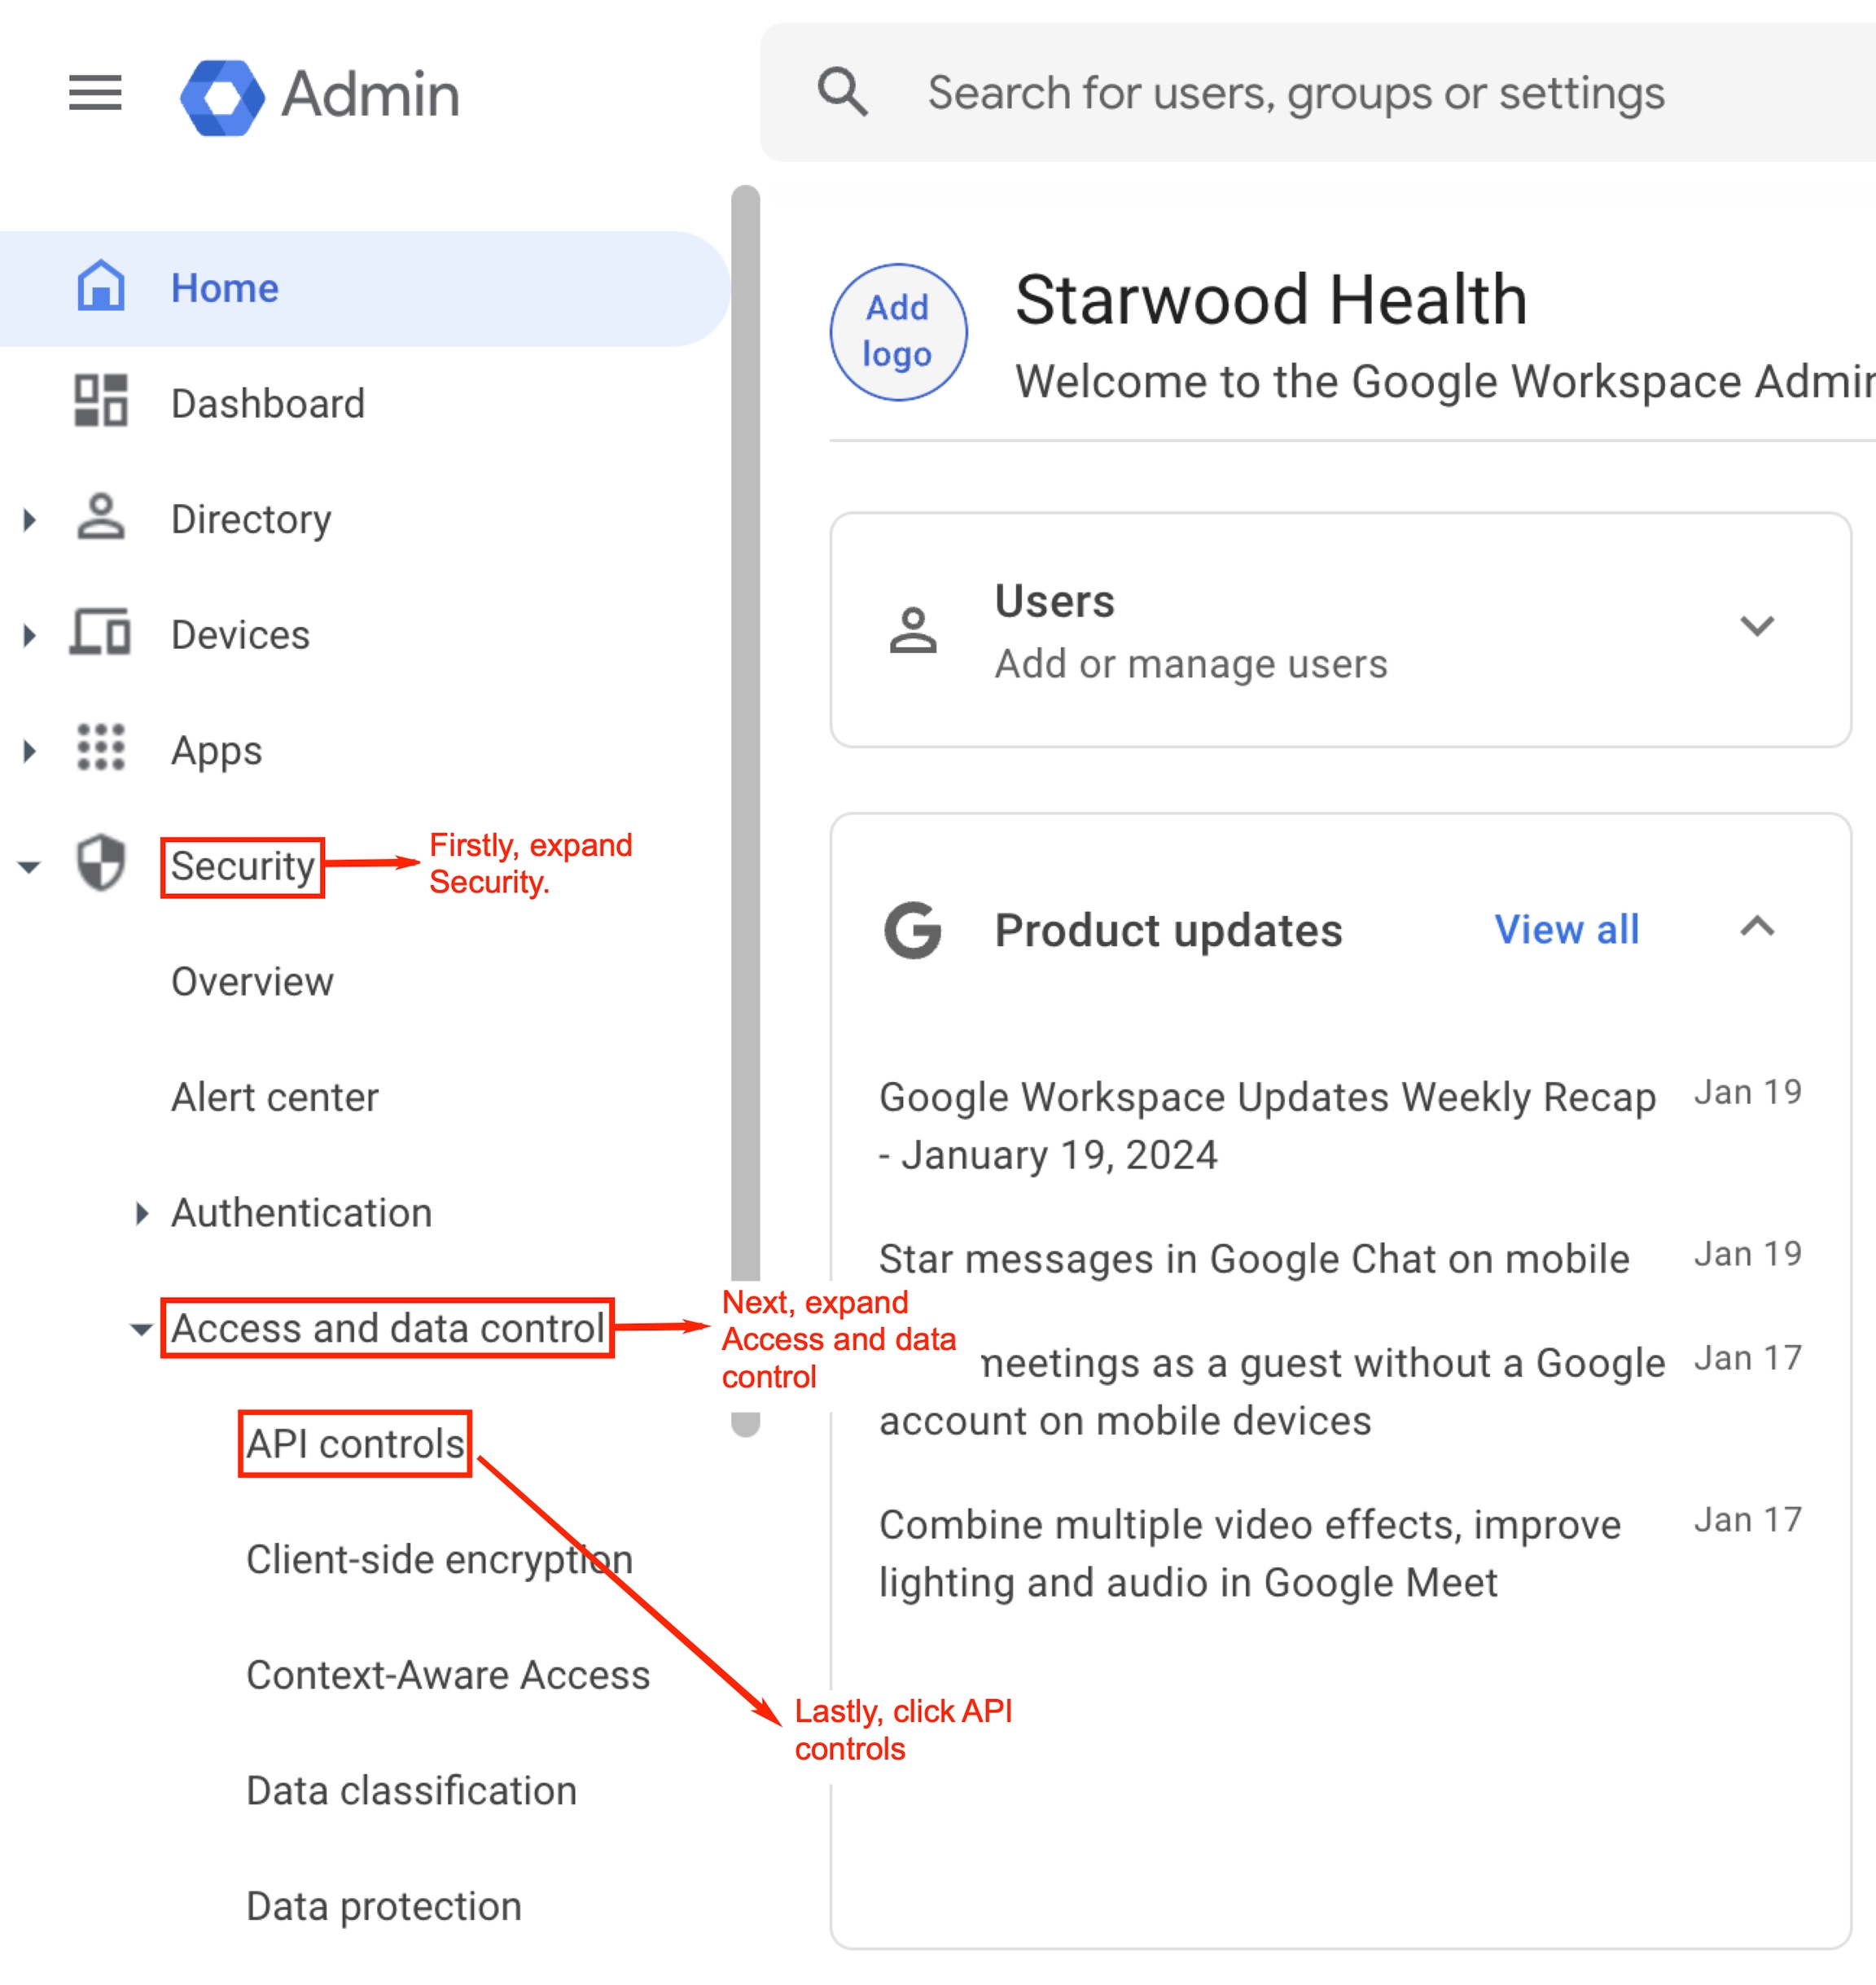
In the Admin console left pane, expand Security and then expand Access and data control.
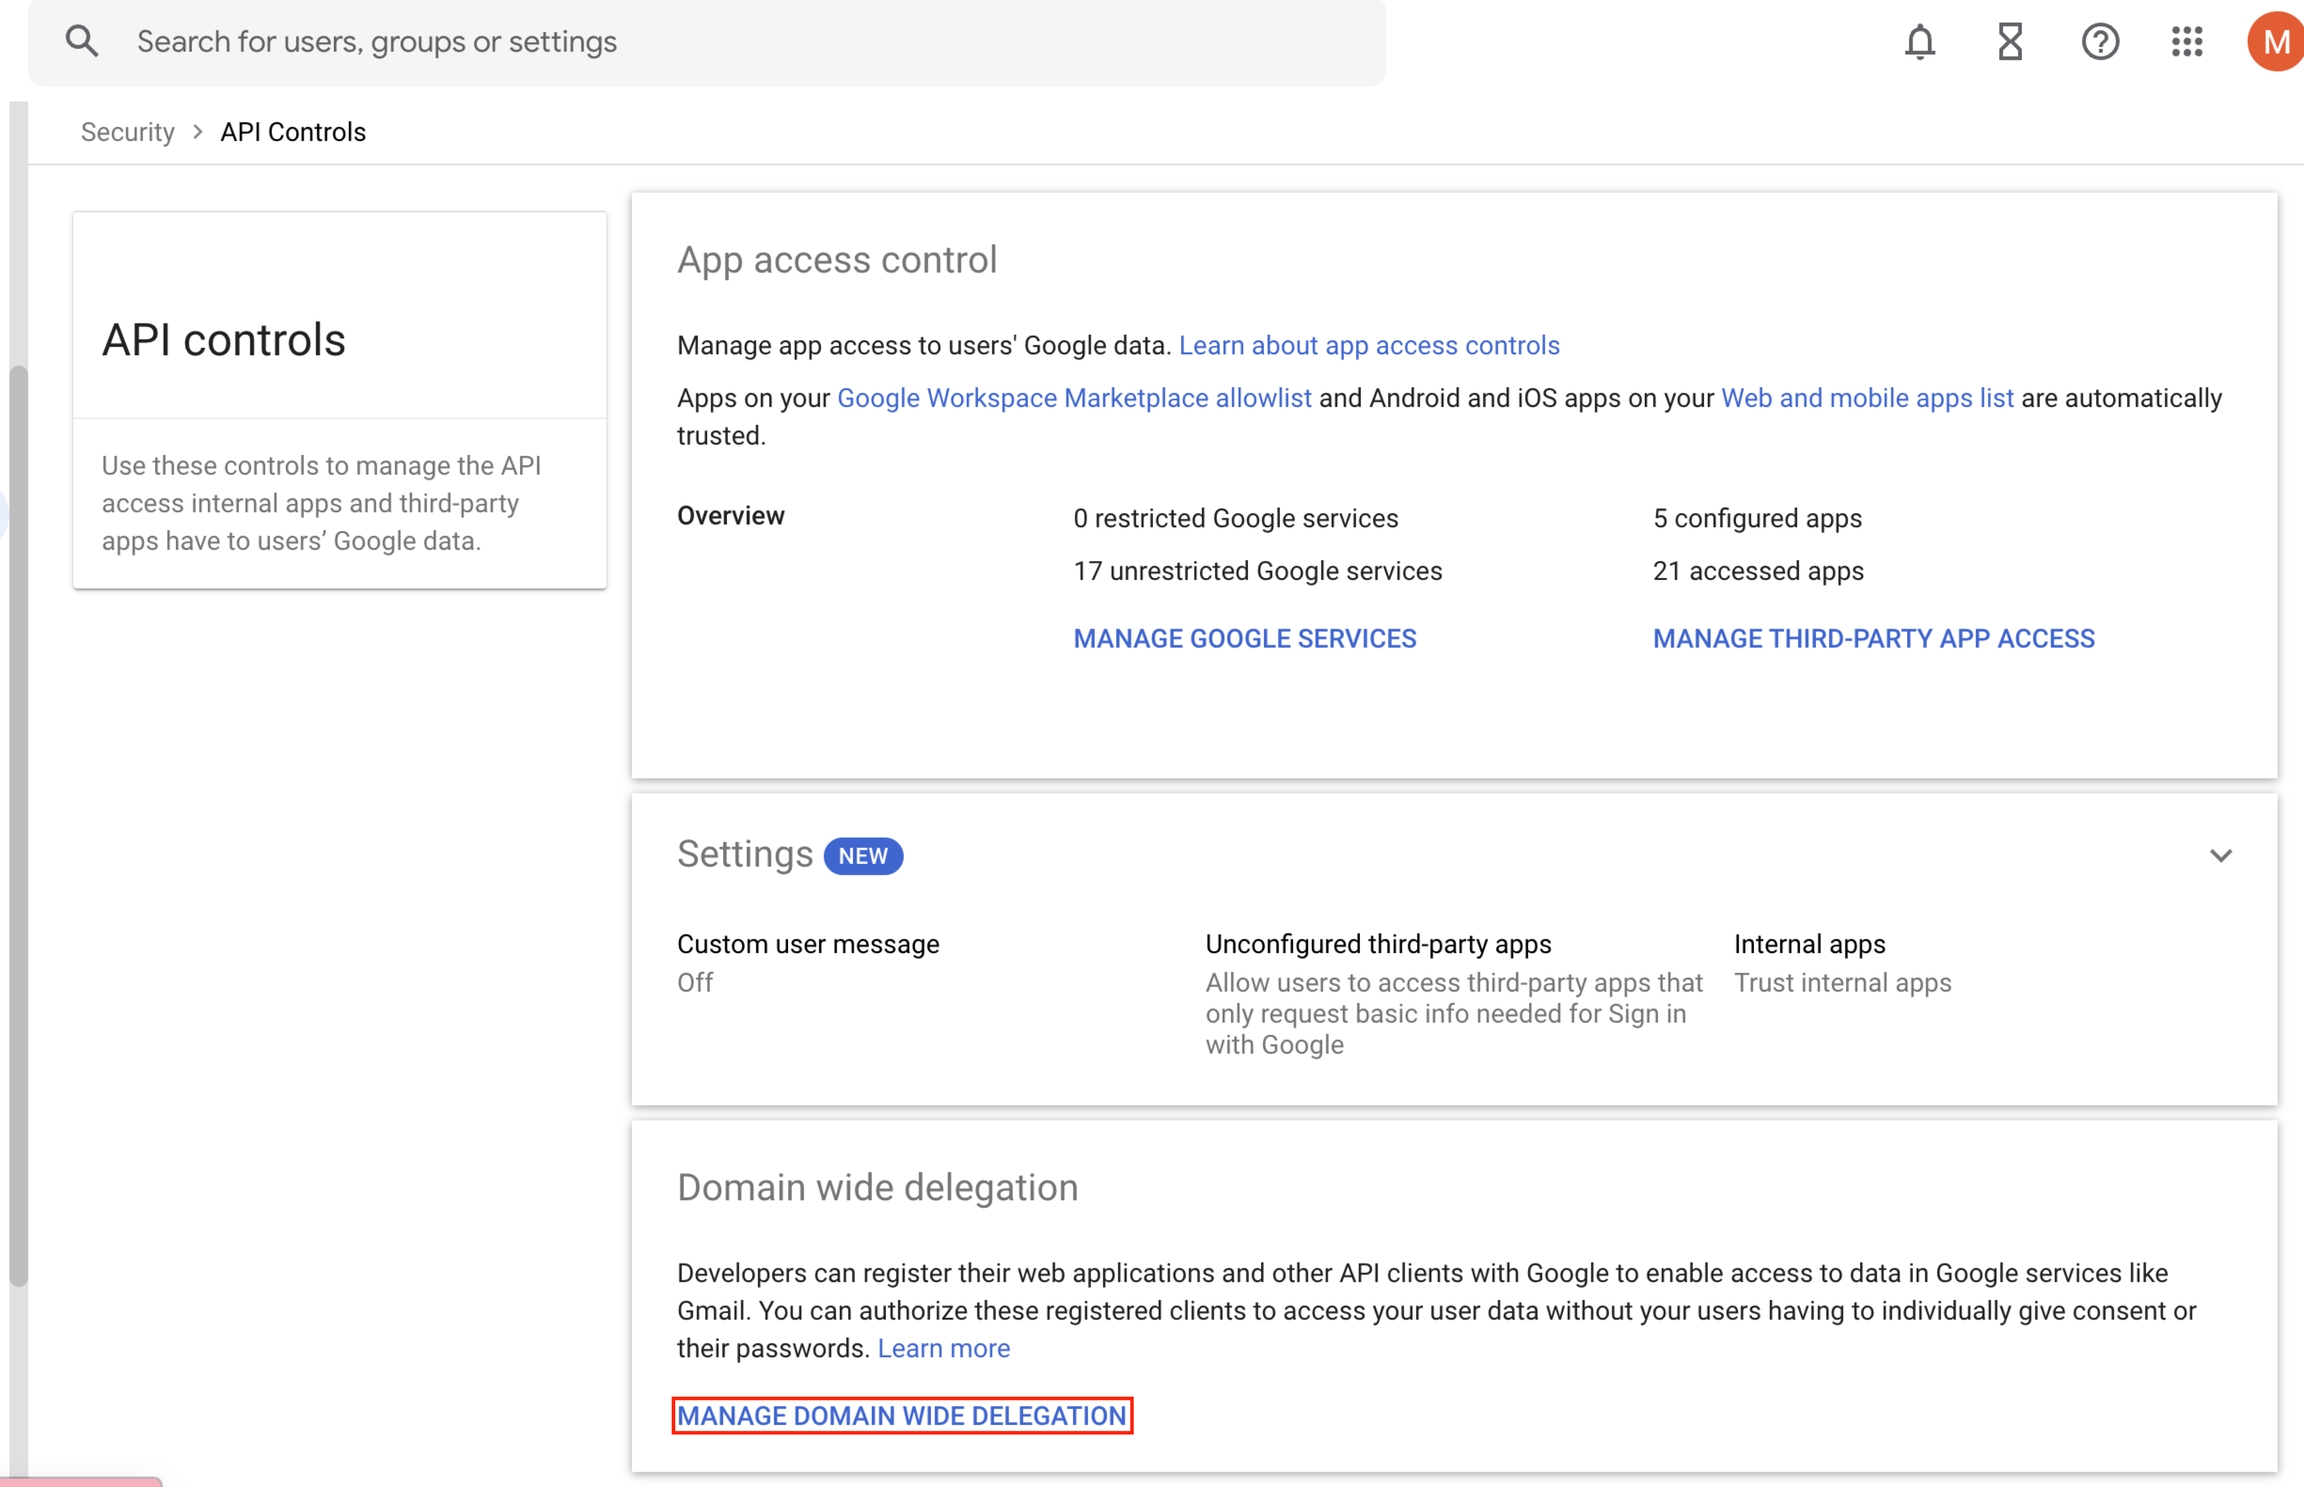
Click API controls.
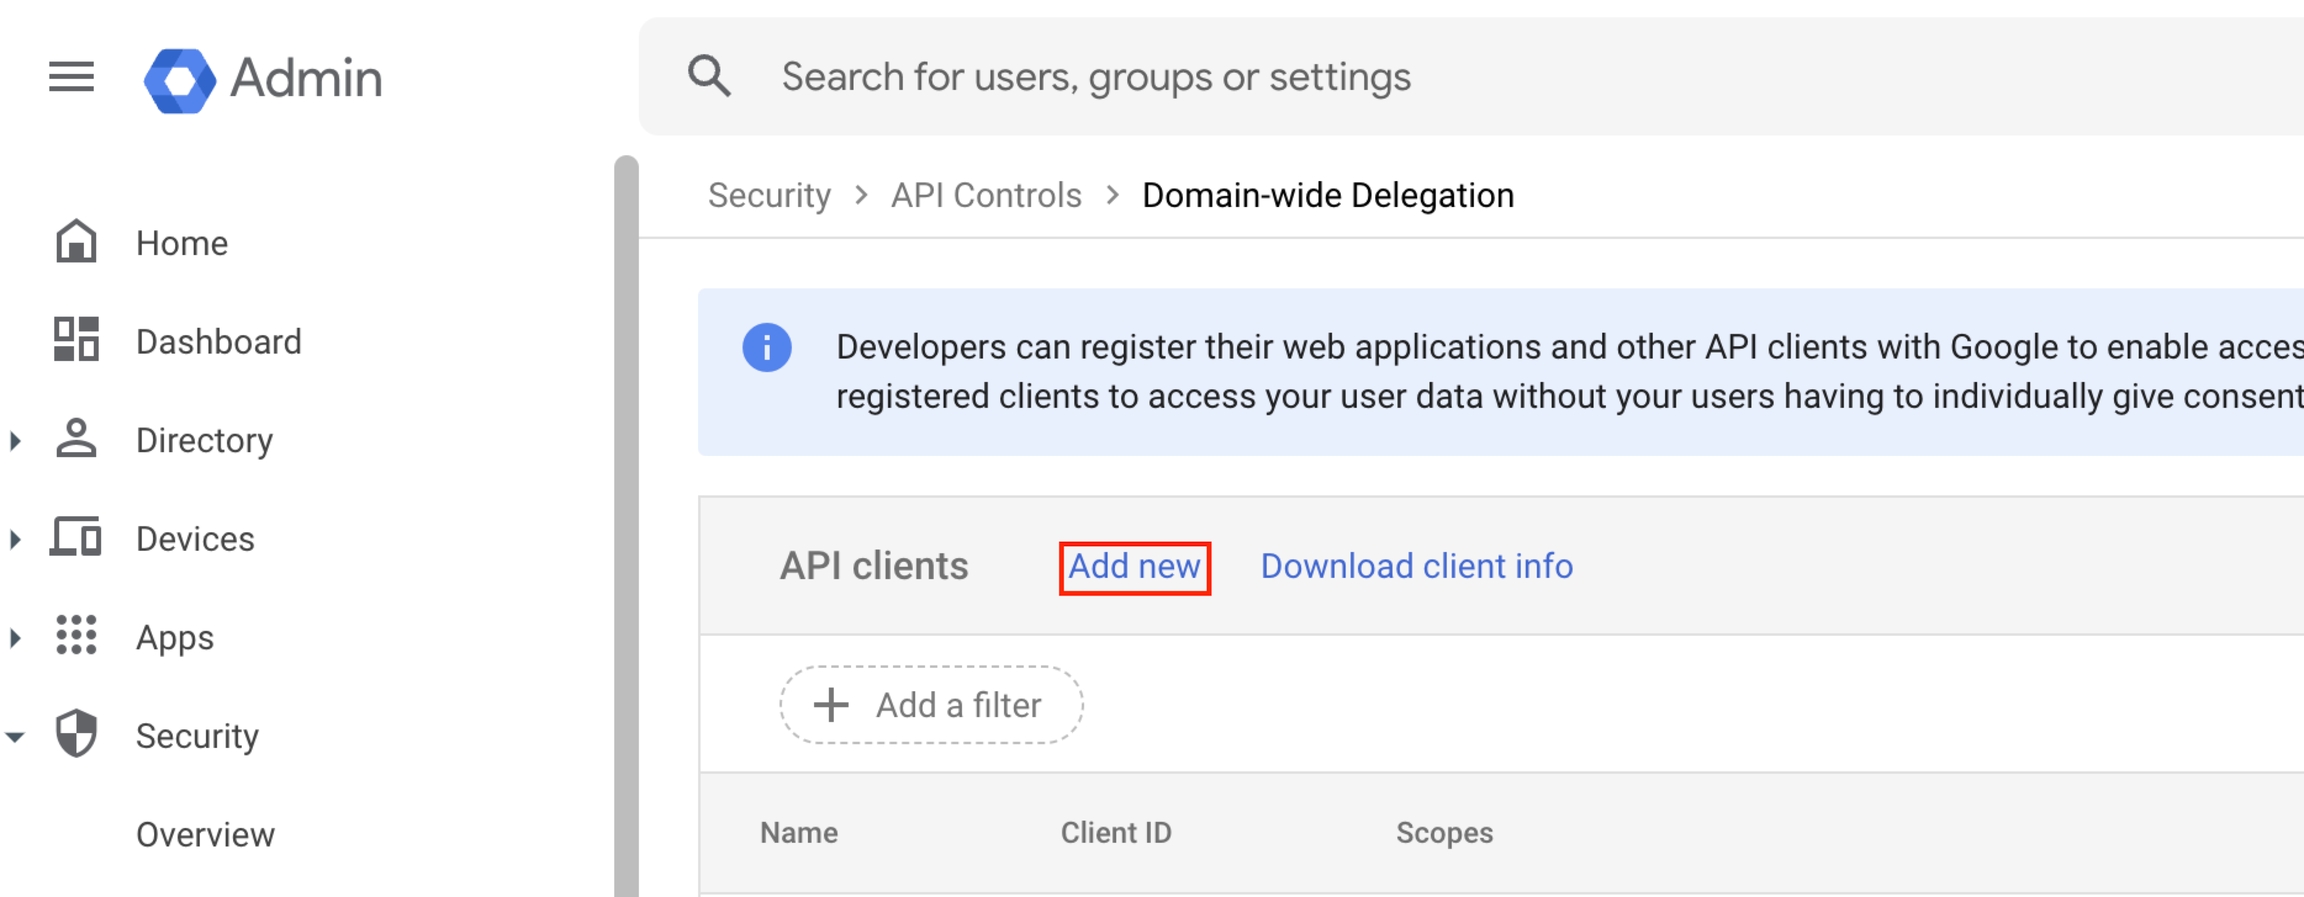
Click MANAGE DOMAIN WIDE DELEGATION under Domain wide delegation.
Click Add New.
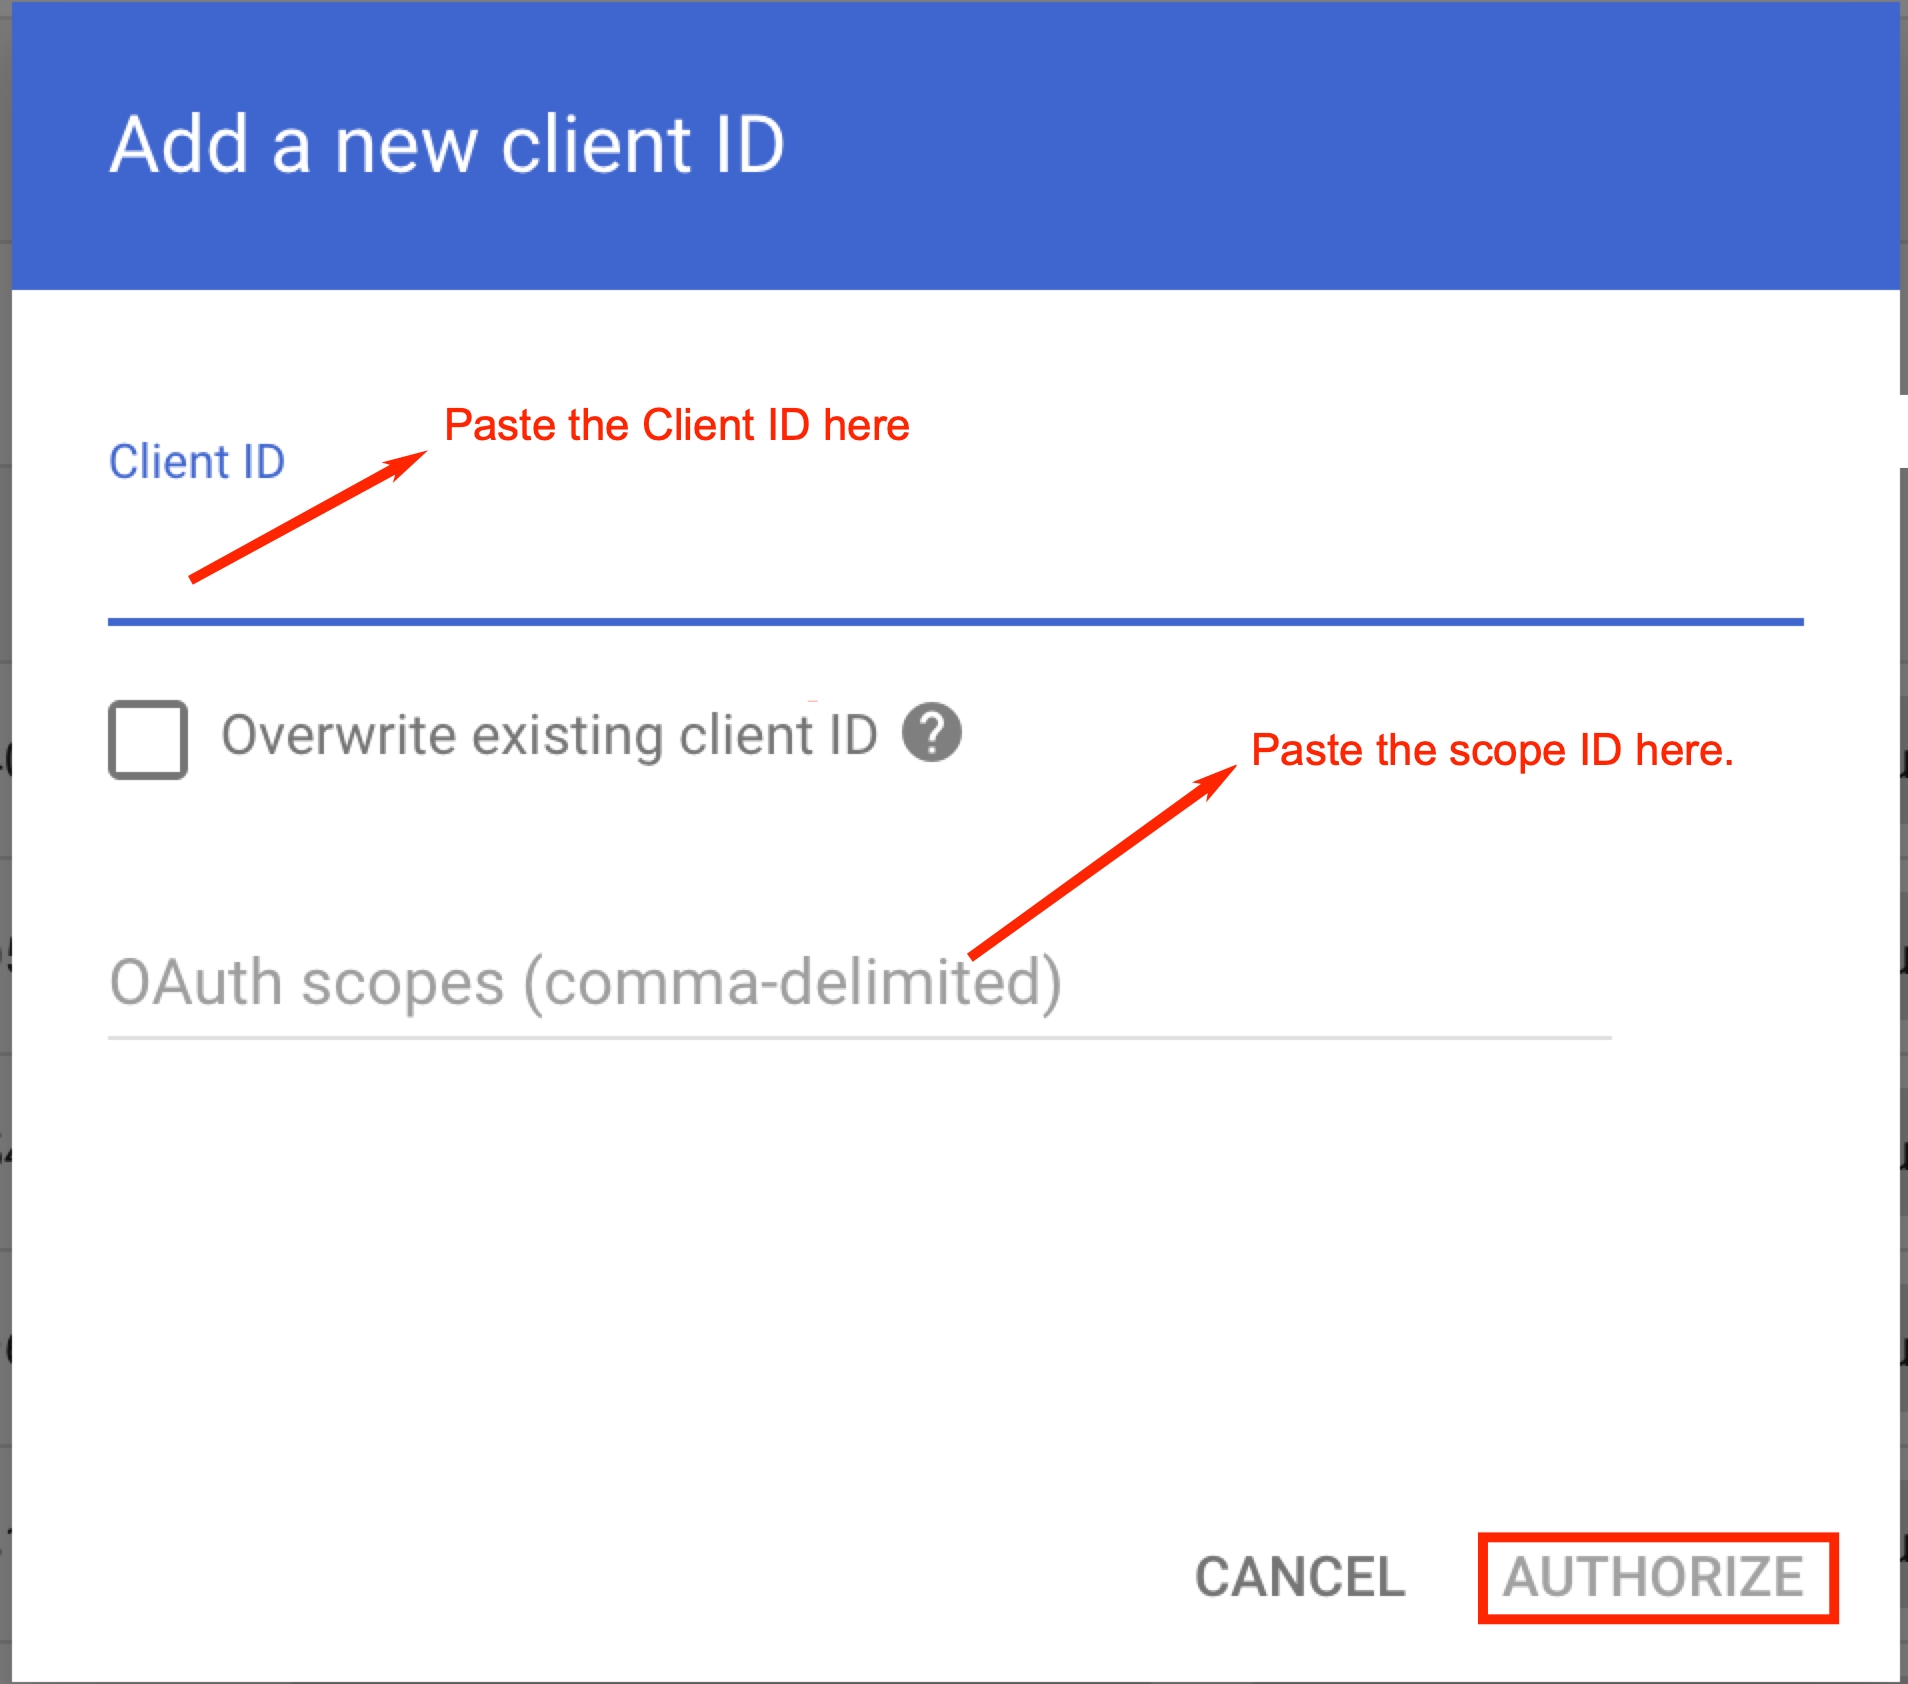
Paste the Client ID copied from the Nightfall app, in the Client ID field.
Paste the Scopes ID copied from the Nightfall app, under OAuth Scope field. Use comma to add multiple scope IDs.
Click AUTHORIZE.
Return to the Nightfall app and click Next Step.
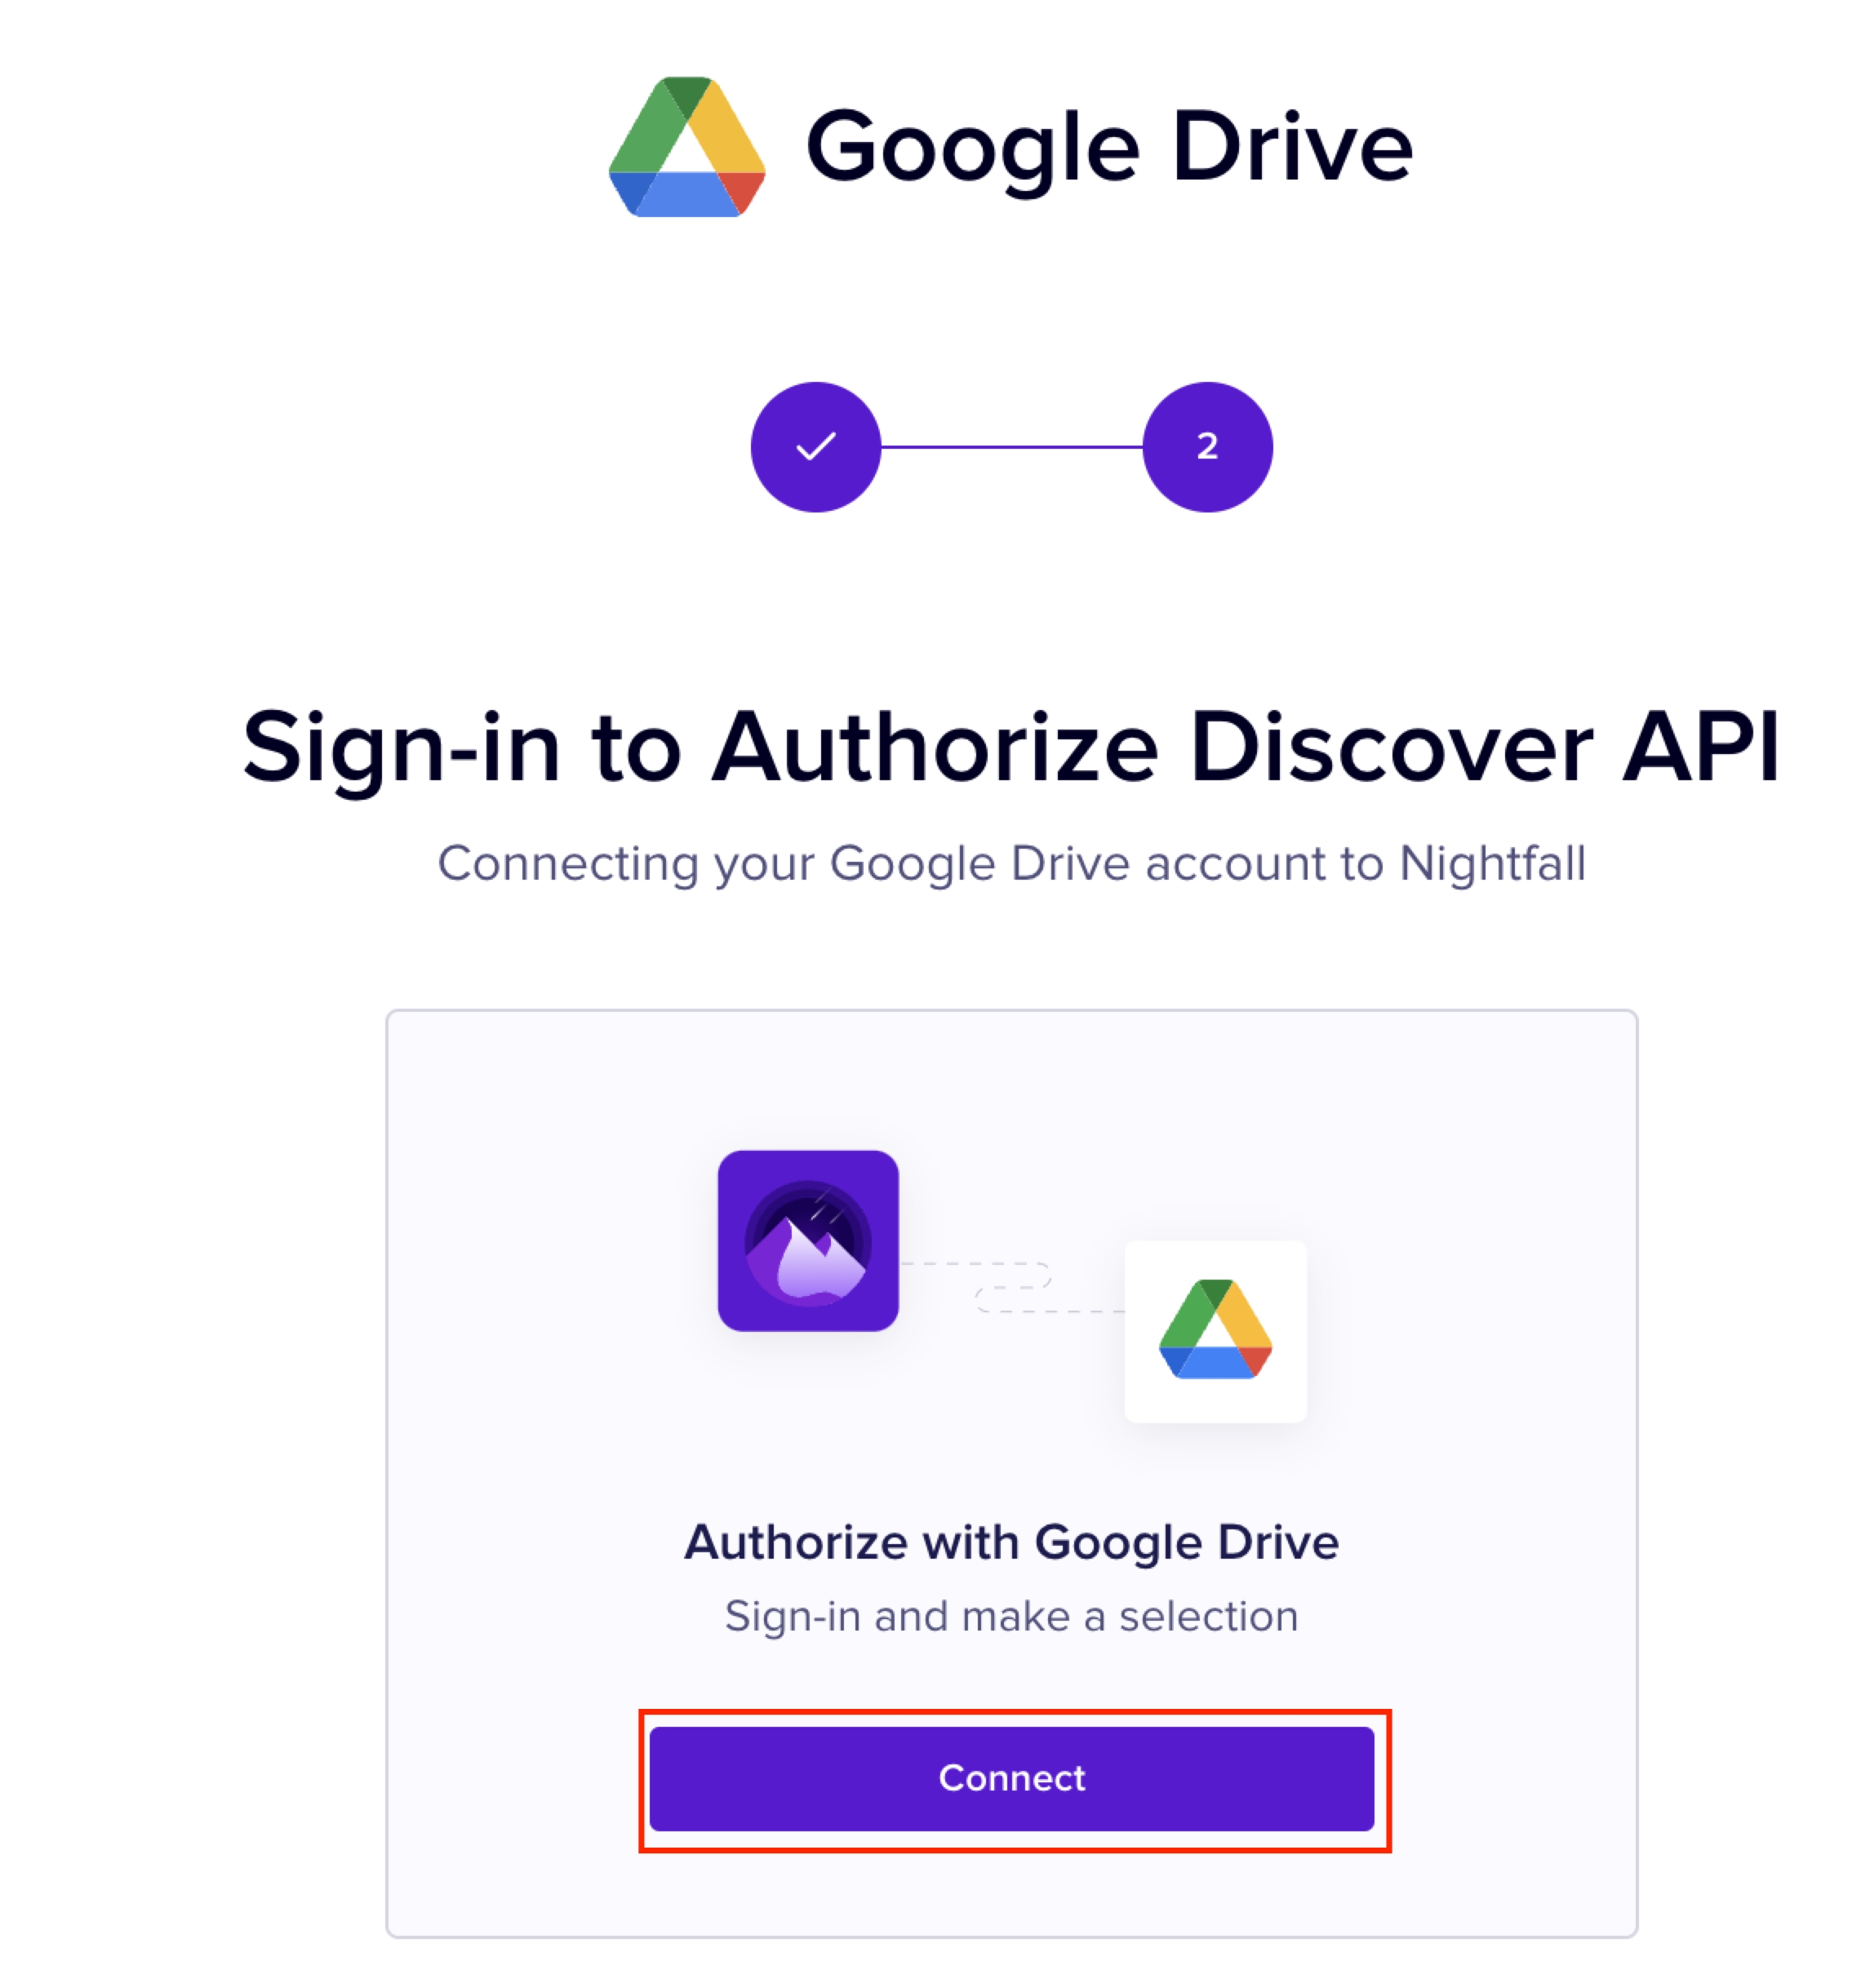
Click Connect.
Once the installation is completed, you can view the details of your Google Drive in the Nightfall app.
Once the installation is completed, Nightfall connects to your Google Workspace account and fetches all the domains. In the above image, you can see that 3 domains are fetched. These three domains were already present in your Google Workspace and are considered to be internal. You can add additional domains by clicking the ellipsis menu at the right end and selecting Manage Domains.
When there is a high volume of posture modifications in your organization, the scoping capability enables you to reduce the noise from low risk events so that you can zero in on genuine posture change events and resolve them.
Posture Changes can be scoped to:
Location: All or a specific set of drives
This allows you create flexible policies to monitor all or specific high-risk locations. This is a required scope for all policies.
User or User Group (Actor): Any or a specific set of users or user groups
This allows you to create custom policies for specific high-risk individuals or user groups. As such, you can create policies to monitor posture change activity by a disgruntled employee or departing employees. This can be set in combination to other scoping capabilities.
Permissions: Public, Organization or Restricted
This allows you to tailor your policies to drives or files with specific access restrictions. This can be set in combination to other scoping capabilities.
Detection rules: Any or a specific set of sensitive data protection detection rules
You can reuse any of detection rules you've already created or create new ones. This helps focus your detection on files which have associated sensitive data violations identified by your sensitive data scanning product. This can be set in combination to other scoping capabilities.
The Scope stage consists of two main sections.
Drive Selection: This section allows you to include various files and drives for monitoring. In this section, you can select the different types of drives to be monitored.
Add Filters: This section allows you to scrutinize your policy scope at more granular levels. While the Drive selection section allows you to select the whole drive to be monitored, this section provides you more granular level filters. You can select specific files within the selected drives for monitoring.
The Drive Selection section allows you to select various drives for monitoring. You can select either User Drives or Shared Drives to be monitored by Nightfall for posture changes.
This section allows you to select various drives in your Google Drive to be monitored. There are two options in this section. You can either choose to scan the User drives, Shared drives, or both.
User Drives: The User Drives is the personal drive of the user. The files in this drive are visible only to the owner of the file and other users to whom the owner has granted access. User Drive is commonly known as My Drive in Google Drive. To monitor a User Drive, you must select the User drives check box as shown in the following image.
IMPORTANT
If you choose to monitor the User drives, all the User drives in your Google domain are selected for monitoring. You do not have the option to choose specific User drives for monitoring.
Shared Drives: Shared drives are common storage locations accessed by all the users in your Workspace. To select this option, you must select the Shared drives check box.
IMPORTANT
If you choose to monitor the Shared Drives, you can select whether to monitor all the Shared drives or only specific shared drives. Nightfall provides the following options.
If you select the All Drives option, all the Shared drives in your Google Workspace are selected for monitoring.
If you select the All Drives, except for option, you can exclude some shared drives from being monitored.
If you select the Specific Shared Drives option, you get the option to choose specific Shared drives for monitoring.
The following image displays the scenarios when you select the Shared Drives check box.
If you select the All Drives, except for option, you must also select the shared drives which must be excluded from monitoring.
Similarly, if you select the Specific Drive(s) option, you must also select the specific shared drives which must be monitored.
The filters section provides you the flexibility to include and exclude users at a granular level.
For instance, in the previous section, irrespective of whether you selected Shared Drive, User Drive, or specific User Drives, you ended up selecting one or a set of Drives for monitoring.
Once you select the Drives to monitor, in this section, you can overlay additional filters to further scope your monitoring. Nightfall provides the following additional filters:
Specific User(s): Choose this option to monitor one or a specific set of internal users. Once you choose this option, Nightfall populates the list of users from the synced IdPs in Directory Sync. You must select the required users.
All users, except for: Choose this option to exclude specific individuals from your monitoring policy. Once you choose this option, Nightfall populates the list of users from the synced IdPs in Directory Sync. You must select the required users.
Note
If you have not configured the Directory Sync feature, the users list is populated from the Google Drive integration setup. As a result, you can see the Google Drive icon before the user name. However, if you have set up Directory sync, the users list is fetched from the IdP used for the configuration. In the above image, the users list is populated from the Microsoft Azure IdP and hence you can see the Azure icon before the users’ names.
Important
For exclusions, Nightfall only checks the file ownership. For inclusions, Nightfall checks both file ownership and shared access. This rule is applicable to all the filters.
Specific User(s): Choose this option to monitor one or a specific set of external users. Once you choose this option, you must manually enter the email ID(s) of the external users and hit the enter key.
All users, except for: Choose this option to exclude specific external users, from being monitored. Once you choose this option, you must manually enter the email ID(s) of the external users and hit the enter key.
Specific Group(s): Choose this option to monitor one specific or a set of internal groups. Once you choose this option, Nightfall populates the list of internal groups from the synced IdPs in Directory Sync. You must select at least one group.
All Groups, except for: Choose this option to exclude one specific, or a set of, internal groups from being monitored. Once you choose this option, Nightfall populates the list of internal groups from the synced IdPs in Directory Sync. You must select the required users.
Specific Group(s): Choose this option if you have external user groups defined in your IdP and would like to monitor one specific or a set of external groups. Once you choose this option, you must select at least one external user group to monitor then hit the enter key.
All Groups, except for: Choose this option if you have external user groups defined in your IdP and would like to exclude one or more external groups from being monitored. Once you choose this option, you must select at least one external user group to monitor then hit the enter key.
Before understanding the Permission filters, we must understand Google's General Access feature.
The general access feature in Google Workspace consists of three types of access, which are as follows.
Restricted: Files with this permission can only be accessed by users who have been granted access.
Target Audience: Files with this permission can be accessed by the users of the selected target audience group. There is a default target audience that gets created when the Google workspace is provisioned. This target audience has the same name as provisioned in the Google Workspace and includes all members of the organization. You can refer to this Google document to learn more about the target audiences.
Anyone with the Link: Files with this permission can be accessed by any user who has the file link.
Nightfall also provides inclusion and exclusion of files in policy scope that resembles the General Access sharing principle in Google Workspace. The Nightfall General Access permission options are as follows.
Restricted: Choose this option to scope monitoring to files with restricted access.
Shared with target audiences: Choose this option to scope monitoring to files shared with target audiences within your Google Workspace environment.
Anyone with the link: Choose this option to scope monitoring to files shared with anyone with a link.
The Nightfall Detection Rules consist of a single or multiple detectors. You can use this filter to either include all the detection rules or include only specific detection rules.
All: If you select this option, all the detection rules are included.
Specific Detection Rules(s): If you select this option, you must also select the required detection rules. Nightfall scans your files only for the selected detection rules.
A Label is a metadata that you can create to help users organize, find, and apply policy to files in Google Drive. To learn more about Google Drive Labels, refer to this Google document.
Before utilizing filters for Labels, you must enable Google Drive Labels as per instructions and create labels in your Google Drive.
You can choose one of the following options.
Specific Label(s): You must choose this option to monitor only those files that contain the selected Labels. Once you choose this option, you must select the Labels. Nightfall only monitors those files that have the selected labels.
All Labels, except for: You must choose this option to exclude the monitoring of files that contain the selected Labels. Once you choose this option, you must select the Labels. Nightfall does not monitor the files that contain the selected labels.
Once you zero down the policy Scope to the required devices and originating domains, you must now define the trigger actions that can be termed as Posture change events. When these trigger actions are performed on the scoped entities, Nightfall considers it as a violation and a Posture Management Event is created.
Nightfall provides you two types of trigger actions that you can set as Posture change events.
Changes Share Settings: Attempt to modify Link sharing settings (ex. from restricted to public) of a single or multiple Google Drive asset.
Gives Access: Attempt to provide access to a single or multiple Google Drive assets.
If an user changes the Sharing Settings of one or multiple assets, within a stipulated amount of time, it is considered to be a violation and a posture change event is created.
To use this Trigger action, you must select the Changes share settings option.
Once you select the Changes share settings option, you must select the Google share setting that must be used as a Trigger.
You must then select the number of assets and the timeline within which if the trigger action is implemented, Posture event must be raised.
For instance, in the following image if the Sharing setting of five Google Drive assets is modified to Public, within 1 hour, a Posture Event is created.
In this Trigger action, if an employee grants permissions to one or multiple assets within a short span of time, it is considered as a Violation by Nightfall and a Posture Management Event is created.
You must define the number of assets and the timeline. In the following image, if access is given to 5 or more assets within 1 hour, Nightfall considers it to be a Violation and triggers a Posture Event.
You can add filters to scope the generation of violations events to when asset access is granted to specific users, user groups, or domains.
Conversely, you can also add filters to prevent the generation of violations events when asset access is granted to trusted users, user groups, and domains. This helps you to reduce the noise from trusted sources.
The filters section consist of the following filters.
Specific user(s): You must select this option to monitor file access granted to specific internal users. Once you choose this option, Nightfall populates the list of users from the synced IdPs in Directory Sync. You must select the required users.
All users, except for: You must select this option to exclude the monitoring of file access, granted to specific internal users. Once you choose this option, Nightfall populates the list of users from the synced IdPs in Directory Sync. You must select the required users.
Specific user(s): You must select this option to monitor file access granted to specific external users. Once you select this option, you must manually type the email ID of the user and press the enter key.
All users, except for: You must select this option to exclude the monitoring of file access, granted to specific external users. Once you select this option, you must manually type the email ID of the user and press the enter key.
Specific group(s): You must select this option to monitor file access granted to specific internal groups. Once you choose this option, Nightfall populates the list of users from the synced IdPs in Directory Sync. You must select the required groups.
All users, except for: You must select this option to exclude the monitoring of file access, granted to specific external users. Once you choose this option, Nightfall populates the list of users from the synced IdPs in Directory Sync. You must select the required groups.
Specific Group(s): You must select this option to monitor file access granted to specific external groups. Once you select this option, you must manually type the email ID of the group and press the enter key.
All Groups, except for: You must select this option to exclude the monitoring of file access, granted to specific external groups. Once you select this option, you must manually type the email ID of the group and press the enter key.
Specific domain(s): You can use this option to only monitor if users belonging to specific domains are given access. To add a domain, type the domain name (example abcd.com) and hit the enter key. This option also allows you to include personal email domains by clicking the Add free personal email domains check box.
All Domains, except for: You can use this option to exclude monitoring of certain users who belong to a specific domain. To exclude a domain, type the domain name (example abcd.com) and hit the enter key. This reduces unwanted noise from sanctioned external collaboration. Note that you can also exclude monitoring of sharing with personal email accounts. This latter option is recommended if you already have an existing policy monitoring personal email (also recommended). This will ensure that your monitoring policies are mutually exclusive.
This document explains what admins and end-users can do once a policy is violated.
When end-users violate a policy, the Nightfall admin is notified about the incident. The notification channel used to notify the Nightfall admin depends on the settings configured in the section. If you have not enabled any notification channels in the Admin alerting section, Nightfall admins are not notified.
If you have enabled the email notification in the Admin alerts section, Nightfall admins receive an email. The email is as shown in the following image.
The Email consists of the following data.
Event: The event that caused the violation. For Google Drive, the event is always a download of assets.
Actor: The Email ID of the user who downloaded the file.
When: The date and time when the email was downloaded.
Where: The name of the file that was downloaded.
Policies Violated: The name of the policy that was violated.
Violation Dashboard: The link to the Events screen to view the violation in detail.
Actions: The list of actions that the Nightfall admin can take.
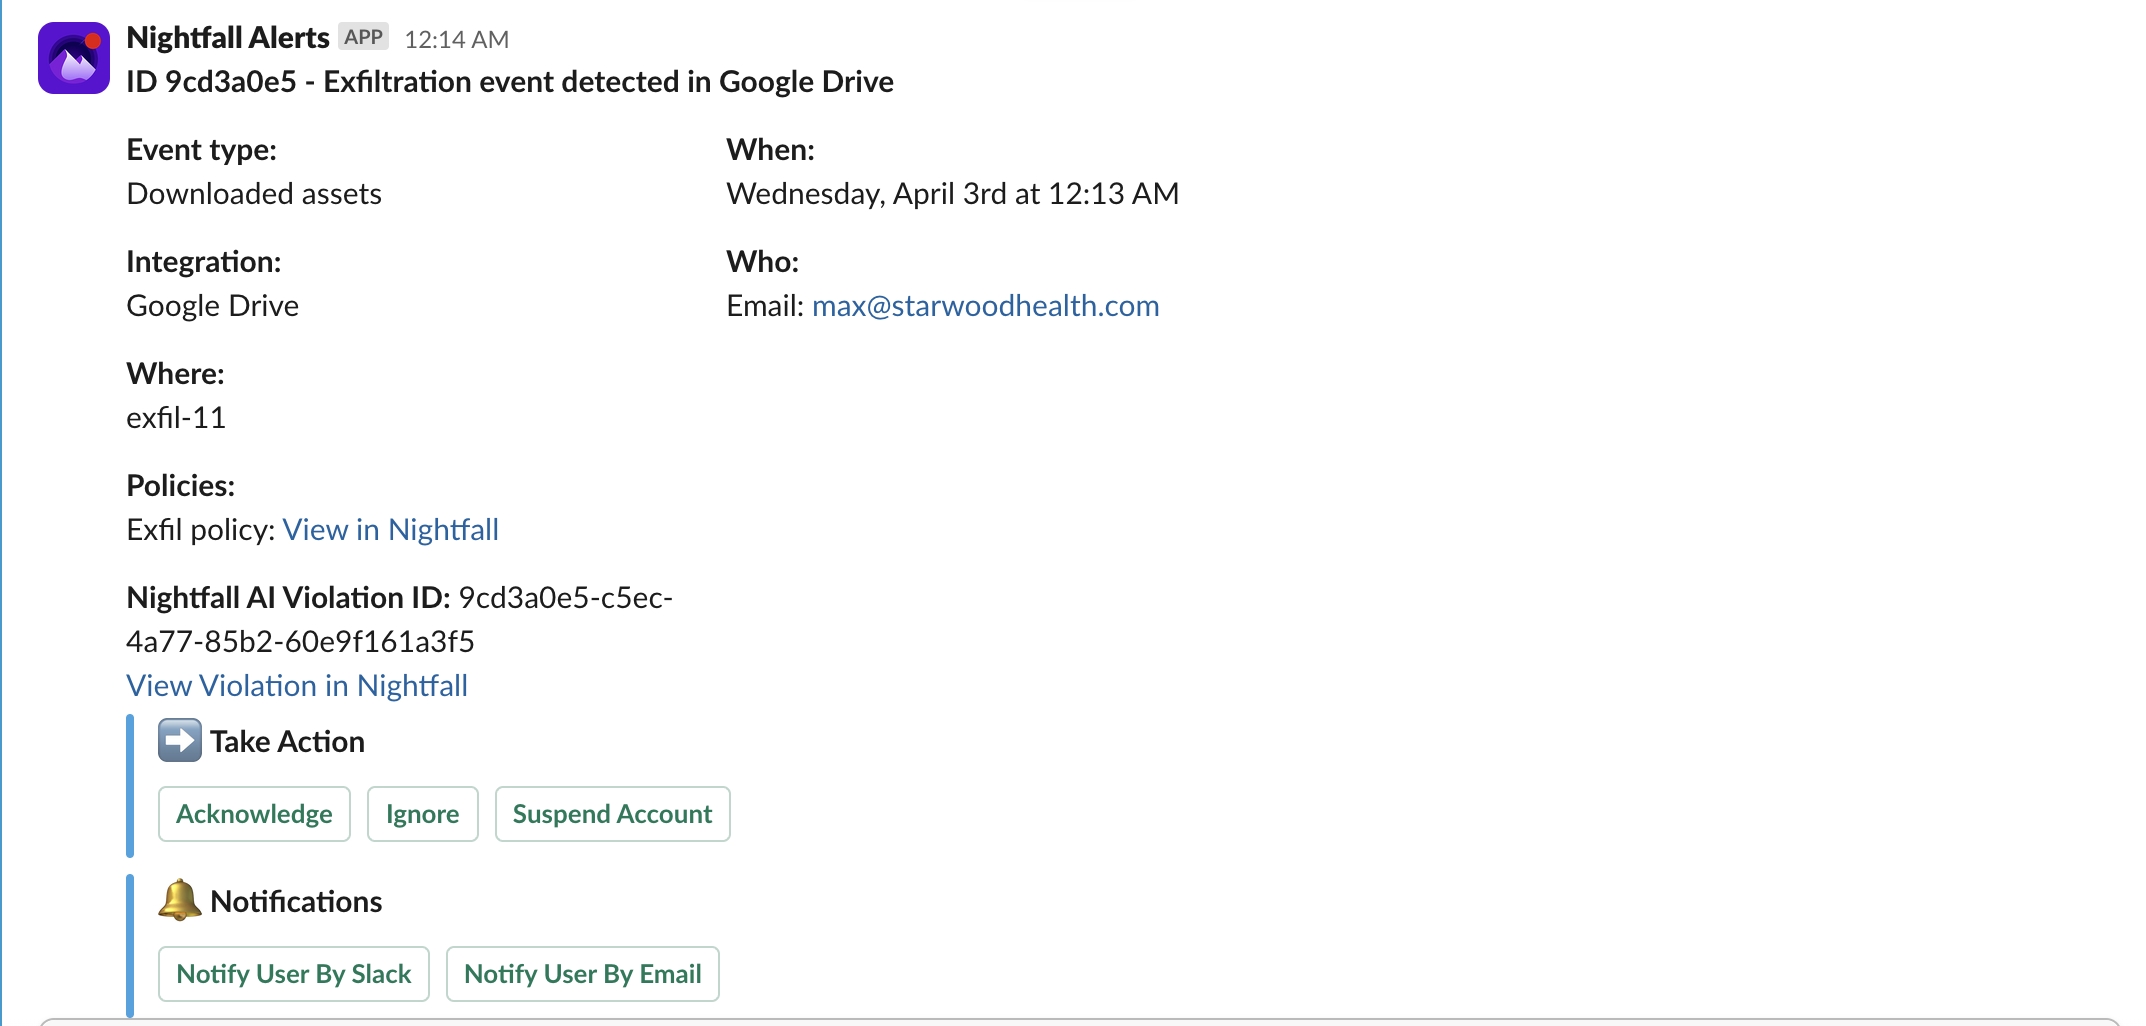
Also, a Slack message is sent if you have enabled the Slack alerts for the Nightfall admin. The Slack message looks as shown in the following image.
If you have configured the Email notification for end-users and enabled the end-user remediation, end-users can take remediation actions from the Email itself.
The end-user Email for adding external users violation is shown in the following image.
The end-user Email for adding Changing Share settings violation is shown in the following image.
If you have configured Slack notifications for end-user and enabled end-user remediation, end-users can view the Slack message.
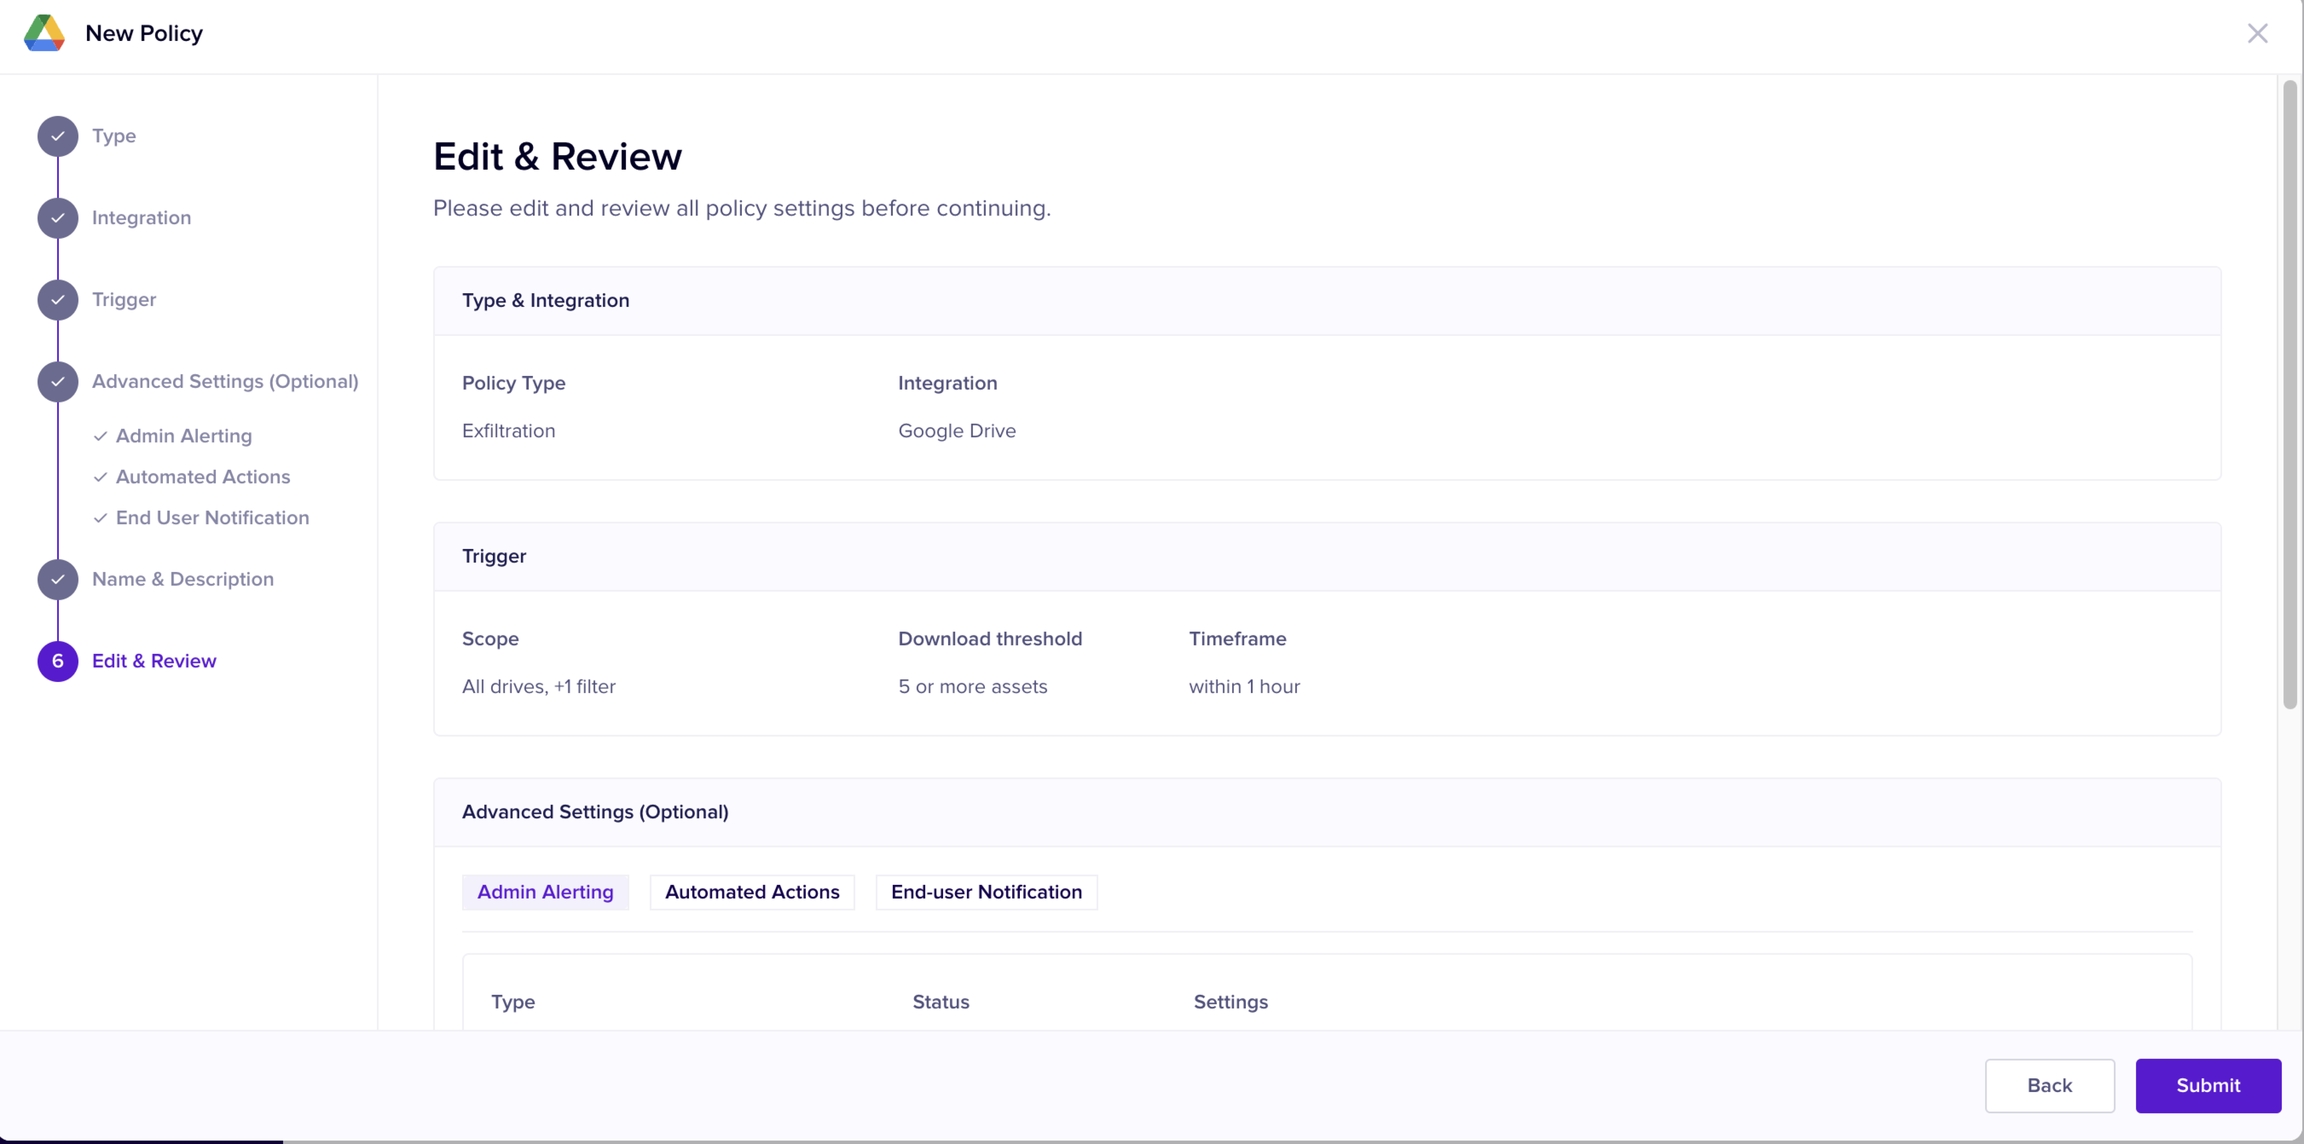
In this final stage, you assign a name to the policy, verify your configurations, and create the policy.
Enter a name for the policy.
(Optional) Enter a description for the policy.
Click Next.
Verify if all the policy configurations are set up as per your requirements.
(Optional) Click back or click on any specific stage to modify any of the policy configurations.
Click Submit.
This stage allows you to select notification channels if a policy violation occurs. The notification alerts are sent at two levels.
This section allows you to send notifications to Nightfall users. The various alert methods are as follows. You must first turn on the toggle switch to use an alert method.
The alert configurations configured in this section describe the process of creating alerts at the policy level. Policy-level alerts apply only to the policy on which they are configured. To configure an alert on all the Google Drive Posture policies, you must configure alerts at the integration level. To learn more about how to configure integration-level policies for the Google Drive integration, read .
The steps to configure alert channels for policy-level integration are the same as in the case of integration-level alerts. You can refer to for steps.
Automated actions allow you to configure automated remediation actions when a posture alteration attempt is detected by Nightfall policy. Nightfall supports the following automated actions for Google Drive. You can choose to implement the automated action immediately after detecting a download attempt or after some time.
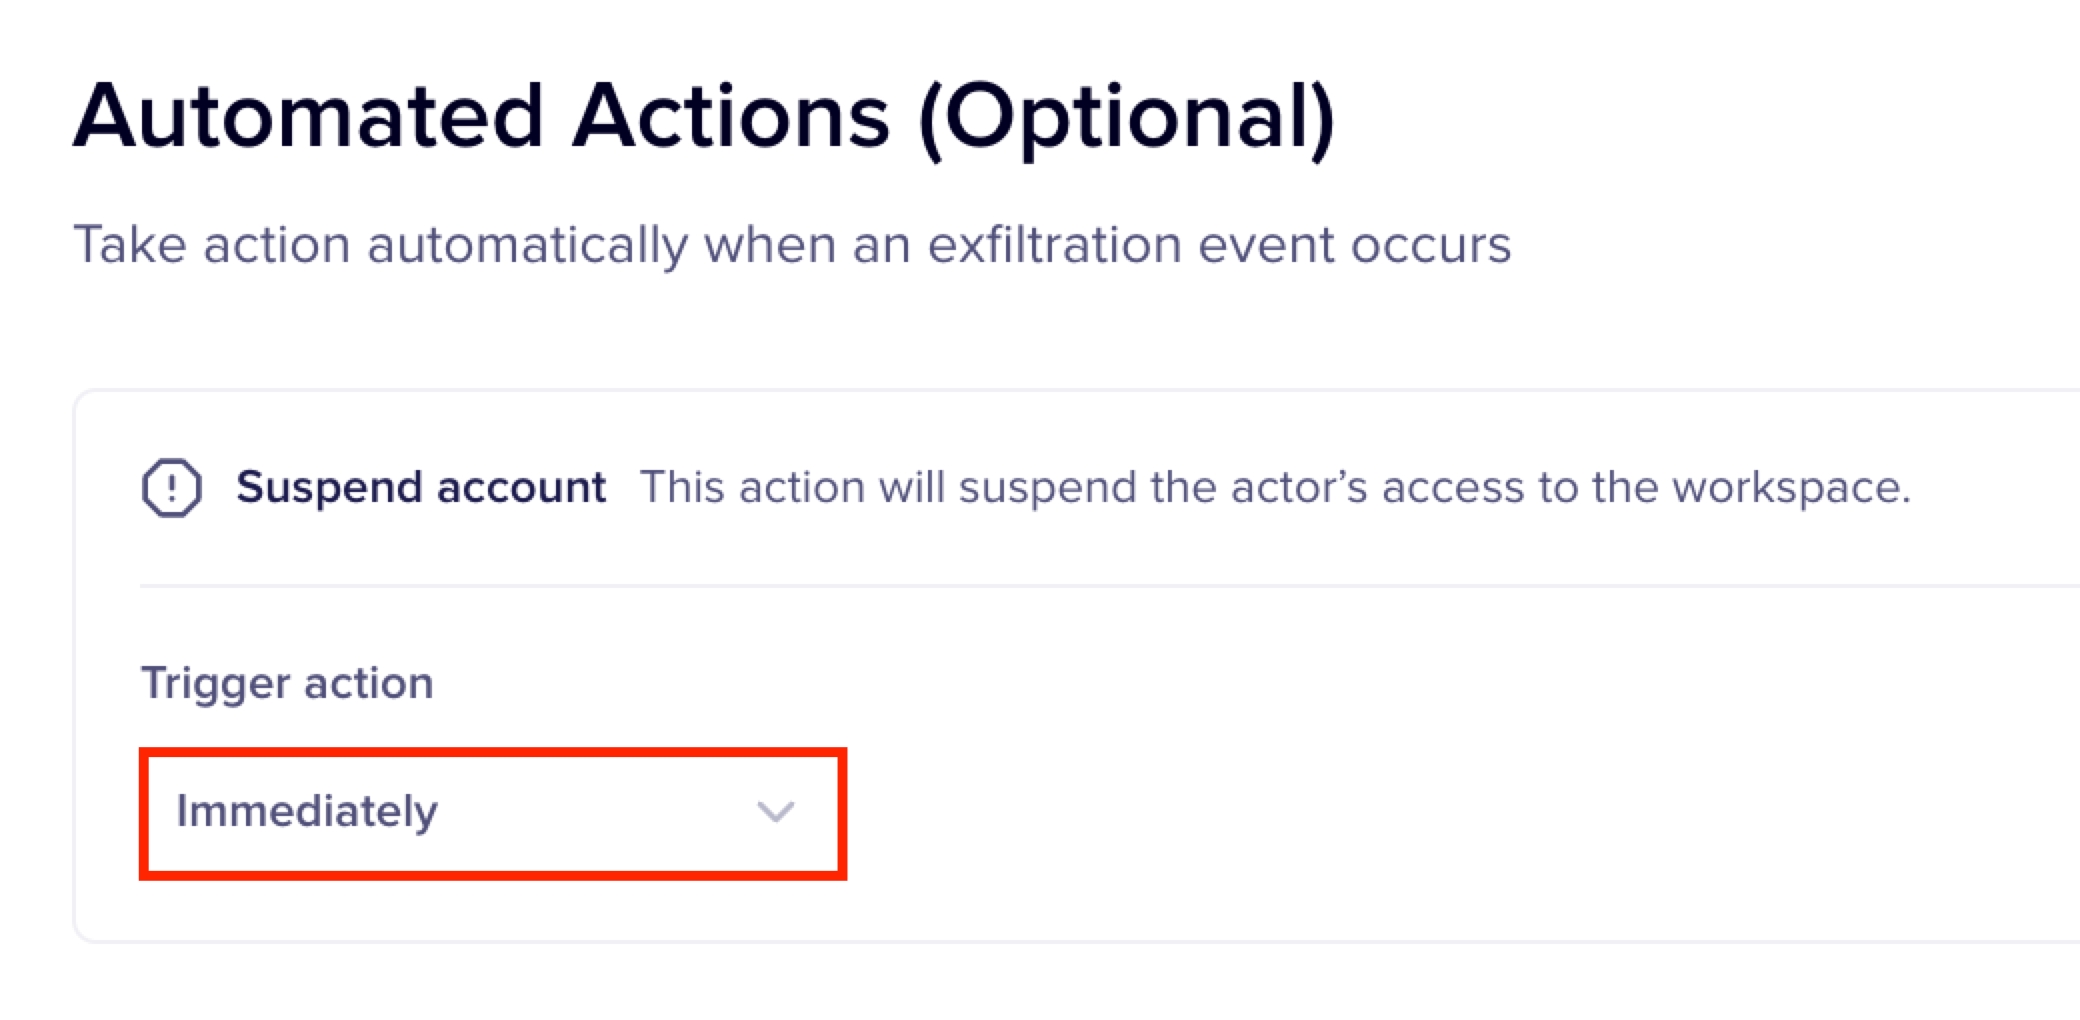
This action suspends the user's account who tried to download files and triggered the posture alteration event.
To enable the automated action, you must turn on the respective toggle switch.
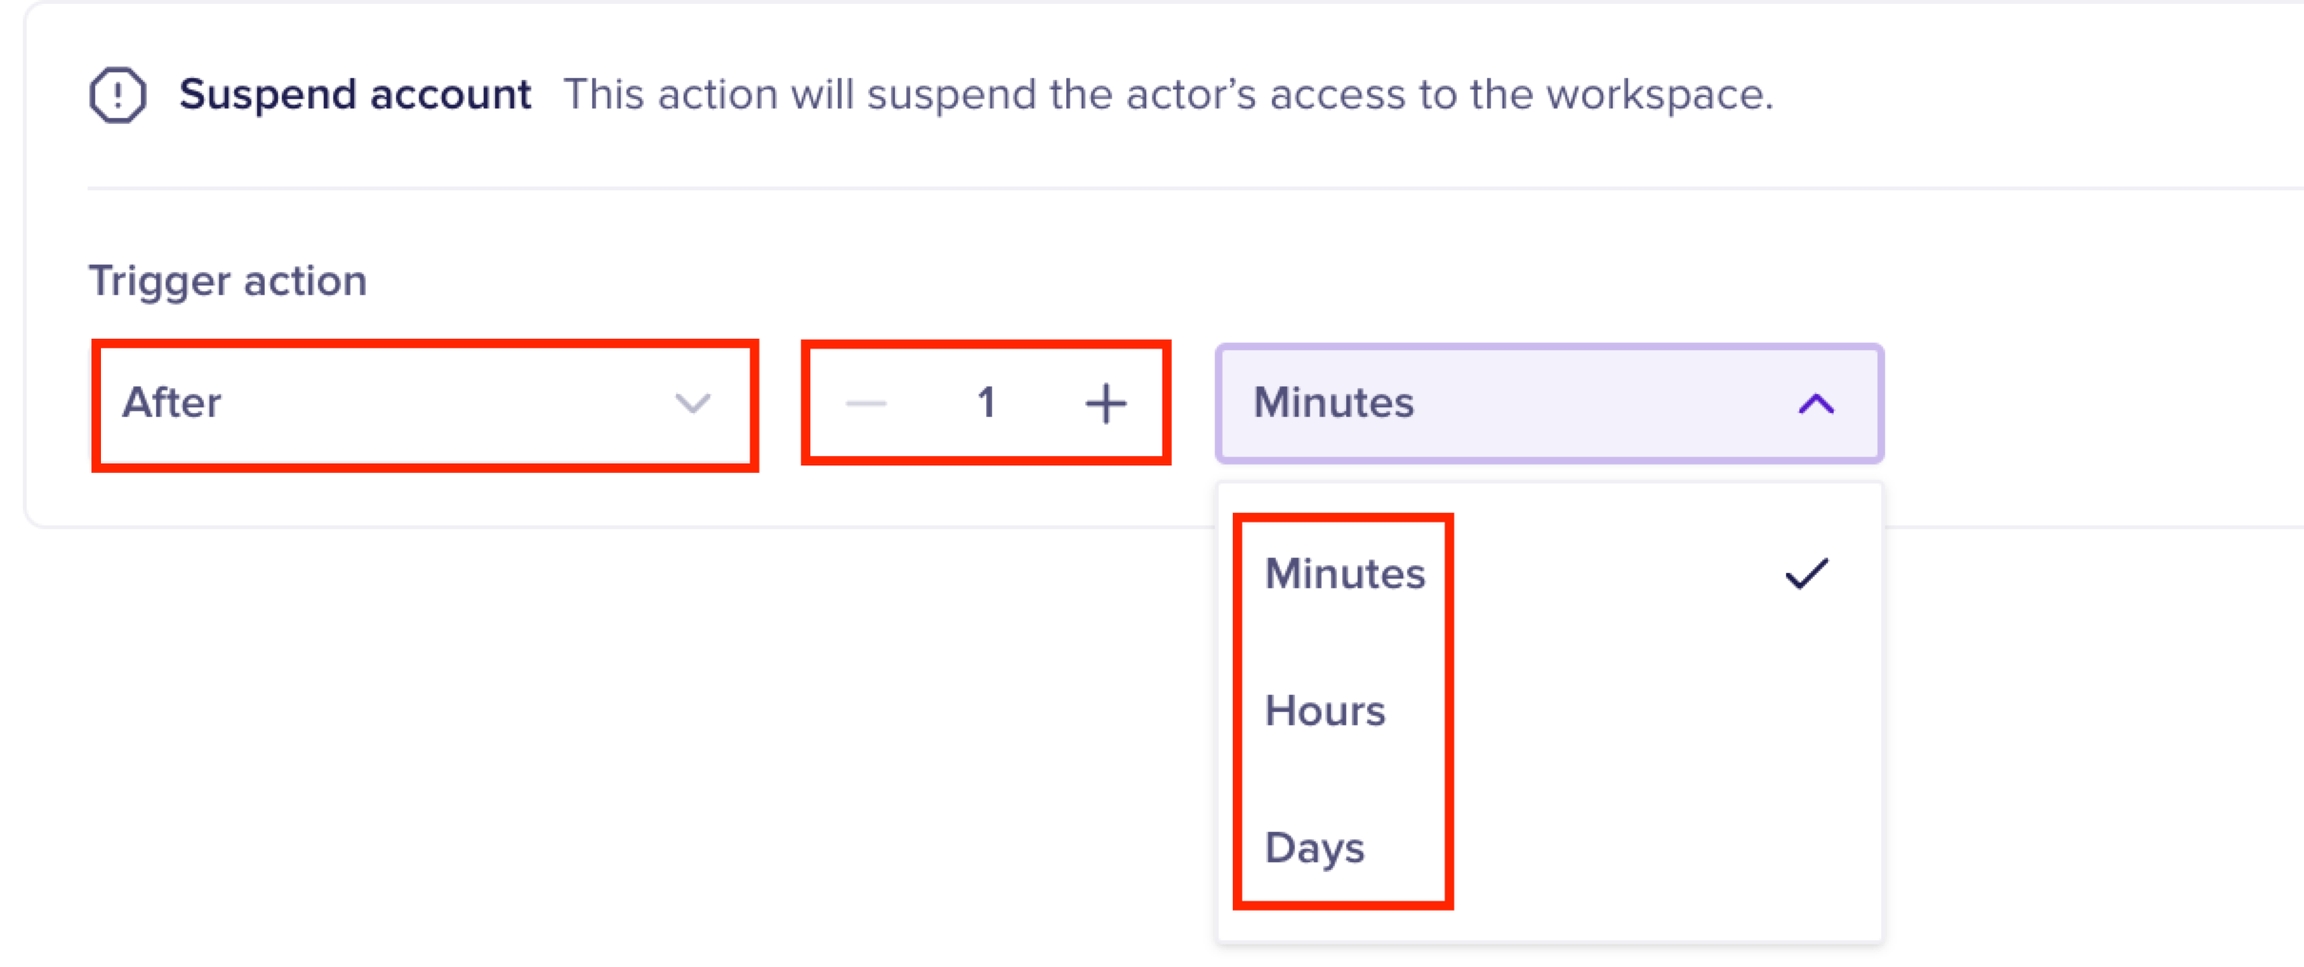
You must now select when exactly after detecting the event, the action must be triggered. if you select the Immediately option, the automated action is triggered immediately after the download attempt is made.
If you select the After option, you must select the time gap after which the automated action must be implemented.
This action revokes the access to the asset which caused the policy violation. You can select if the access must be revoked for external users and groups, internal users and groups, or both.
This section allows you to configure notifications to be sent to the end user whose actions triggered the violation.
The automation settings allow you to send notifications to end users. You can select one or both the notification methods. You must first turn on the toggle switch to use the automation option. The automation notification channels are as follows
Email: This option sends an Email to the user who attempted the download.
Slack: This option sends a Slack message to the user who attempted the download.
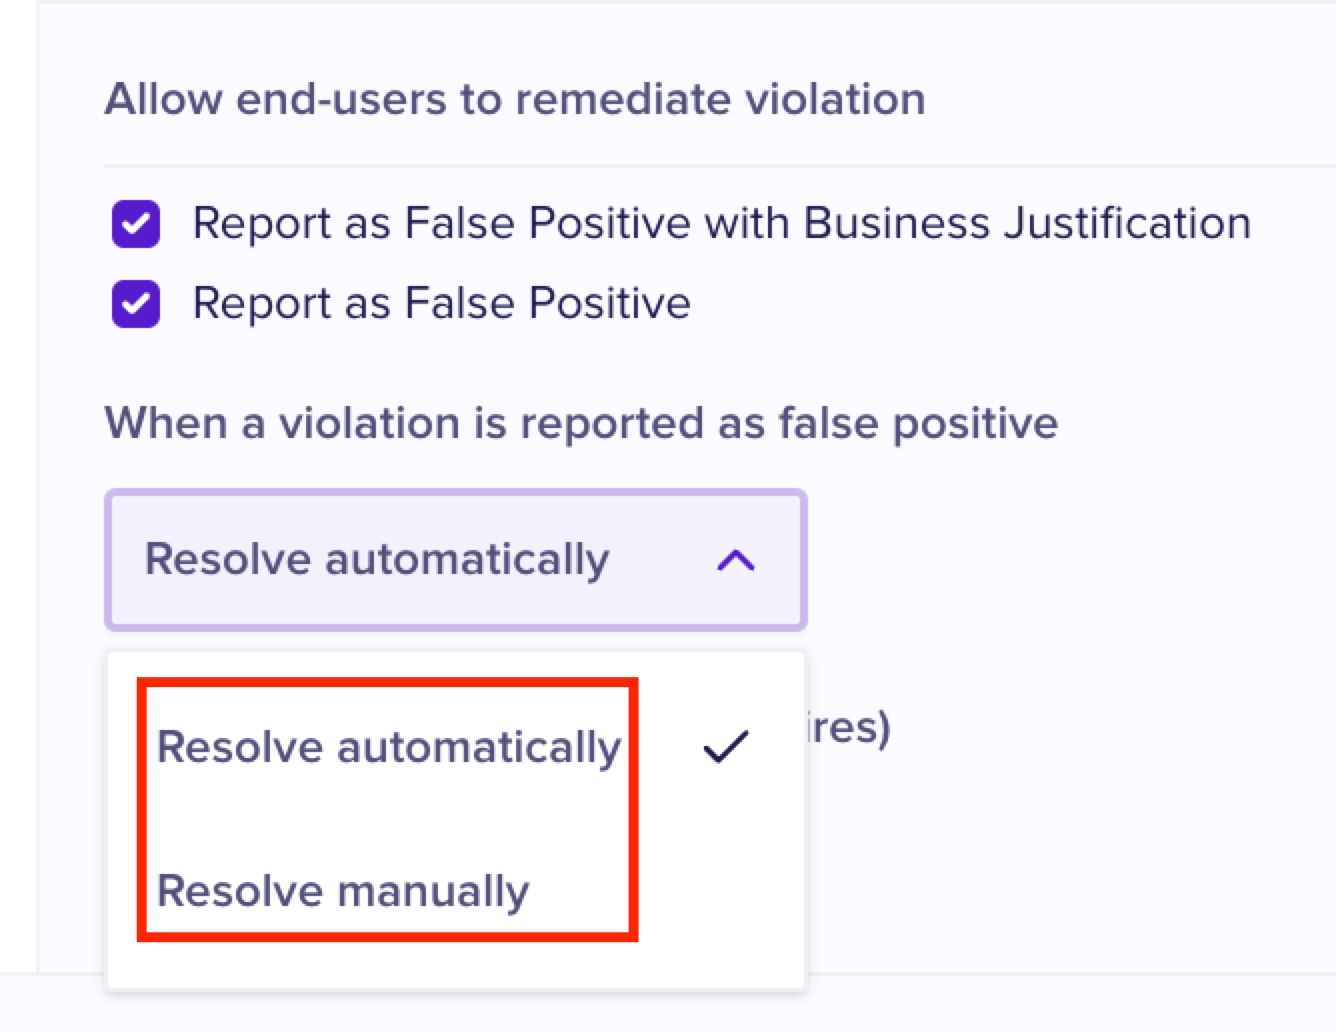
End-user remediation (also known as Human Firewall) allows you to configure remediation measures that end users can take, when a violation is triggered as a result of their actions. You must turn on the toggle switch to use this option. End-users receive the remediation actions in an Email as an action item. The various available remediation actions for end-users are as follows.
Report as False Positive with Business Justification: This option allows end users to report false positive alerts and provide a business justification as to why the alert is considered to be false positive.
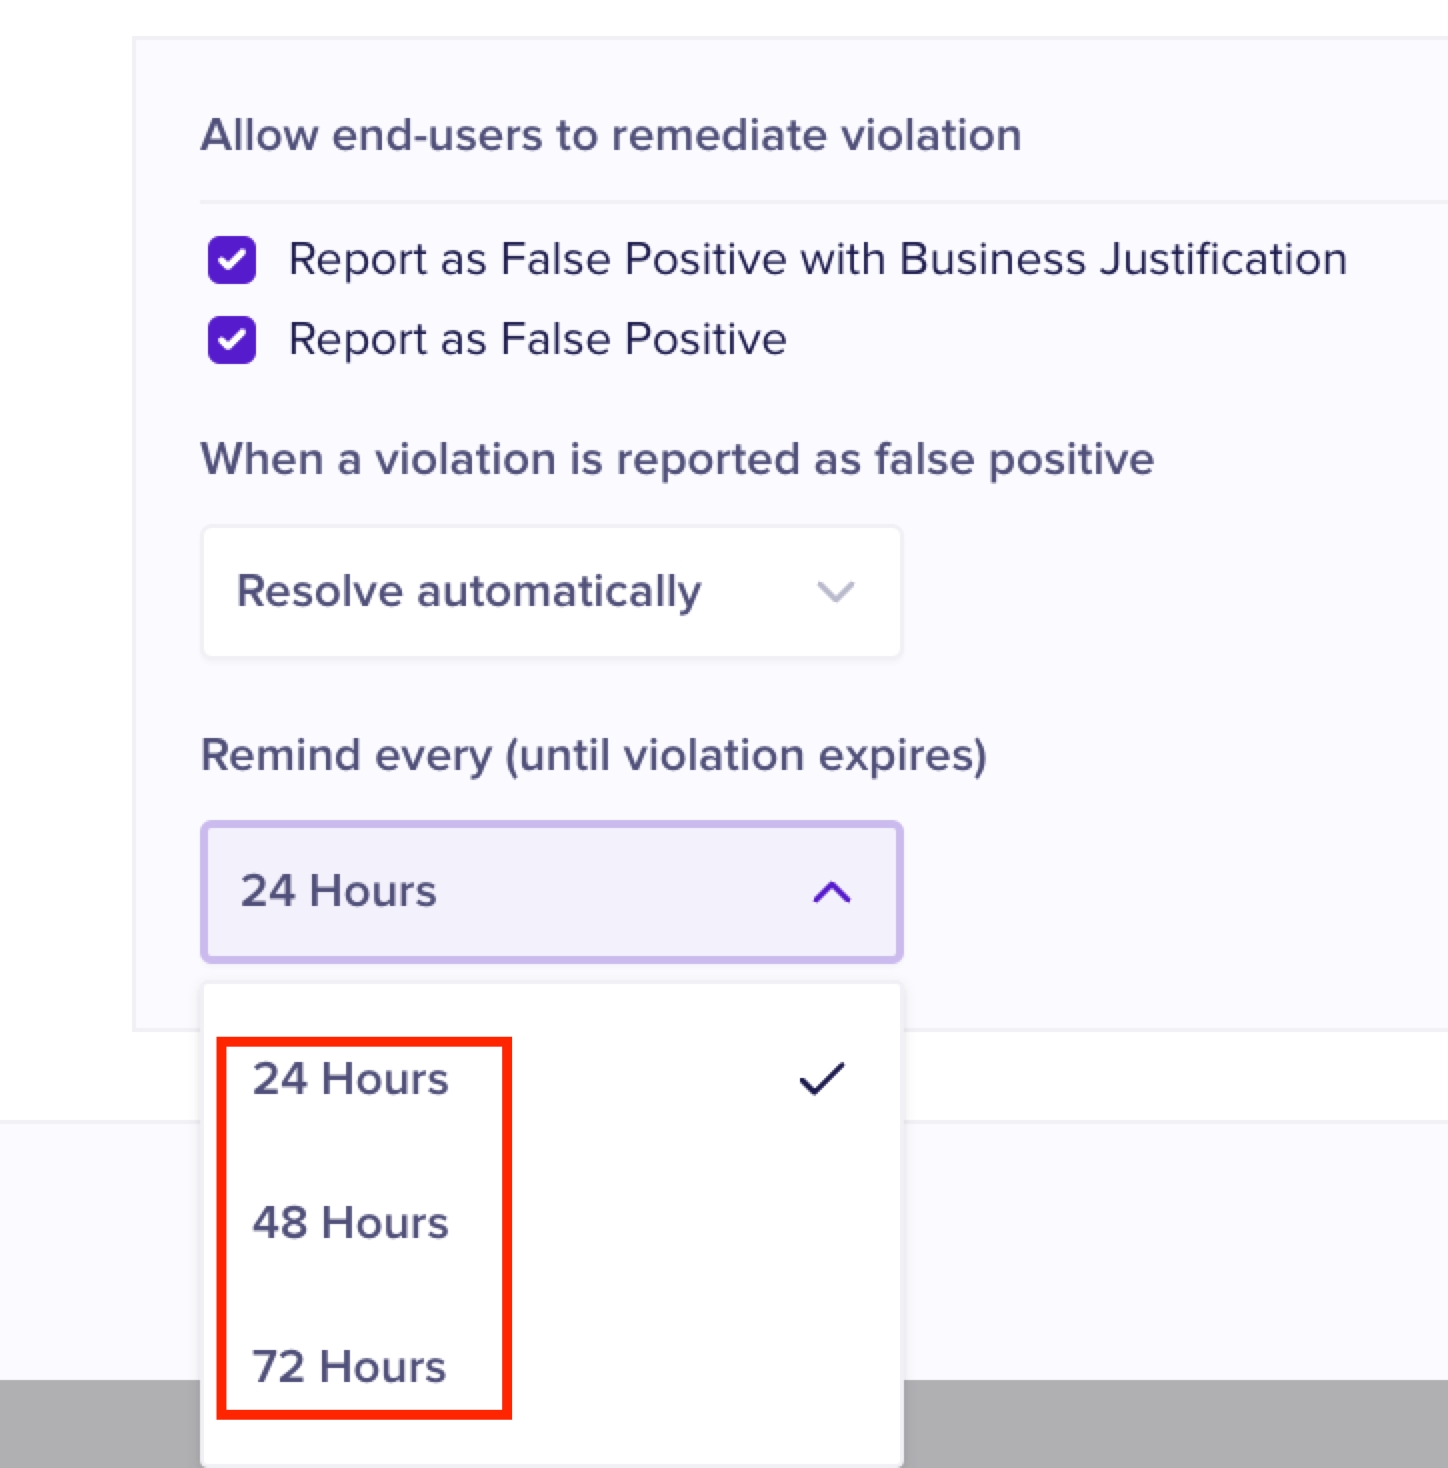
When end-users report alerts as false positive, you can choose the resolution method to be either Automatic or manual.
If end-users do not take any remediation action, you can set the frequency at which they must receive the notifications to take action.
End-users receive notifications and remediation actions if the Nightfall admin has enabled these settings. The notifications are based on the settings configured in the section. The end-user remediation actions are based on the settings configured in the section.
Nightfall admins can manage violations from within the Nightfall console. The Posture Management Events page in Nightfall lists all the violations under the Posture tab. End-users can get a detailed view of each Posture violation recorded. To learn more about Posture Management Events page, refer to the document.
Additionally, you can also configure the timing as to when this automation action must be implemented, after detecting the violation. The configurations are similar to the action.
Enter a custom message to be sent to the end user. This message is sent in an Email. You can modify the default message provided by Nightfall and draft your message. The total character length allowed is 1000 characters. You can also add hyperlinks in the custom message. The syntax is <link | text >. For example, to hyperlink with the text Nightfall website, you must write <www.nightfall.ai|Nightfall website>.
The Posture Management events page displays all the posture management events. An event is triggered when a posture management policy is violated. To learn more about configuring posture management policies, refer to the Creating Policies for Posture Management document.
Important
An posture management event is generated only when both of the following conditions are met.
Nightfall admin creates one or more posture management policies.
An end-user (who matches the scope for at least one of the policies) performs an action that violates the posture management policy.
To view violations in Nightfall, navigate to Posture Management from the left menu.
The Posture Events page lists all the posture events. To view events with specific statuses, you can click the respective tabs.
To view historic events, click the Time filter and select the required time period.
The list view consists of a table that contains the following columns.
This column displays the type of posture event (Added external user or Changed share settings), and the name of the asset(s) on which the posture change was implemented.
This column displays the icon of the integration on which the Event occured (in the above image, its Google Drive).
This column displays the timeline whrn the Event occured.
This column displays the email ID of the user whose actions triggered the Event.
This column displays the name of the Policy that was violated.
This column displays the current status of the Event.
This menu allows you to take actions on the Event.
The event entries are different for the two kinds of Trigger actions ; Adding external users recorded and Changing the sharing settings. You can identify a violation type by viewing its name.
You can click an event to view the details. The header of the event displays the type of violation. The detail view window is as follows.
You can navigate to the detail view of an Event by clicking the Event. The detail view window consists of the following tabs.
The Summary tab consists of the following details.
Assets: The name of the asset on which the posture change event occured.
Policy: The name of the policy violated.
Actor: The Email ID of the user who violated the policy.
The Data Security Posture Management page also contains Log section and Comments section.
Event logs - The event logs section contains a log of activities performed on the Event. By default, the first log activity recorded is the Event creation activity. The next set of activities generally provide information about Event notifications sent via various notification channels and actions taken on the Event.
Comments - The comments section allows you to enter comments on the Event. The maximum character limit for the comment is 300.
The Asset tab contains the details of the asset in which the Data Security Posture Event was triggered. If there are multiple assets that triggered an Event, you can switch between assets to view the details of each asset. When there are multiple assets responsible to trigger an Event, a drop-down menu appears. You can click the drop-down menu and choose an asset. Additionally, when there are multiple assets, the Assets tab displays a number in brackets. This number indicates the number of assets that triggered the Event.
The asset tab displays the following details.
Name: The name and a hyperlink to the asset.
Location: The location of the asset.
Drive: The nature of the Google Drive that holds the asset (personal drive, shared drive).
Permission: The sharing permission that is applied on the asset (Restricted, Within the Organization, or Anyone in the Internet)
Shared With: The number of internal and external users with whom the asset has been shared.
Created At: The date and time when the asset was created.
Size: The total size of the asset.
Owner: The Email-ID of the asset owner.
The Asset tab contains an Asset history section. This section displays the details of assets like change in permission of asset and the edits made to the asset. You can apply filters to view asset history for a specific time period.
Actor: The actor refers to the user who edited the file that triggered the Event. This tab displays the details and history of the user who downloaded the asset. You can choose to view historical data of the user. You can also add details which can serve as metadata for the Event.
The Actor history section displays details of the actor like the files edited by the actor, viewed by the actor, and shared by the actor. You can apply filters to view Aactor history for a specific time period.
The events list view displays an ellipsis menu at the extreme right corner. Admins can click this menu to take appropriate action on a Posture change Event.
The Event detail view also displays list of actions that an admin can take. These actions are present at the bottom the detail view page.
The various available actions are explained as follows.
Acknowledge: This action can be taken when you wish to acknowledge that you have viewed the Event.
Notify Email: This action sends an email notification to the end-user who caused the Event.
Notify Slack: This action sends a Slack notification to the end-user who caused the Event.
Change Link Settings: This action allows you to modify the sharing permissions of the asset. You can perform tasks like restricting the file from being accessed by external users, groups, and so on.
Suspend Account: This action suspends the account of the user who caused the Event.
Ignore: This action ignored the violation. You can take this action when an event is false positive.
Copy Event Link: This action copies the link to the Event. You can share this link with other users or save it so that you can use the link to easily access the Event. This action is only displayed in the Event detail view.
Download: This action downloads the asset that triggered the Event. To perform this action, you must first go to the Asset tab and choose an asset. This action is only displayed in the Event detail view.


